Insulated Siding: Part 2
Video
This second of our insulated siding articles focuses on the technical aspects of using this exterior cladding as an insulation product. We will also touch on some relevant details regarding its installation.
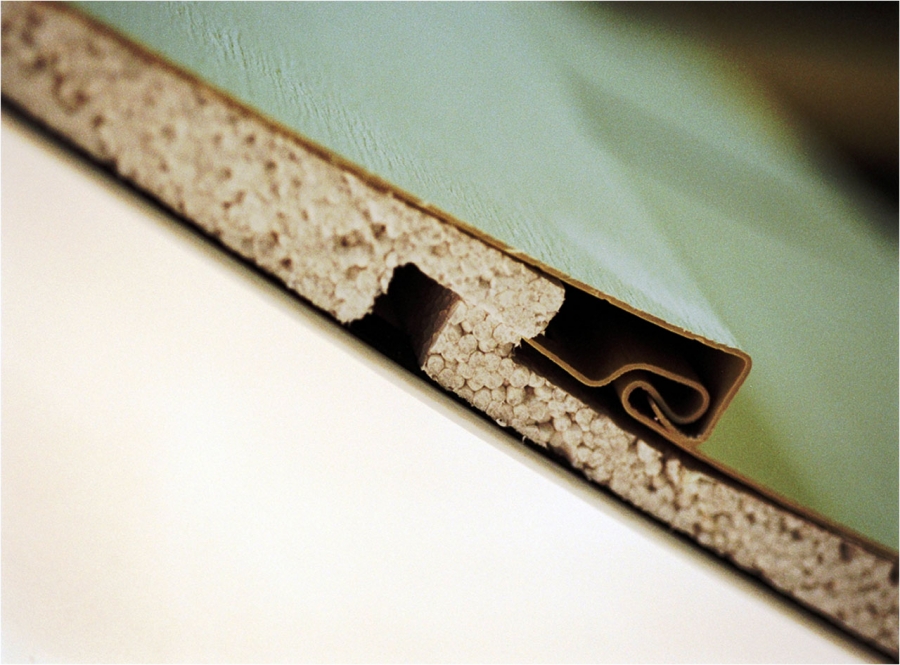
The industry definition of insulated siding, or IS, is an exterior cladding product with a significant thickness of insulation permanently adhered, so that both cladding and insulation are installed in one step and as one product. This is currently limited to some aluminum and many vinyl siding products. (There also exists a line of contoured foam insulation manufactured as either a universal backing, or a product-specific backing for several types and brands of solid plank siding, including fiber cement. We will discuss this material separately.)
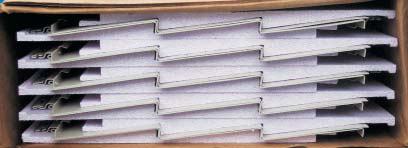
Insulated siding is defined as an exterior cladding product with a significant thickness of insulation permanently adhered, so that both cladding and insulation are installed in one step and as one product. As soon as you open the box you notice one striking difference between IS and traditional siding: it’s a lot thicker.
In recent years, several industry-commissioned studies on the efficacy of IS as an exterior insulation, along with the recent development of an ASTM International standard for IS, have provided builders, designers, and energy raters with a basis for incorporating IS into envelope design.
“To demonstrate insulated vinyl siding’s energy-efficiency performance in the field, the Vinyl Siding Institute (VSI) commissioned the energy research firm Newport Ventures to determine insulated siding’s effect on existing homes under real-world conditions,” says Matt Dobson, VSI code and regulatory director. Last year, the U.S. Department of Energy’s (DOE) Building America Program helped to sponsor this continuing Insulated Siding Energy Performance Study (ISEPS), which is based on a three-year analysis of four existing homes in various climate zones retrofitted with insulated siding. Although the study is ongoing, preliminary results of the study showed:
-
A 12% improvement in air tightness between existing conditions and post-installation of insulated siding;
-
A projected 5%–12% improvement in the heating energy savings for the four homes, after the installation of insulated siding, based on simulations of pre-and post-insulated siding conditions; and
-
An improvement (reduction) of two to eight points in the homes’ HERS Index score through the installation of a water-resistive barrier and insulated siding based on energy simulation results.
Most recently, a manufacturing standard for insulated vinyl siding, ASTM D7793 Standard Specification for Insulated Vinyl Siding, was approved, with expected publication in Summer 2012.
Insulated Siding in the Code and Rating Systems
Insulated siding is now listed in the 2012 International Energy Conservation Code (IECC) among the building materials you can use as continuous insulation outside the building framing to provide the required total wall R-value for buildings in even the coldest climate zones.
The following sections of the IECC apply when insulated siding is used as an option for compliance:
-
Under the 2012 IECC, the R-value of insulated siding may be used to satisfy the R-value insulation requirements of Table 402.1.1 when insulated siding is used as continuous insulation. (International Code Council, 2012 International Energy Conservation Code Table R402.1.1, footnote h.)
-
Per Section 402 of the 2009 IECC, Building Thermal Envelope, the rated R-value of insulated siding can be used to calculate a whole wall U-factor when insulated siding is applied. (International Code Council, 2009 International Energy Conservation Code, Section 402.)
-
Because insulated siding is recognized under the 2012 IECC as continuous insulation, local building officials may also permit the R-value of insulated siding to satisfy the R-value insulation requirements of Table 402.1.1 of the 2009 IECC.
The U.S. Environmental Protection Agency (EPA) also now includes insulated siding in its ENERGY STAR Qualified Homes, Version 3 program as an option on its checklist of building products or methodologies for new homes to earn ENERGY STAR certification. Those interested in tapping into weatherization program subsidies or state energy-efficiency grants will find that insulated siding now qualifies for low-interest loan, grant, and rebate opportunities under several state programs including the California Energy Commission and New York State Energy Research and Development Authority (NYSERDA).
“In code and voluntary programs, insulated siding qualifies as continuous insulation that reduces the thermal-bridging effect,” says Dobson. “Installed outside of the building framing, insulated siding helps reduce energy loss through thermal bridging and air leakage, which improves the overall R-value of the wall assembly.” Exterior cladding specifiers, energy raters, installers, or others wanting in-depth information can consult VSI’s Insulated Siding as Home Insulation Guide. The Guide includes details on code-compliant assemblies for installing insulated siding in different climate zones, installation suggestions, and other background information. Representatives from the EPA, DOE, and other stakeholders provided feedback on the Guide.
Installation
In most ways, insulated siding installation is exactly the same as conventional siding. The first step is always to read the manufacturer's installation guidelines, because general practice may vary in important ways with specific products. An overview of vinyl siding installation is provided by the Vinyl Siding Installation Manual published by VSI, the organization that also certifies vinyl siding installers.
Although IS has foam, and the foam provides insulation, it is not intended as an impermeable or impervious cladding. Water and wind will penetrate the siding, so correctly installing a weather-resistive barrier before siding is not only recommended, it is required. With that said, the foam insulation will protect and extend the life of your weather-resistive barrier; the siding’s capacity to circulate air will help to keep your building surface dry. Some of the foam insulation on certain brands comes with small channels or grooves along the back to create a structural drainage plane. All forms of IS have tested effectively for drainage and drying characteristics.
The biggest difference with insulated siding is obvious the moment you see it: it’s much thicker. You will find that standard trim pieces will not accommodate the added thickness, but manufacturers supply a full line of accessories for each product. Since each siding profile has a different overall thickness, you won’t be able to mix and match trim pieces easily.
Another important difference comes with the requirement that the foam sheathing form a continuous sheathing on the exterior of building. So while the vinyl on the siding requires a gap between end pieces and trim, and an overlap between adjacent panels, as always, the foam backing must butt against the adjacent pieces. Manufacturers use permanently flexible adhesives to laminate the foam and vinyl siding, so these can move independently.
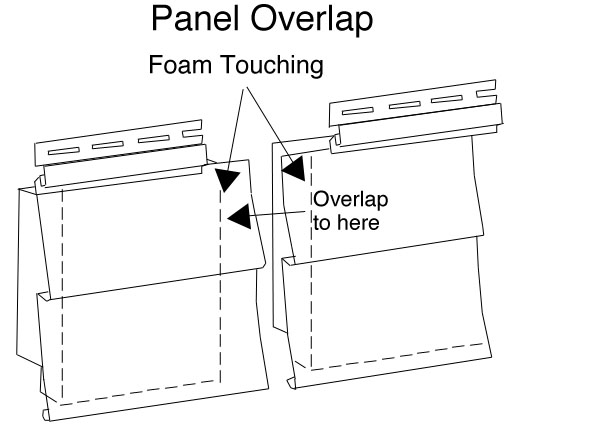
Illustration courtesy of the Vinyl Siding Institute (VSI) from Insulated Siding as Home Insulation Guide.
You will find that on the factory-cut ends of insulated siding panels, the foam is set back from both ends of the panel. This set-back is required to ensure correct overlapping of adjacent panels. To correctly overlap the panels, insert the vinyl tab at the end of one panel between the foam and the vinyl of the adjacent panel. Slide the panels together until the ends of the foam touch. Note: It is recommended to have a gap of 1/8” during installation under cold weather conditions (i.e., 40 degrees Fahrenheit or 4.4 degrees Celsius).
When cutting insulated siding, manufacturers generally recommend using a circular saw with a fine-tooth (plywood) blade inserted backward and cutting slowly with the vinyl face up. While this applies to traditional siding, you will find that the use of alternate cutting tools, such as snips, is limited by the IS thickness.
General rules that apply to all vinyl installation apply to IS, sometimes even more so, such as not over-driving nails tightly against the siding nail hem (allow approximately 1/32” clearance, the thickness of a dime, between the fastener head and the vinyl siding), allowing gaps for material expansion and contraction, and assuring a positive lock between one panel and the piece below it. These rules are as important – maybe more important – than they are with traditional siding, because of the added girth and weight of the foam material. Likewise, the proper application of nails (in the center of the nailing slot, making sure the fastener penetrates a minimum of 3/4” into framing, furring, or another approved nailable surface) becomes more important due to the weight and girth of IS.
Because of the added thickness of the siding, you may need to build up the trim around window and door openings. The most effective course is to remove the existing trim and replace it with compatible vinyl products. In the case of window lineal (trim), it may be necessary to cut and remove a section of foam where the corners meet, and then to reinsert the foam after the vinyl trim pieces have been locked together.
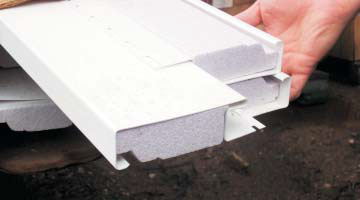
Lineals and other trim pieces come with insulation to provide a continuous insulating surface over the whole structure. It’s important to use compatible trim that accommodates the added thickness of IS while maintaining the integrity of the insulation.
Because of the material's weight, and the vinyl lying farther from the wall surface, it is especially important to pay close attention to the installation of the top course or you will be back to replace it every time the wind blows.
Once you have determined the final cut for the top piece, allowing 1/4" for expansion, cut the panel to the required measurement and then cut back the foam only another 2”. Using a snap lock punch (a vinyl tool generally used to create nail holes), punch the vinyl siding along the cut edge every 6” without breaking the surface but so that a raised lug is on the outside face. Install utility trim along the top of the wall to receive the top edge of the siding. Use shims under the utility trim to match the angle or distance from the wall of the siding edge; do not force the siding to conform to the utility channel nailed flat, as this added tension may force the siding loose. Push the siding into the utility trim. The raised lugs will catch and hold the siding firmly in place.
Completing the Final Course of Insulated Siding
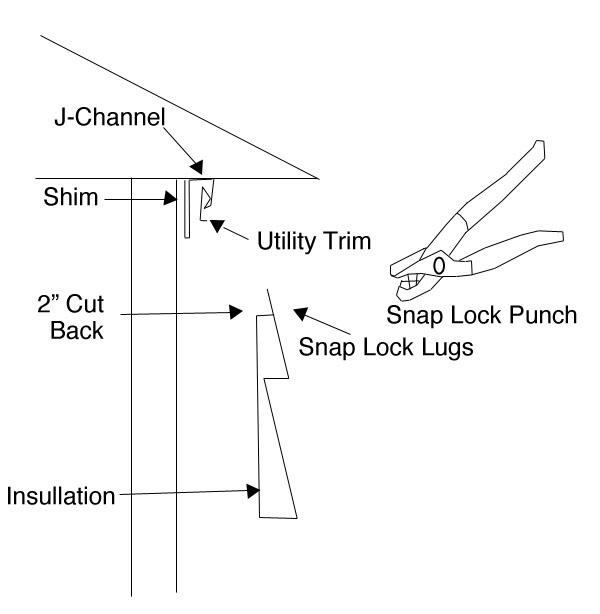
Illustration courtesy of the Vinyl Siding Institute (VSI) from Insulated Siding as Home Insulation Guide.
Foam Backing for Solid Plank
While you can use solid foam sheathing or universal contoured foam panels to achieve an effective insulation and thermal break, you’ll be missing the advantage of using a brand- and panel-specific contoured foam panel that provides a no-gap solid backing and alignment guide. Most solid plank siding is thin enough to telegraph framing bumps and dips and, when installed and aligned freehand, will usually have a slight horizontal waviness that results in uneven shadow lines.
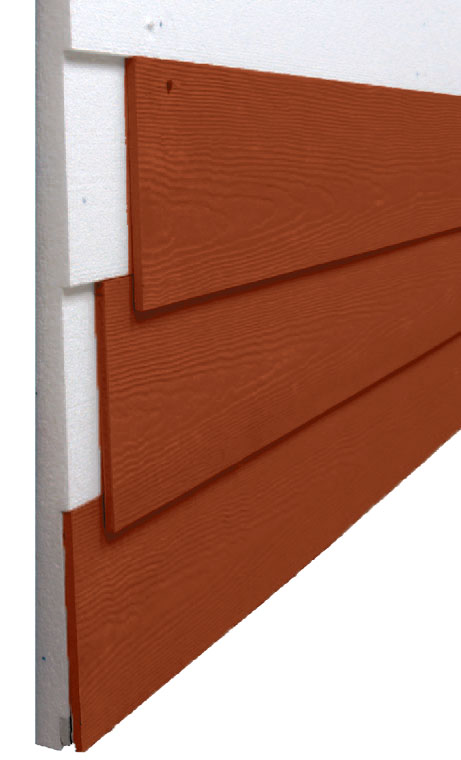
Insulating contoured foam backing provides an insulated sheathing, full-contact backing, and an alignment guide for solid plank siding.
Unlike IS, contoured foam backing goes on the house after the weather-resistive barrier, in a separate operation, with the siding to follow. Because the foam backing adds thickness, special consideration must be given to openings, such as doors and windows. Progressive Foam Technologies, a company that makes all-foam backing for siding, provides accessories, including door and window shims and inside and outside corners.
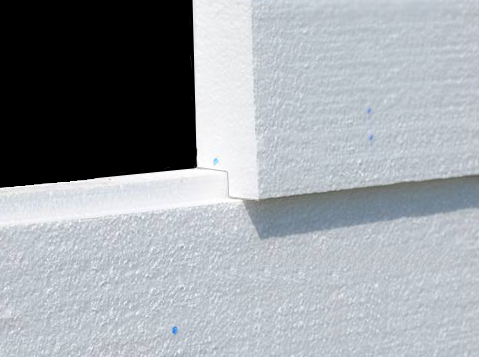
The contoured foam panels have a shiplap joint so panels can easily stack horizontally. Make sure to stagger panel joints from course to course.
After correctly installing a weather-resistive barrier, the next step is one of the most important: installing the starter strip. If you do it right, the rest of your installation will go quickly, easily, and well. The starter strip sets the course level for all the planks, much like a first row of tile sets the level for the rest of the wall. Here the manufacturer suggests using a tape rather than a level, measuring down from the eaves, and marking a line with chalk to assure your siding runs parallel to eaves, soffit, and windows, regardless of true level.
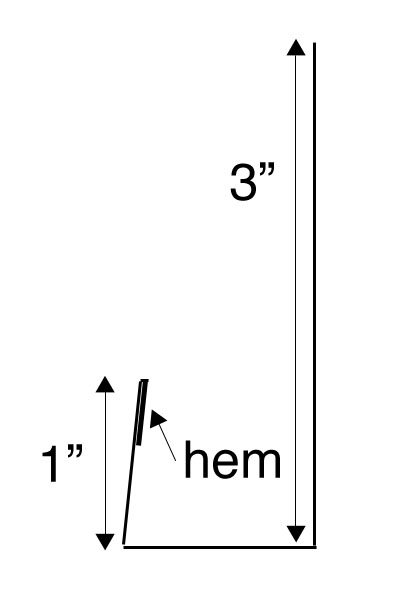
Snap a chalk line and align the starter strip. Preformed starter strips are available from Progressive Foam Technologies, Inc.
After installing the starter strip, the following step is to fur the openings and corners using the manufacturer's foam profiles. Corner and trim shims fill out the finished trim boards and insulate at the same time, accommodating for the base thickness of the siding insulation as required for proper installation.
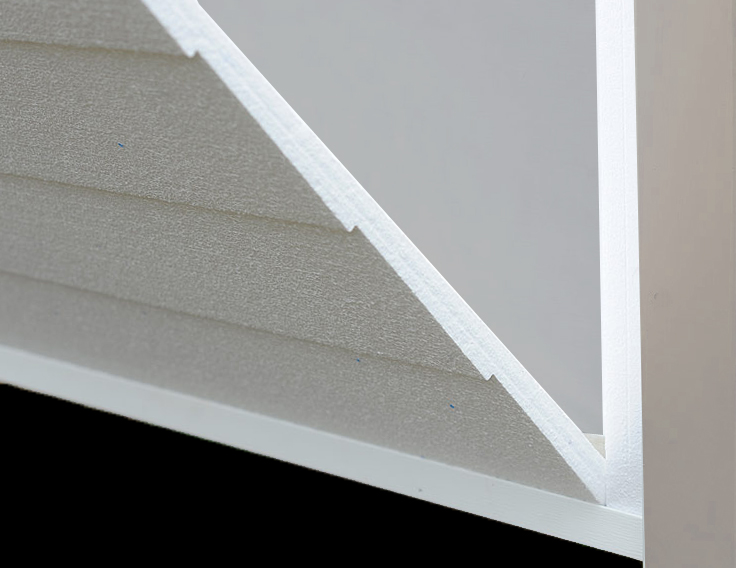
After the starter strip is in place, you will insert the insulation panel in the starter, and then slide the panel left or right into position and securely fasten it to the wall with 1.5” corrosive-resistant nails.
The foam trim shims can be overlaid with solid trim or wrapped with aluminum coil bent to fit on a siding break. Progressive Foam Technologies also provides ready-cut aluminum trim for this purpose.
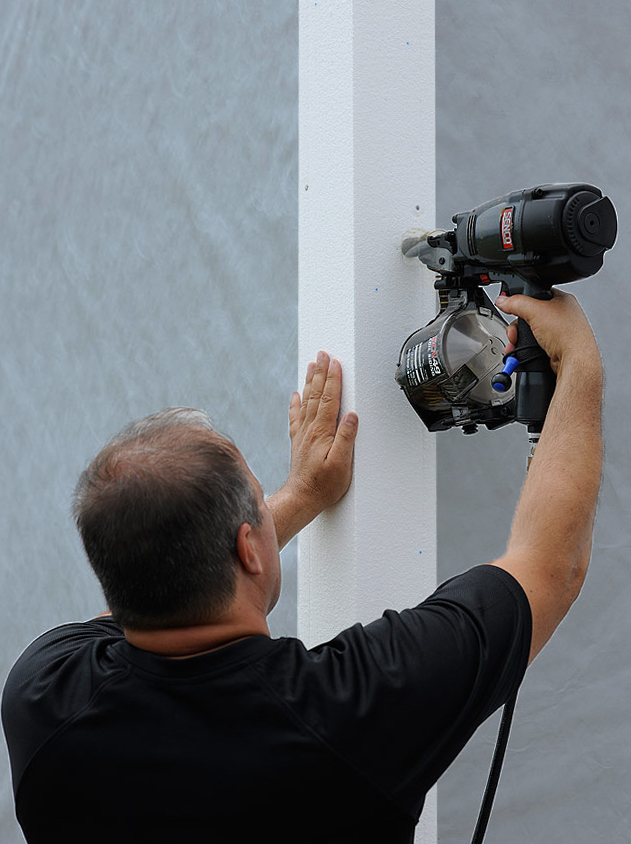
Progressive Foam Technologies, Inc, provides a full line of corners and trim shims that accommodate the extra thickness of siding backed with contoured foam, and a continuous insulating plane to preserve the integrity of the building envelope.
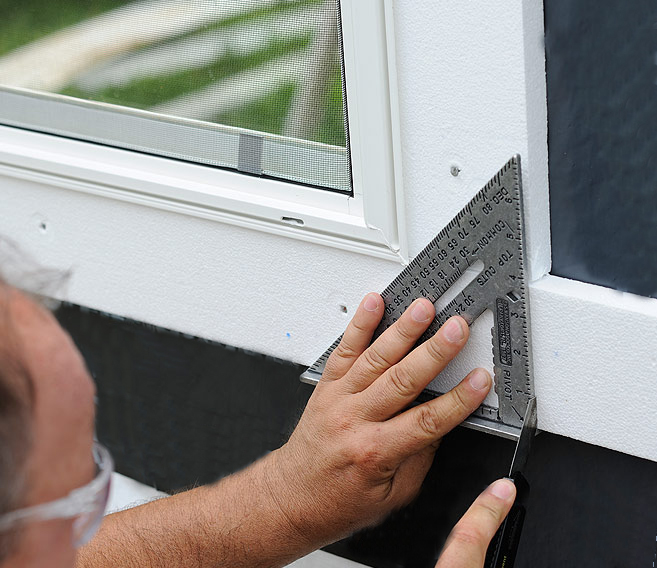
Foam shim trim cut to size with an Easy Cut Knife, which has a long, thin, segmented blade and is sold by Progressive Foam Technologies specifically for cutting siding insulation.
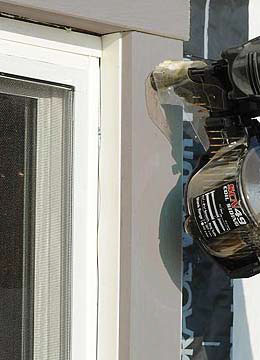
Once the trim insulation is in place, and the edge capped with aluminum coil, you can place your desired trim piece directly on top of the coil and foam and secure it to the wall by nailing through the trim piece.
After the preparatory work comes the fun part: installing the contoured foam siding insulation. The insulation must go up before the siding, and utmost care must be taken to ensure that the material locks firmly in place on the started strip and butts cleanly against corners and trim and the next panel of insulation. The top and bottom of each siding insulation panel features a shiplap edge for easier alignment and also for continuity of insulation. You simply stack the next panel on top of the lower panel, ensuring that the shiplap edges are tight. Your panels should stack in a brick pattern so that your vertical seams do not align.
Once you’re ready to start siding, you discover how much easier the job has become. Install the first course of plank-style siding by butting the top of the panel against the first alignment step – the first lap – in the foam, and then secure it to the wall per the siding manufacturer’s instructions. Be sure to use the correct nail length recommended, taking into account the required penetration and the thickness of the foam. Continue up the wall in a similar fashion, using the alignment steps as a guide, which should eliminate the need to check that each panel is level as you continue up the wall.
It’s important to stagger your plank joints so that they do not line up with the foam panel joints underneath. If the brand of siding you’re using requires joint flashing, install this as you would normally.
Resources: For more information on IS, you can download the most recent version of the Vinyl Siding Institute’s “Insulated Siding as Home Insulation: Guide for Users and Energy Raters,” which includes wall assembly calculations based on the 2012 International Energy Conservation Code (IECC). For more information on Fullback, Progressive Foam Technologies' solid plank line of contoured insulated sheathing, you can refer to one contractor’s experience with Fullback™FC by clicking here: Installing Fiber Cement with Fullback FC Siding Insulation.

Fernando Pages Ruiz
Homebuilder, developer and author Fernando Pagés Ruiz builds in the Midwest and Mountain States and consults internationally on how to build high-quality, affordable and energy-efficient homes. As a builder, his projects have numerous awards including the 2008 “Green Building Single Family House of the Year” and the 2007 “Workforce Housing Award” from the National Association of Home Builders. In 2006, the Department of Housing and Urban Development's PATH project chose him to build America's first PATH Concept Home, a home that is affordable to purchase and to maintain while meeting the criteria of LEED for Homes, ENERGY STAR, MASCO Environments for Living, and the NAHB's Green Building standards. A frequent contributor to Fine Homebuilding and EcoHome magazines, Pagés is also the author of two books published by the Taunton Press: Building an Affordable House: A high-value, low-cost approach to building (2005) and Affordable Remodel: How to get custom results on any budget (2007).
Contact Fernando on facebook or by way of his website buildingaffordable.com.

