Framing Out Openings
-
font size
decrease font size
 increase font size
Contractor to Contractor: Follow professional interior contractor Robert Thimmes as he demonstrates how to frame-out openings. This third installment in a series of articles,�Framing Walls With Light Gauge Metal Studs, visits the common practices for the framing of window and door openings.
When plumbing your openings and transferring your layout to the top track, turn your stud 90 degrees and attach your level high on the stud flange. Align the bottom edge of your stud with the edge of your opening, get the bubble "dead-on" and mark the top. Attaching your level to the flange rather than the webbing gives you a straighter surface that is less prone to bow, thus reducing variables and improving quality. Since one side of your opening has been plumbed, now just measure over the actual width of the opening and mark to establish the top of the other side.
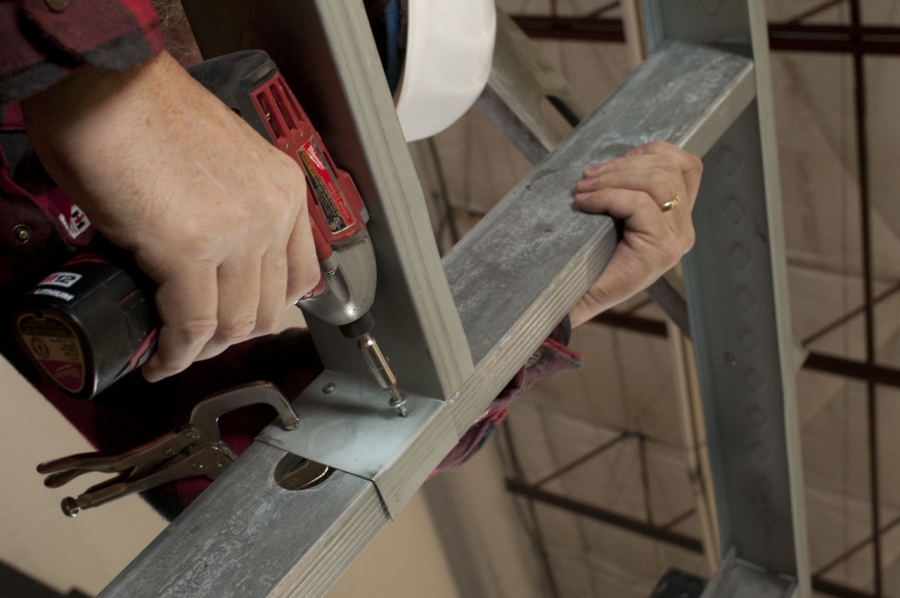 Image courtesy of Kinopicz American


As touched on briefly in Metal Stud Track Layout and Shoot-Down, a variety of factors determine the actual width of your framed openings. On welded frames, if you wrap the door clips around the door studs, you will want to leave some room for deflection at the bend. No metal bends a sharp 90 degrees cold, so you will need an extra 1/8" to 1/4" on each side of the frame. If you snip the tabs off and screw through the webbing of the stud into the back of the clip, your tolerances will be tighter. Add to the width only that which is necessary to keep your studs from bowing. Remember, after-drywall "knockdown" (three-piece) frames require approximately 1" of wall for the "throat" of the frame to straddle. Your header height for knockdowns is critical for this reason. The header height for welded jambs is less critical, so my tendency is to mark that dimension a full inch above the top of the frame for ease of frame and drywall installation. Some openings wrap with drywall and corner bead, both of which need to be accounted for in your math. Add the thickness of the drywall plus 1/8" for bead to each side; it will take up at least that much space when full of mud (joint compound).
Window openings follow the same general rules as door openings, but with the addition of a sill plate to your calculations. The attachment clips for hollow metal welded window frames are positioned at the top and bottom of the assembly, rather than at the sides. How tall your clips are and how they nest in the frame will affect the frame�s final elevation. Your rough frame sill height will be based on this. Generally windows do not need clips at their sides unless they are quite oversized or tall. So, lay out accordingly.
In most blueprints, standard details show the hard side of the stud against the jamb clips usually backed by a second stud. This "double stud" assembly exists to develop more strength in the wall at the jambs. Since there is no practical way to attach these two studs together in this configuration, both studs need to be screwed off when the drywall is hung in order to fully gain this advantage. This assembly is widely accepted and most commonly used. It allows for a variety of header attachment considerations. It is required when the framer cuts the tabs off the clips to ease the sliding of the drywall into the frame. It is not the strongest assembly, however.


When standing up your door stud, turn the soft side toward the opening. Place your "double stud" webbing-to-webbing against the door stud. Screw these studs together about every 2'. This forms an "I" or an "H" stud that is very strong and not prone to lateral deflection. Its strength is not dependent on the drywall hanger remembering to screw off both studs. This configuration requires that you wrap the door clip tabs around the stud and limits which header attachments you can use. While strength is its main advantage, you will find sliding drywall behind the frame easier because the soft side of the stud will bend out of the way, requiring less beveling of edges and less brute force. When rough framing, keeping your openings plumb matters, but what the hangers do when they tuck their drywall into the frames can undo your every best effort. Making the hanger�s job easier helps to keep your work looking good. The "I" stud assembly must be plumb precisely because it is so rigid. Hangers learn to love this assembly because they don�t have to wear themselves out beating the drywall into every frame.

Header attachment depends a great deal on personal preference. Cutting 2" "ears" on a piece of track, folding them down, sliding them onto your doorstuds, and fastening them with two screws, each near the bend, is the simplest, fastest way to attach a header. The advantages to this header are speed and self-alignment. It is the necessary way to attach to the "I" stud assembly. Its disadvantages revolve mainly around the thickness added to the framing by the header�s flanges at the door frame corners, the point that is most difficult to slide drywall behind. Some prefer to screw "cripples" to the sides of the door studs (usually scrap stud cut-offs), then attach their header track (sans ears) directly to these. The advantage of this is more clearance for drywall at the door frame corners with the thickness of the panhead being the only interference. The disadvantages are slower install time and the need to generate cripples if you have no cut-offs handy. The last commonly used attachment method for headers is the cleat. Primarily employed in conjunction with box headers, the cleat is a piece of track screwed four times or more (the number is sometimes spelled out specifically in the prints) to the door stud. Box headers are used for load bearing situations and at long header locations. The screws develop shear strength so don�t scrimp. The cleat receives the end of the box header which is attached to the flange with muliple screws (again, to fully develop the shear strength). The strength of a box header is determined by a combination of the gauge of the metal, the width of the webbing and the number and size of the screws holding it together.


When installing headers for welded jambs, I usually just measure up each jamb stud to mark my attachmant point location. It is nice that the header be level, but not essential. Unless your floor is wildly out of level, this method works well. When framing for after-drywall knockdown door frames, every header must be level. Take the time to find the high side of your opening, then level across to mark your opposite stud. If you don�t, you will not have room to adjust the doorframe to level after everything is hung and locked into place.


As mentioned earlier, what the drywallers do greatly affects the quality of any framed opening. Solid framing practices that reduce variables, standardize methods and set up an easy hang go a long way toward maintaining quality. The hanger is your friend... be his.
Related Content:

Contractor to Contractor: Installing Welded Hollow Metal Door Frames
In this installment of Rob Thimmes� series on framing walls with light gauge metal studs, he reviews the basics of hollow metal door frame installation.
During your framing process, the question of when you should set welded hollow metal door frames must be addressed. Many contractors prefer to install door frames before the walls are built. This facilitates the ease of fastening the �feet� down to the floor. After the frames are fastened down, braces are required to keep wind or inadvertent contact from toppling the freestanding frames. Read More...

Contractor to Contractor: Standing Up and Bracing Off Walls
Contractor to Contractor: Follow professional Interior Contractor Robert Thimmes as he demonstrates how to stand up and brace off walls. This second in a series of articles, Framing Walls With Light Gauge Metal Studs, starts with your walls located, lines chalked and bottom track already shot down (for details on this process, see Metal Stud Track Layout and Shoot-Down). Read More...

Contractor to Contractor: Metal Stud Track Layout and Shoot-Down
Contractor to Contractor: Follow professional Interior Contractor Robert Thimmes as he produces a layout and final shoot-down of a metal stud track system.
Plumb, level, square, and straight: all carpentry is the same, right? Well, no. Basic building principles apply, but how you build with metal studs differs greatly from building with wood. The following discussion offers a systematic explanation of installing metal studs, with various best practices for each step. Read More...

Light Gauge Metal Stud Framing
Planning and Best Practices
The light gauge metal stud framing phase of a project significantly impacts several other trades. It is no secret that good planning and practices will achieve higher production rates and a level of quality that meets the project's specifications. Planning and layout should be the responsibility of the project foreman; however, everyone should be involved with preparing the work flow. While actual layout is underway, other production items should also be thought through. Read More...


Robert Thimmes
Rob Thimmes, 30 year veteran of the interior trades and 15 year owner of Homefront Construction Company, still wears his tools most days. As owner/operator of a small business, he has worn all the hats: estimator, accountant, truck driver, warehouse man, project manager, superintendent, foreman, journeyman, and laborer. When he's not on the job he enjoys writing, blacksmithing, church, his family and 'solving all the world's problems'.