Standing Up and Bracing Off Walls
-
font size
decrease font size
 increase font size
Contractor to Contractor: Follow professional Interior Contractor Robert Thimmes as he demonstrates how to stand up and brace off walls. This second in a series of articles, Framing Walls With Light Gauge Metal Studs, starts with your walls located, lines chalked and bottom track already shot down (for details on this process, see Metal Stud Track Layout and Shoot-Down).
In the previous installment of �Contractor to Contractor,� we reviewed the details of how to perform the track layout and shoot-down for metal stud walls. Now we move on to the second part of our discussion: standing up and bracing.
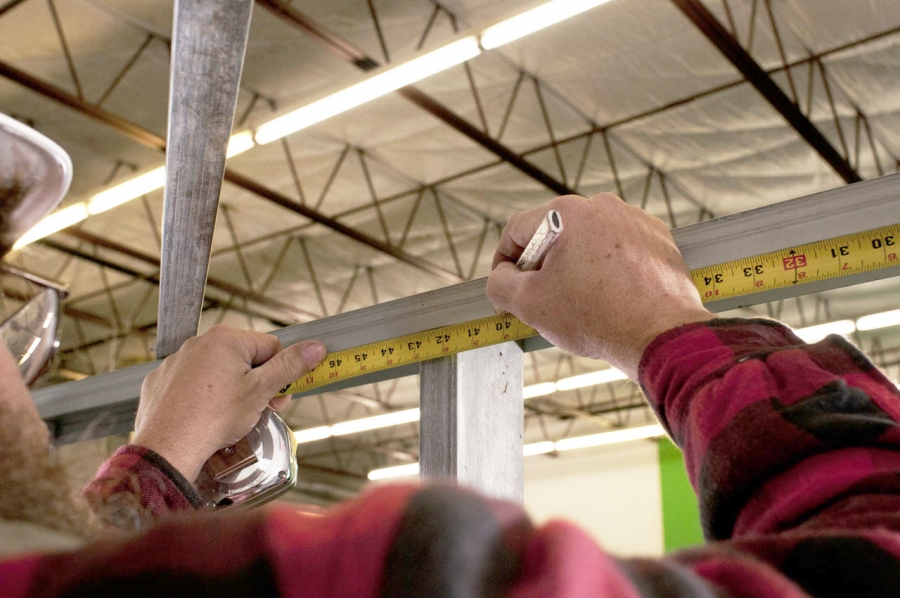 Image courtesy of Kinopicz American
Stud Layout
It�s time to do your stud layout on the bottom track. A 30� tape measure, a Pony clamp, and a Sharpie are all the tools you will normally need. If the track is wet or oily, a carpenter�s pencil may work better. Standard stud spacing is 16� on center (O.C.) or 24� O.C. (usually indicated in the wall types on the prints). When walls are laid out 24� O.C., particular care must be used in determining stud placement. There is no margin for error when standing a board up because, when you stagger your joints from one side of the wall to the other, every stud becomes a "breaking" stud. For the purposes of this article our layout will be 16� O.C.


The beginning of the wall is the place where most stud layout errors occur. The simple rule of thumb is as follows: if the wall abuts an existing finish, your layout will be 16� to the center of your first stud. "Main" walls and starter walls follow the same rule. If your wall begins with a "slap" stud (floater) your layout will be 16� to the near-edge of the stud. These positions will cause the leading edge of your board to break in the middle of a stud when hung correctly.
Note: Metal studs have roughly a "C" shape. The open side will be referred to as the "soft" side. The side with the webbing will be referred to as the "hard" side. Although there is healthy debate among hangers over which they prefer, the soft side of your studs should face the origin of your layout, which is also the starting point of your hanging. All the studs in a wall should face the same way with the exception of floaters and door studs. Also, don�t flip the studs end-for-end. Metal studs have a crown, just like wood. Aligning the knock-outs aligns the crown and facilitates the installation of bridging, conduit, flex, etc.


Exceptions to the above rule of thumb abound, but factors that affect your stud placement primarily cluster around pipe locations and door and window openings. Stretch out your tape, lock it down, and lay it along your bottom track to look for any stud placement conflicts. Under normal circumstances, you don�t want boards breaking at the sides of windows or doors. These are natural stress points where joints in the drywall are sure to crack. With longer walls that carry a layout from end to end, sometimes this condition is unavoidable. However, longer walls usually require expansion joints (x-joints) every 30� or so, making joints at the corners of openings preferable since this is exactly where the most movement will take place. Another factor to consider is that an x-joint over the corner of a door will require less finishing than one in the middle of a wall. Again, frame like you are going to hang and finish it. Look out for the tradesmen "downstream" from you. It makes you more valuable to whomever you work for.

Once you are satisfied with stud placement, use the Pony clamp to secure your tape to the track. This will prevent bumps and jostles from changing your layout. Use your pencil or Sharpie to transfer the layout to your track. A simple "V" works fine for walls center-aligned and a "VX" works well for walls edge-aligned. The "X" denotes on which side of the mark the studs rests. If you are framing alone, mark the inside webbing of the track or the floor to help you to see your layout from on top of your scaffold. Keep in mind what finish the floor will get. (Don�t mark up a concrete floor that is receiving only a clear sealer.) Go ahead and lay out the whole job if possible. Just as with wall layout, stud layout requires you to wear your thinking cap. Doing these processes all at once keeps you in the problem-solving state of mind, which later allows you to shift focus solely to production when it�s time to stand up studs.
Standing Up/Bracing Off Walls
Different wall types (load-bearing, curtain, full height) require different approaches when you are securing their top tracks. A variety of fasteners, clips, expansion tracks, and techniques apply. We will focus on free-standing interior partition walls for this article, assuming 20 or 25 gauge drywall metal not taller than what can be reached from a standard 6�-0� hallway scaffold.


Load your scaffold with the gear you�ll need (magnetic level, cordless, speed square, framing clamps, extra panheads, etc.), pre-position some track and studs, and climb aboard. Measure how far it is from the deck above to your top track and precut a kicker (angle brace). This piece of metal should be long enough to reach from the top track to an appropriate attachment point on the structure above at approximately a 45 degree angle to the plane of the wall. Allow enough overage to cut the flanges 3� to 4� in on each end of the kicker, bending one end up and one end down to create "ears" (or feet, boots, tabs, whatever you wish to call them). Now plumb up a stud at the beginning of your bottom track. Wipe off the magnet and attach your level to the stud near the top. Always attach your level in the same high position and on the same side of the wall each time you use it. This reduces your variables and gives you greater consistency. If your starting stud is against an existing wall, fasten it securely within 2� of the top. Have your helper ready with a stud at the other end of your top track. Lift that track into place, clamping it onto the secure stud. Move your scaffold down to the track�s end (where your helper is standing with the other stud placed on the layout mark nearest the top track�s end). Turn the stud into the top track and, while your helper steadies the assembly, drop back and lay out your stud placement on the top track. Your Pony clamp will come in very handy for this. Match what you did on the bottom track. Clamp the loose stud on layout and fasten both sides of its top. Have your helper fasten one side of the bottom then, again, steady the assembly. Assuming you can reach the deck from your position, shoot (or screw) one end of the kicker to the structure above. Keep your fasteners close to the bend of the ear to prevent flex. Now plumb your stud as before, clamping the kicker�s ear directly over your stud with the kicker�s bend even with the edge of the track. Screw downward through the bend of the ear into the top track. Keeping the bend and edge lined up like this reduces movement in the wall, making it more rigid. Screwing down through the track allows for future adjustment, if needed, after the drywall is installed. This assembly can now be filled with layout studs and securely fastened. Don�t forget your clamps at the other end of the track! If code does not require you to fasten both sides of the tops, at least do so at every kicker and every 4�. (This prevents movement in alignment and also keeps the top track from �popping off� when drywall is hung on the opposite side.)


There are three main ways to attach your next piece of track. One way is to overlap the pieces about 10�, use your framing clamps to pinch them together at the flange corners, then fasten them with two screws on each side. This method works well when you have no other way to brace the joint. Another way is to "scab" a piece of stud halfway under the track end with screws, then drop the next piece of track onto the newly created extension. This method works well when there is no interference with layout studs or you have heavier gauge studs to deal with. The last way is simply to cut a slot in the end of the track, tuck it onto the last piece of track, clamp the flanges tightly together, and put a screw through the top. This method is the fastest and most often used with drywall metal, but it needs bracing since the point of contact is so small. Each subsequent piece of track can be erected using the same methods as the first.


Be careful to carry your layout correctly from pull to pull and track to track. If you started on centers and then hook a stud with your tape measure to continue your layout, mark 16-5/8� rather than 16�. If you don�t, you will be 5/8� out of plumb each time you make this mistake. These kind of errors slip easily into your work, drive hangers crazy, and greatly slow production when corrected after the fact. I generally plumb a stud, pull three scaffold-lengths worth of layout, then plumb another stud. That way, if I have layout creep, it is arrested before things get way out of plumb.
To establish the end of your wall, run your top track a little long, turn a stud 90 degrees aligned to your bottom track�s end, plumb it, and mark the top track. Use your speed square to transfer the mark from flange to flange, then cut off your overage slightly short of your marks. At a corner, mirror in your top track what you have done with your bottom track. If you cut back the flange at the bottom, do so at the top. Don�t reverse which wall "tucks" into the other.


Often, decks are prohibitively high, requiring walls to be braced to one another. Bracing at 45 degree angles to corners creates very rigid connections. Plumbing one side of a hallway, then measuring and bracing over to set the top track of the other side is common practice. However, there is nothing like framing up a bunch of walls only to return to the jobsite and find your braces all disconnected and lying on the floor. Considerations for bracing locations to keep in mind are acoustic ceiling heights, duct lines, electric raceways, lights, etc. Find out where the trunklines for the duct work are running and try to work around them, especially in hallways.
It is easiest to lay a stud flat on its webbing from wall to wall, but this is also its weakest configuration. Stand the stud on its edge so it doesn�t belly and become an instant raceway for the electricians. Most prints seem to call for kickers or bracing every 4�-0�. I have found most inspectors respect bracing every 5�-0�. This makes aligning kickers with joints in the top track much easier, keeping the walls more rigid and saving a lot of extra overhead work. If your inspector wants them closer, by all means keep him happy.
A small note of explanation: Lasers have made framing walls and soffits much easier these days. I have not included practices for these pieces of equipment for two reasons. First, lasers from different manufacturers differ greatly in their capacities and set-up. Second, lasers can break, die, or go out of adjustment. Just like learning math in school the old-fashioned way (i.e., without a calculator), you should learn and become proficient in the standard ways of framing before you incorporate lasers into your routine.
Following the above process for stud layout and bracing off will ensure that the studs are properly installed to facilitate the hanging of drywall, running of conduit, etc. You will also save yourself time, and potential rework, by adopting this kind of "best practices" approach.
Related Content:

Contractor to Contractor: Installing Welded Hollow Metal Door Frames
In this installment of Rob Thimmes� series on framing walls with light gauge metal studs, he reviews the basics of hollow metal door frame installation.
During your framing process, the question of when you should set welded hollow metal door frames must be addressed. Many contractors prefer to install door frames before the walls are built. This facilitates the ease of fastening the �feet� down to the floor. After the frames are fastened down, braces are required to keep wind or inadvertent contact from toppling the freestanding frames. Read More...

Contractor to Contractor: Framing Out Openings
Contractor to Contractor: Follow professional interior contractor Robert Thimmes as he demonstrates how to frame-out openings. This third installment in a series of articles, Framing Walls With Light Gauge Metal Studs, visits the common practices for the framing of window and door openings. Read More...

Contractor to Contractor: Metal Stud Track Layout and Shoot-Down
Contractor to Contractor: Follow professional Interior Contractor Robert Thimmes as he produces a layout and final shoot-down of a metal stud track system.
Plumb, level, square, and straight: all carpentry is the same, right? Well, no. Basic building principles apply, but how you build with metal studs differs greatly from building with wood. The following discussion offers a systematic explanation of installing metal studs, with various best practices for each step. Read More...

Light Gauge Metal Stud Framing
Planning and Best Practices
The light gauge metal stud framing phase of a project significantly impacts several other trades. It is no secret that good planning and practices will achieve higher production rates and a level of quality that meets the project's specifications. Planning and layout should be the responsibility of the project foreman; however, everyone should be involved with preparing the work flow. While actual layout is underway, other production items should also be thought through. Read More...


Robert Thimmes
Rob Thimmes, 30 year veteran of the interior trades and 15 year owner of Homefront Construction Company, still wears his tools most days. As owner/operator of a small business, he has worn all the hats: estimator, accountant, truck driver, warehouse man, project manager, superintendent, foreman, journeyman, and laborer. When he's not on the job he enjoys writing, blacksmithing, church, his family and 'solving all the world's problems'.