How to Fix a Leaking Toilet
-
font size
decrease font size
 increase font size
Video
Repositioning and Replacing a Wax Ring
If you have noticed water damage near the base of your toilet, chances are your toiletÆs wax ring has failed. Although toilet leaks have several common causes, only a bad wax ring will require the removal and resetting of the toilet. When this problem occurs you could call a plumber or you could arm yourself with a little know-how and fix the leaking toilet yourself. To complete the job you will need towels, a flathead screwdriver, a crescent wrench, gloves, a putty knife, and a hacksaw.
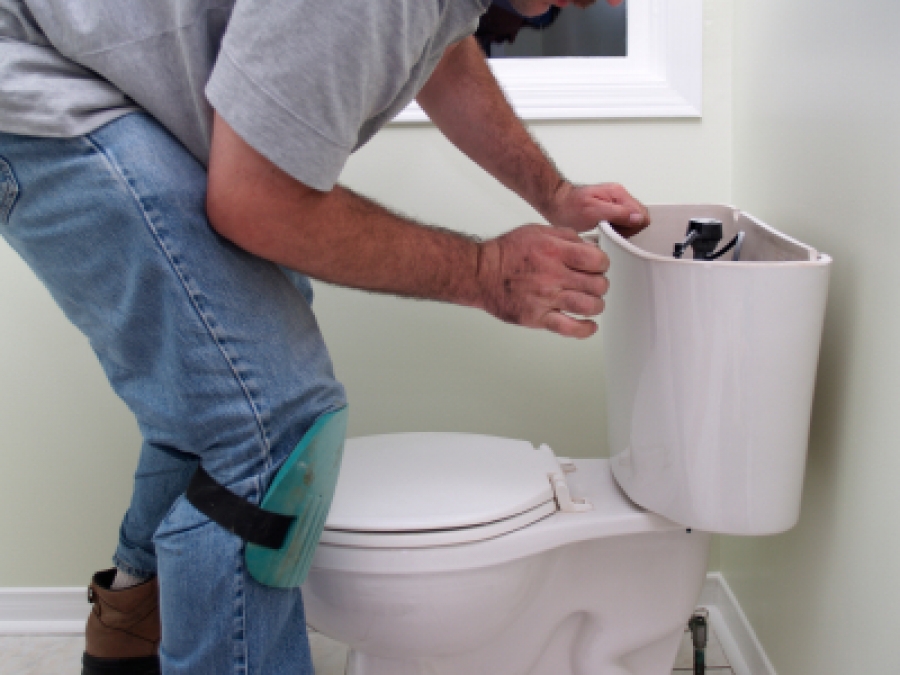
Wax Ring 101
A wax ring is what is commonly used to seal the connection between a toilet horn and the waste line flange. Any toilet bowl movement due to loose connections will allow the wax ring to become misplaced under the toilet horn and could provide an opening for gases and water to escape. Also, excessive heat, whether from a radiant floor system or hot liquids being poured down a toilet, can damage the wax ring. Another culprit is wastewater backup pressure. A clogged drain line or the backup of wastewater will put pressure on the wax ring, causing it to fail and break the seal of the connection. Ultimately, a wax ring will deteriorate over time and stop providing the necessary seal.
How to Fix a Leaking Toilet
Fixing a Leaky Toilet in 60 Simple Seconds

Finding water all over your bathroom floor from a leaky toilet is never a good situation. Fortunately, fixing the leak is only a few flushes away. One of the most common causes of a leaky toilet is the wax ring that sits between the toilet and the drain. Replacing a leaky wax ring is a quick DIY project that should be done when you first notice the leak. Watch this episode of 60 Simple Seconds for a quick look at how to replace a wax ring and fix that leaky toilet. Read More...
- Begin by cleaning up the current leak and ensuring that the floor around the toilet is clean and dry.
- Inspect the porcelain toilet bowl for cracks. This can be accomplished by placing food coloring in the toilet bowl water. Prevent the toilet from being flushed for a short period of time. If colored water leaks on the floor adjacent to the toilet, then the bowl is cracked and the toilet will need to be replaced. If no water leaks from the bowl, the wax ring will need to be checked.
- Repositioning the toilet's wax ring. Remove the plastic caps located at the base of the toilet with a flathead screwdriver. Tighten the floor (Johnny) bolts with a crescent wrench and flush the toilet. Note: If water doesn't leak, you have reseated the wax ring and sealed the drain connection. Keep a close eye on the toilet for future leakage and consider this a warning. Plan to replace the wax ring at some point in the near future. If the toilet leaks again after repositioning the wax ring, you will need to remove the toilet from the floor and replace the wax ring.
- Replacing the toilet's wax ring. Prior to beginning, visit your local home improvement store and purchase a wax ring kit. The wax ring kit should include a wax ring, new floor (Johnny) bolts, and nuts and washers.
- Shut off the water supply, flush the toilet, and soak up any water remaining in the tank with a towel.
- Disconnect the water supply line and the tank from the bowl with a crescent wrench. Set these aside in a safe location to prevent damage.
- Loosen the floor (Johnny) bolt nuts with a crescent wrench and lift the bowl off the floor. Place the bowl upside down in a safe location with the toilet horn on top.
- Remove the existing bolts from the floor flange and inspect the floor beneath the toilet for any rotted wood. Any soft, sagging, or rotted wood under a leaking toilet should be replaced prior to reinstalling the toilet.
- Remove the wax ring and use a putty knife to clean the existing wax from the toilet horn and floor flange.
- Install new floor (Johnny) bolts in the existing floor flange.
- Place a new wax ring in the floor flange drain opening.
- Set the bowl back in its original location, over the floor (Johnny) bolts and with the toilet horn inside the new wax ring. Shims can be used to level the bowl over uneven floor surfaces. Apply downward pressure to the bowl to ensure a good connection ¢ you should feel the wax ring compress. If you don't feel this, your wax ring could be too short. Consider a taller wax ring or even using two wax rings, one on top of the other. Using two wax rings isn't the best solution; however, it is a common fix and, when properly installed, can provide a good seal between the toilet horn and floor flange.
- Tighten the floor (Johnny) bolt nuts by hand and then with a wrench. Make sure you do not overtighten the bolts, which could result in cracking the bowl. Use a hacksaw to cut the floor bolts above the nut so the plastic cap will fit.
- Reinstall the tank, connect the water supply line, and turn the water on to fill the tank. Once the tank is full, flush the toilet and inspect for leakage.
Some municipalities require the gap at the base of the toilet to be sealed. If you live in such an area you should complete the job by caulking the gap between the base of the toilet bowl and the floor surface. If this is not required, you might forgo caulking around the base of the toilet altogether or only caulk along the side and front edges. Leaving the back edge uncaulked provides a location for leaks to be readily detected.
While a common scenario has been identified above, there are alternatives to a traditional wax ring, and it is important to note that it is possible that you may find a very different situation after removing the toilet from the floor. Wax-free toilet seals are available for 3" and/or 4" waste line pipe connections. Wax-free seals offer some advantages over traditional wax rings in certain situations, such as recessed flanges due to raised floor surfaces. They are not messy to work with, they move with a wobbly bowl, and they become a permanent component of the waste line system. Like anything else, when you dig into fixing one problem, you may find a new one. When you lift the toilet bowl from the floor, you should inspect the floor structure as previously mentioned; however, you should also inspect the waste line pipe and floor flange. If either is damaged, it needs to be repaired or replaced. This portion of the work should be completed by a licensed plumber prior to replacing the wax ring and resetting the toilet.


Jeff Calcamuggio
Jeff is an Editor-at-Large for Buildipedia.com who writes and edits Featured At Home and Knowledgebase content. Prior to joining Buildipedia, Jeff's work experience included carpentry, construction documentation, specification writing, construction administration, project management, and real estate property inspection. Jeff is a member of the Construction Specifications Institute (CSI) and an educator at Columbus State Community College and enjoys challenging DIY home improvement projects.
Ā