6 Inexpensive DIY Firepits for Fall
-
font size
decrease font size
 increase font size
Video
Anchoring your backyard or patio with a fire pit provides warmth and a welcoming glow for outdoor entertaining or just relaxing.
Because of their natural allure, fire pits often serve as focal points in landscape design and can be an important element to consider when you’re trying to increase your home’s curb appeal. Designs can vary greatly in terms of size and materials used and depend on the answers to many questions, such as whether your fire pit is to be a permanent or portable fixture and whether you plan to equip it to multitask as a barbeque grill. We’ve compiled a list of six DIY fire pits, even some intended for use in apartments, all of which cost just a few dollars and are simple enough projects for one or two people to undertake.
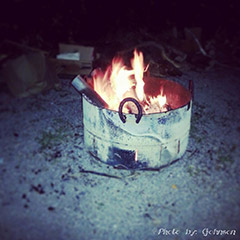
The Ultimate Country Fire Pit
Ah, the simple life! Just want to kick back, have a beer, a BBQ, and maybe roast some marshmallows? To heat up the great outdoors on the cheap, this portable fire pit made with salvaged yard materials and a little metal welding know-how does the job while still managing to provide rustic appeal.
Materials:
-
Salvaged 55-Gallon Steel Drum
-
Old Horseshoes (four)
-
Salvaged Metal Grill Grate (optional)
-
Metal Welding Equipment (rent, buy used, or borrow from a good friend)
-
Kindling
-
Fire Starter
How to:
Time to visit your local junkyard! For this project, you are on the lookout for an empty steel drum or barrel (half will do), old horseshoes, and a metal grill grate that you can recycle (if you would like to use the fire pit for cooking). Once you have your materials, thoroughly clean them before proceeding.
If you know how to weld metal, you are good to go with these next steps. If you don’t know beans about welding, enlist the services of a metal welder, preferably a friend willing to work for a few beers or for just the cost of welding materials. A professional welder’s services for this type of project can range anywhere from $20 to $80.
Whether it’s you or the welding pro wielding the torch, first cut the barrel to a height of 1.5’ –2’. Next, cut vent openings around the bottom section of the barrel (see image) about 7”-8” (20 cm) apart. Vent openings allow air in to fuel your fire, and keeping them free of ashes and other debris will keep your fire burning.
Once all the vents are cut, weld around the cuts and rim of the barrel so the edges are not sharp. Position horseshoes so that the opening faces down, one at each point of the compass, and weld each into place. These will serve as handles when you’re moving the portable fire pit and as rests for your barbecue grill.
The Result:
Yee-haw! You’re done and now it’s time to light up the night. Place your fire pit on cleared, level ground and fill it with kindling (small wood scraps, left over paper, cardboard box pieces, etc.). Add firestarter and ignite.
Once your fire is roaring, lean back in a lawn chair and relax. If you salvaged a metal grill, balance it on the horseshoes once the flames lower. Then, throw some burgers and hot dogs on and enjoy!
The Sunken Pit
What’s better than cheap? How about free? This DIY fire pit project only requires you to have good hole-digging skills and extra rocks lying around your yard. For zero cost, you get a classically elegant, recessed fire pit that blends with natural landscape designs.
Before You Begin:
-
Map out where in your yard you will dig your Fire Pit and plan its circumference, keeping in mind space for chairs or benches, surrounding plants, and any other accessories or personal touches you want to add.
-
Make sure you have a digging, trowel-type shovel handy, but before breaking ground, consider the type of soil in your backyard, and don’t forget to take necessary safety precautions to avoid the possibility of hitting buried underground power lines (the Fire Pit requires a depth of 1 - 1.5 feet). A call to your local utility company can usually give you more information about this.
-
Collect a wheelbarrow full of hard, dry rocks that are as tumbled (smooth) and leveled or flat as possible. Rocks should be medium size, roughly 8”x8” (approximately 20x20 cm). Using flat, smooth rocks of uniform size allows you to skip the mortar to hold rocks in place when lining the Fire Pit. Exactly how many rocks you need will depend on the dimensions of your pit.
Dig away!
Rocks collected and everything all planned out? Then it’s time to roll up those sleeves and get your hands dirty. Measure the circumference of your pit, marking off the ground with spray paint. And then, start digging, and digging, and digging some more! You’re done when your hole is a uniform depth of 1 - 1.5 feet.
Stacking the wall:
Once the hard work of digging is over, begin stacking up the rocks to build the inner wall of the Fire Pit. Wedge rocks as closely together as possible, using a hammer to knock them into place and keep the wall leveled. If needed, you can use heat resistant mortar mix or grout to make the walls even more stable. The bottom of the pit can be left bare earth or you may want to add a thin layer of gravel or sand to help with drainage when it rains.
Accessorizing:
Now the fun part! First, step back and marvel at your creation and think about all the fun times and memories to come. You can personalize by this little oasis by placing loose stone around the pit to really make it stand out, or lay flagstone for a true patio effect. Add some benches or chairs, outdoor cushions, or a freestanding hammock and you are ready to rest your (no doubt) aching muscles and enjoy!
The Cutest Flameless Fire Pit!
Want the feel of having a fire pit even if you live in the city, a studio apartment, loft, or simply a house with no backyard at all? Bring the outdoors inside with this “faux” Fire Pit that doesn’t use real flame. We like it because it’s simple to make yourself and offers enough glow to transport you right back to camp bonfires and romantic fireside evenings, without burning down the house.
Materials
This Fire Pit can be adapted to whatever size you prefer, but you will need:
-
Rocks (color and texture of your liking)
-
Strand of red or white Christmas lights
-
Wooden Sticks or Branches
-
At Least 2-3 Yards of White Lace or White Muslin Fabric Strips
-
Fabric Stiffener (available at craft store)
-
Paint Brush
-
Aluminum Foil
-
Box Cutter or Exacto Knife
The DIY How-To:
-
Wrap branches in a single layer of aluminum foil. Prepare the lace with the fabric stiffener and wrap each foil covered stick. Allow sticks to dry.
-
Once dry, run a knife down each branch in a single line. To avoid cutting yourself, always cut away from your body.
-
Separate the fabric “logs” from the branches and remove any foil still clinging to the lace. You’re ready to stack!
-
Picking a spot that’s close to an electrical outlet to avoid lights dangling across the floor, place Christmas lights in a small mound on the floor and arrange logs around it in a “tipi” shape, using rocks to hold everything in place.
Although you won't be able to roast up your favorite foods with this Fire Pit, you can still order out for something tasty, dim the lights, and enjoy the cozy indoor comfort of your living room.
Mobile Mini Fire Pit
Ever wish you could move your fireplace or Fire Pit around the yard when rearranging your patio furniture? Or finally figured out the perfect Feng Shui layout for your yard...only to discover that your Fire Pit is in the wrong location? This easy-to-make -- and completely mobile -- DIY Fire Pit may be the answer you you’ve been looking. Plus, it’s use of glass, metal, and rock makes this easy project very Feng Shui-friendly!
Materials
-
Square Planter Pot
-
Palm-Size Stones Rocks
-
4 Glass Squares (cut to measure the planter pot, 2 length and 2 width)
-
Glass Adhesive
-
Can of Sterno Fuel (what you see warming up foods at a buffet)
-
Stiff Metal Mesh (enough to cut two filters the size of the planter)
-
Extra Long Matches or a Grill Lighter
Prep work:
Glue the glass pieces together to make a cube shape. Glass adhesive is available at most craft stores or specialty glass shops. Cut the wire mesh to fit above the planter covering both the length and width completely, this will be the ¨grill¨ section.
Assembling:
Place the planter on a study table or the patio floor and put the open fuel can on the bottom of the planter. Lay the mesh on top and stack the glass cube on top of that. Fill with rocks or stones to cover the mesh, leaving a small space in the middle in order to light up the can with the long match. After this you are done! Enjoy the soothing and warming alternative to a big fireplace or stationary Fire Pit. Want to move it? No problem! Just disassemble and reassemble in desired location.
The Woodless Fire Pit
Famous “green” architect Michelle Kaufmann came up with this pollution-free DIY outdoor Fire Pit, recently featured on FineCraftGuild.com. If you’re into outdoor entertaining and cozying around a fire, but just aren’t a fan of woodsmoke, this Fire Pit may be the perfect match for your lifestyle. How does a Fire Pit work without wood, you ask? Instead of wood, you use canned “ecofuel,” an environmentally friendly and 100% biodegradable source of fire fuel that will burn up to 10 hours. Compare this to wood fires which can burn out in a few hours, or those chemical logs that generally burn for no more than 3 hours. Ecofuel costs only a few dollars per unit, keeping the total price of this Fire Pit ridiculously low. When going green, it’s nice to save a little green and this project helps you do just that.
Materials:
-
Large Metal or Ceramic Container or Planter
-
Stones, River Rocks, or Sea Glass
-
Eco Fuel
The DIY How to:
-
Collect some pretty tumbled stones, river rocks that mix and match with your choice of container, sea glass, or really anything you can think of as long as it doesn’t burn! Fill half the container with your collected materials.
-
Place 3 or 4 of the eco fuel cans in the container and top them off with more stones, rocks, or glass. Just be careful not to cover the tops of the cans or you won’t be able to light them!
Build yourself a few more of these and you will have several eco-fueled outdoor Fire Pits -- perfect for outdoor entertaining when your party to have relaxing ambience. Plus, you can enjoy knowing that you’re not polluting our Earth and that you're saving a few bucks, too!


Abigail Clark
Abigail Clark is an upcoming freelance writer. She graduated from The University of South Florida with a Bachelor's in marketing, minoring in journalism. When she isn’t up to her neck in coupons, she enjoys fishing. She loves to write reviews for technology and home and beauty products. If you would like her to write a review for you, look her up onTwitter.