Installing Welded Hollow Metal Door Frames
-
font size
decrease font size
 increase font size
Reviewing the basics of hollow metal doorframe installation.
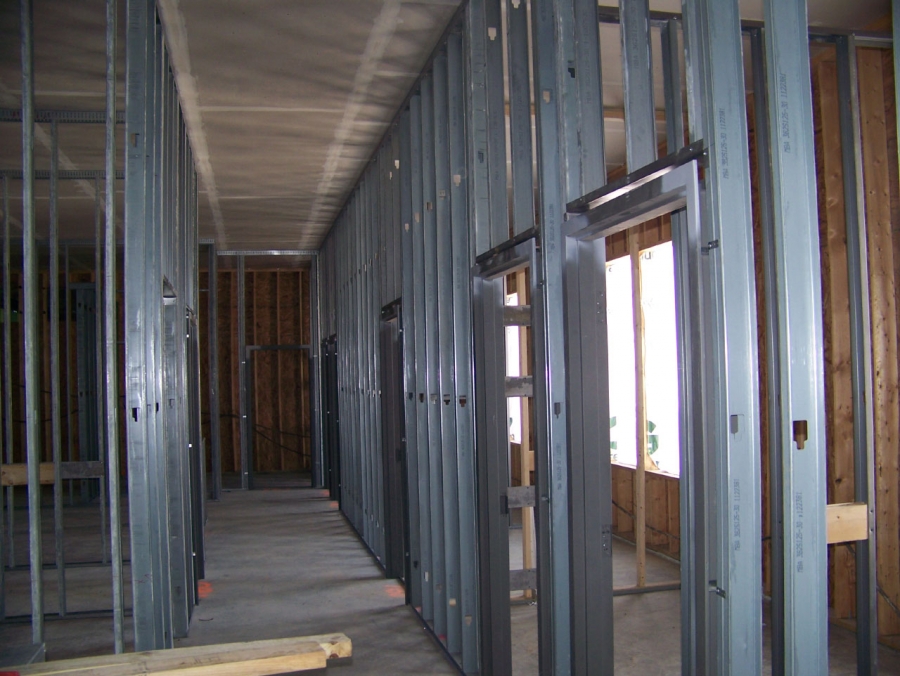 Image courtesy of Rob Thimmes
During your framing process, the question of when you should set welded hollow metal doorframes must be addressed. Many contractors prefer to install doorframes before the walls are built. This facilitates the ease of fastening the "feet" down to the floor. After the frames are fastened down, braces are required to keep wind or inadvertent contact from toppling the freestanding frames. Then, as the framers come to a pre-installed doorframe, they simply remove the braces and frame to, over, and around the assembly. Another method is to install the frames at the time the walls are built. Roughly, this method follows the same progression as the first method without the need to temporarily brace off the frame. The framers build walls until they come to a door opening; then they get down off their scaffold and set the doorframe, after which they resume framing walls. The doorframe need not be braced off when employing this method, since the doorframe is permanently attached to the studs. The drawback to this method is "switching gears": I have found that keeping crews productive and on task is easier when they don’t have to carry equipment for two separate operations and mentally bounce back and forth between them. However, the ease or advantage of either of these two methods is usually negated by late-arriving door frame deliveries (a very common problem). The last method involves setting doorframes after the walls are built. In my experience, I have found this to be the most common occurrence. It is with this last method that we will concern ourselves today.
Your openings have been laid out and framed in. Your frames have arrived on the job site. You have checked them against the print for correct labeling and swing. They have been distributed and oriented properly next to their openings. You are ready to install.


What tools are needed for installation vary according to preference. Some installers prefer to shoot down the feet of the frame and so use a Ramset or Hilti. The advantage to this method is speed. The disadvantages are blowouts in the substrate and no adjustability once the trigger is pulled. Others prefer fastening with Tapcons or similar concrete screws and so use a hammerdrill and a cordless. This method gives tremendous adjustability, with the ability to back the screws out entirely if needed. Getting the cordless into position and tightening the screws down securely can often be cumbersome and difficult. If the screws snap off or strip out, fixing the problem can be time-consuming. My preferred method is to fasten my frames down with "mushroom head" drive anchors. All you need is a hammerdrill and an Estwing. This method is fairly fast and has some adjustability before the anchors are driven in completely. What I give up in removability is offset by a very low failure rate, consistency being the key to productivity.
Other tools helpful during installation are a magnetic level (I use a 6’-6” and a 2’-0”), a spreader, a large framing square, a cordless, a tape measure, and snips.

The configuration of the feet of the frame varies with the manufacture. Some are adjustable; most are not. Door clips are the same way. For our purposes I will assume that the feet are fixed (welded in place to the frame) and the clips are single piece, the same depth as the frame. Most frames call for three clips per side.


Before you put the frame in place, lay your level across the opening to see which is the high side. You always want to anchor the high side first. Twist your door clips into place (they should friction-fit), the top ones about 10" to 12" down from the top, the middle ones approximately even with the strike, and the bottom ones high enough to be out of the way of your hammerdrill. Place the frame into the opening. Bend the tabs of your top clip on the low side around the door stud to prevent the frame from falling out of the opening. If the door studs are fastened at the bottom, remove those screws now. Settle the frame into its final position in the opening, checking with your tape measure to make sure the gap for the drywall is equal on each side of the stud. Pay attention to the "squareness" of the frame with the wall. You don’t want the frame twisted in the opening. Scribe a pencil line on the floor around the base of the high side of your frame. This provides a reference if the frame starts to drift when you run the hammerdrill. Slide the studs on the high side of your opening out of the way, and drill your first hole. Drop an anchor in that hole before you drill your second hole on that side. This helps keep the frame in place while drilling. With both anchors in place, check the frame’s position against your pencil marks, push or pull into final alignment and drive the pins down. Move the bottom door clip on that side down to about 18" above the floor. Slide the door stud back over and re-secure it. Align the frame equally on the stud and wrap the door clip tabs around the stud. Don’t screw them off yet.

Now that the base of the high side is secure, remove any temporary spreaders (which are notoriously inaccurate), drop an accurate spreader into the opening, and snap your 2' magnetic level onto the frame head. Shim underneath the foot of the low side until your level reads perfect. Get this right, as there will be no adjustment the drywall hangers can make to correct it. What shim material you use is up to you. Some people use washers. I prefer to cut pieces of track and hammer them flat. If there is any compression in your shim material, account for that as you level the head (take the bubble slightly past level). If the floor is wildly out of level (and it happens), make sure your fasteners are long enough to go through the shims and get a good "bite" into the floor. Tuck your low side frame into the spreader, align with the wall, pencil mark the floor and drill your first hole. (You might want to remove your level before you drill, as they have a tendency to drop onto your head because of the vibrations!) Fasten this side as before, sliding the door stud over and wrapping the clip tabs. The head of the frame should now be level; this should be double-checked.
Snap your longer level onto the hinge side of the frame. I try to always snap it in the same location (high and tight to the stop) to reduce variables. You should be able to push the frame gently to plumb. With the jamb plumb and the head level, a framing square should nest snugly into the top corner of the frame with no gaps. If, for some reason, the jambs need to travel far to be plumb and square, the door studs can be unfastened and moved to facilitate this. Once you are satisfied that the jambs are nearly plumb, screw the tabs to the studs. Final plumbing of the jamb then becomes the responsibility of the drywall hangers.


One alternate method of fastening door clips is to cut off the tabs and screw through the webbing of the stud into the back of the clip. This helps the hangers to not break their board as they are tucked into the frames. It is not as fast for the doorframe installer and is sometimes impossible for want of access, but it is worthy of consideration because it prevents headaches for the hangers and finishers. Self-tapping panheads must be used for this method and they have a tendency to "walk." Drywall shims or clamps should be used to hold the clips to the stud to prevent drift.
Installing welded hollow metal doorframes is a fairly straightforward process. The basic steps outlined above give good results in a variety of conditions. Good luck and good framing.
Related Content:

Contractor to Contractor: Framing Out Openings
Contractor to Contractor: Follow professional interior contractor Robert Thimmes as he demonstrates how to frame-out openings. This third installment in a series of articles, Framing Walls With Light Gauge Metal Studs, visits the common practices for the framing of window and door openings. Read More...

Contractor to Contractor: Standing Up and Bracing Off Walls
Contractor to Contractor: Follow professional Interior Contractor Robert Thimmes as he demonstrates how to stand up and brace off walls. This second in a series of articles, Framing Walls With Light Gauge Metal Studs, starts with your walls located, lines chalked and bottom track already shot down (for details on this process, see Metal Stud Track Layout and Shoot-Down). Read More...

Contractor to Contractor: Metal Stud Track Layout and Shoot-Down
Contractor to Contractor: Follow professional Interior Contractor Robert Thimmes as he produces a layout and final shoot-down of a metal stud track system.
Plumb, level, square, and straight: all carpentry is the same, right? Well, no. Basic building principles apply, but how you build with metal studs differs greatly from building with wood. The following discussion offers a systematic explanation of installing metal studs, with various best practices for each step. Read More...

Light Gauge Metal Stud Framing
Planning and Best Practices
The light gauge metal stud framing phase of a project significantly impacts several other trades. It is no secret that good planning and practices will achieve higher production rates and a level of quality that meets the project's specifications. Planning and layout should be the responsibility of the project foreman; however, everyone should be involved with preparing the work flow. While actual layout is underway, other production items should also be thought through. Read More...


Robert Thimmes
Rob Thimmes, 30 year veteran of the interior trades and 15 year owner of Homefront Construction Company, still wears his tools most days. As owner/operator of a small business, he has worn all the hats: estimator, accountant, truck driver, warehouse man, project manager, superintendent, foreman, journeyman, and laborer. When he's not on the job he enjoys writing, blacksmithing, church, his family and 'solving all the world's problems'.