Metal Stud Track Layout and Shoot-Down
-
font size
decrease font size
 increase font size
Contractor to Contractor: Follow professional Interior Contractor Robert Thimmes as he produces a layout and final shoot-down of a metal stud track system.
Plumb, level, square, and straight: all carpentry is the same, right? Well, no. Basic building principles apply, but how you build with metal studs differs greatly from building with wood. The following discussion offers a systematic explanation of installing metal studs, with various best practices for each step.
 Image courtesy of Damian Wohrer
In the beginning...

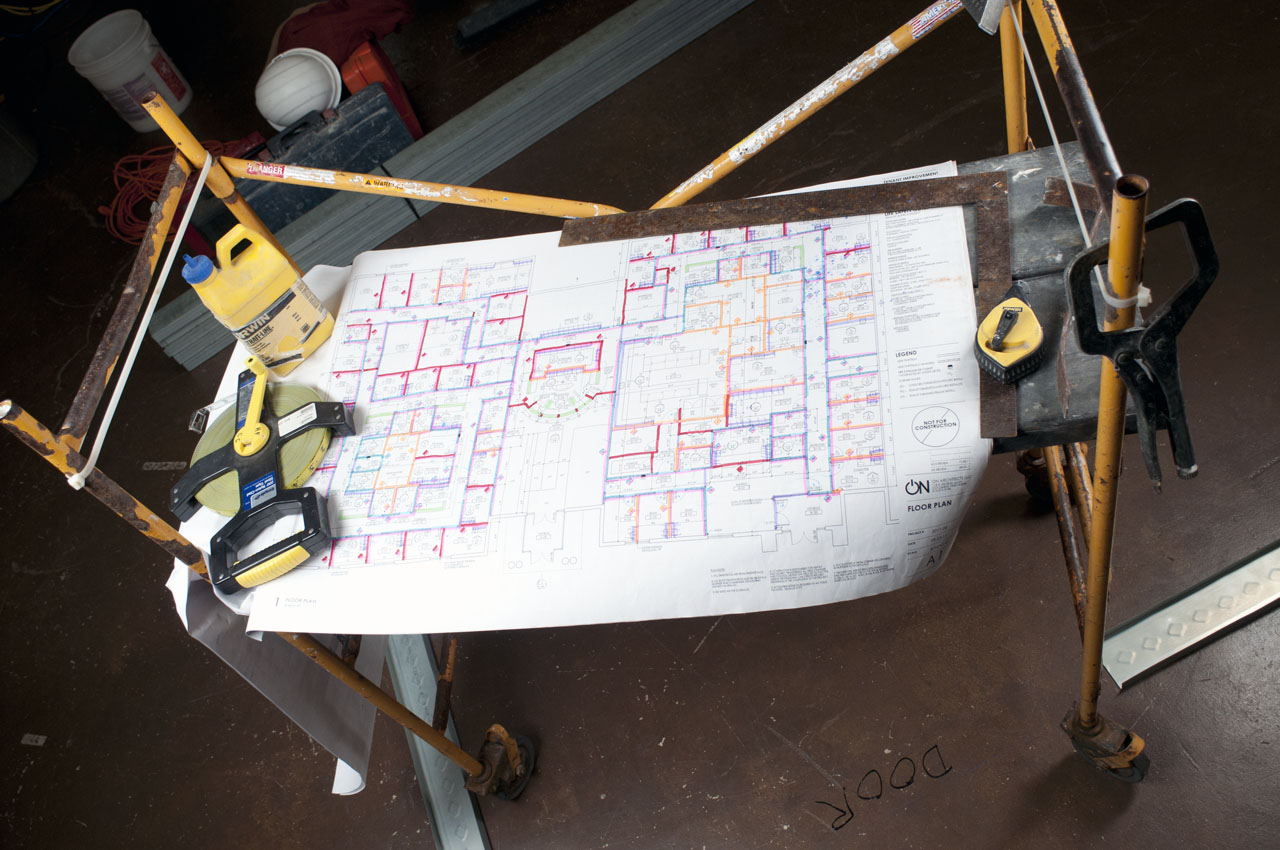
You are on the job with a blueprint, a pile of studs, and a scaffold. What�s next? Hopefully, you had a chance to look over the prints for a few days to familiarize yourself with the floor plan, wall sections, elevations, and details. It's easier to get inside the head of the architect when you see what their intentions are. Even better is a chance to visit the site before you start. Often visiting the site at that point is impossible, however, and you arrive at the site virtually "blind." In any case, you need a plan of attack. Before you unroll the prints, walk the site and answer a few questions. Is the space an addition? Will you have to match existing materials? Is it a new work out of the ground? Do you have multiple floors with framing that has to line up? How high is your deck? What does it consist of? Is the floor old concrete or new? Did the steel erection/masonry/concrete people do a good job (are things level, plumb, and square)? Are you under roof and dried in? Is there temporary power? Have you worked with this general contractor or these other sub contractors before? The answers to these questions affect how you proceed.
Light Gauge Metal Stud Framing

The light gauge metal stud framing phase of a project significantly impacts several other trades. It is no secret that good planning and practices will achieve higher production rates and a level of quality that meets the project's specifications. Read More...
The Layout
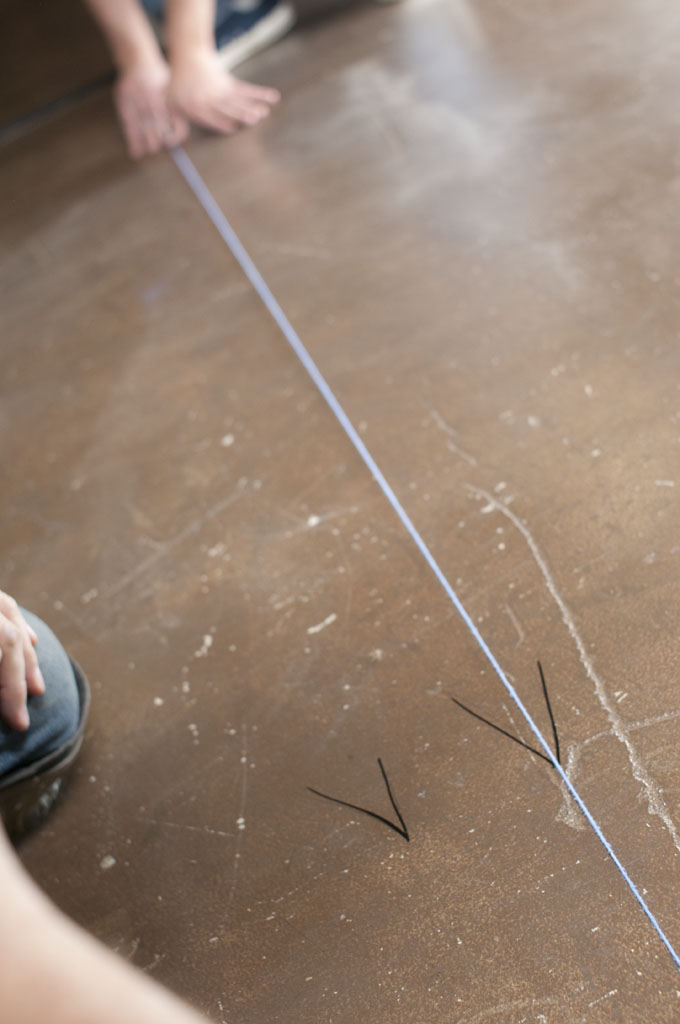
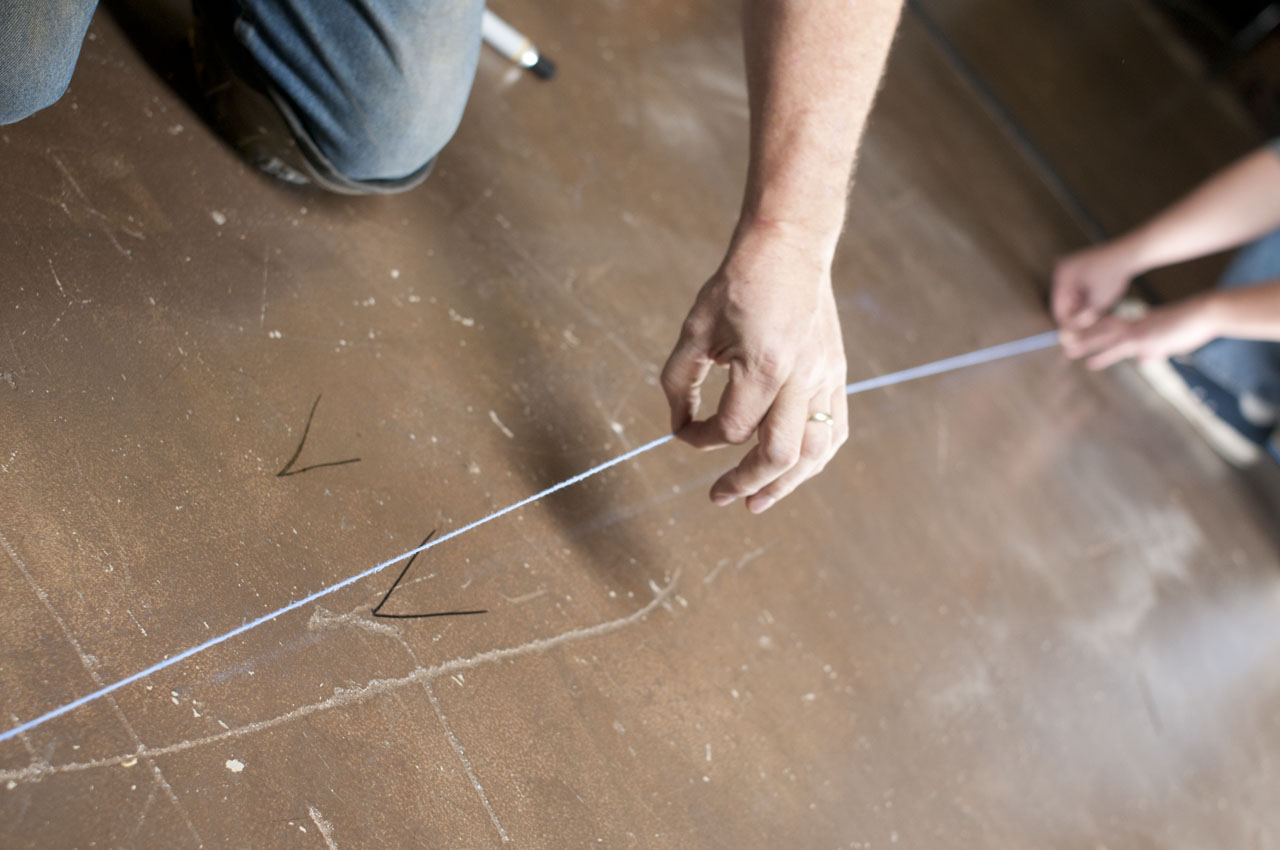
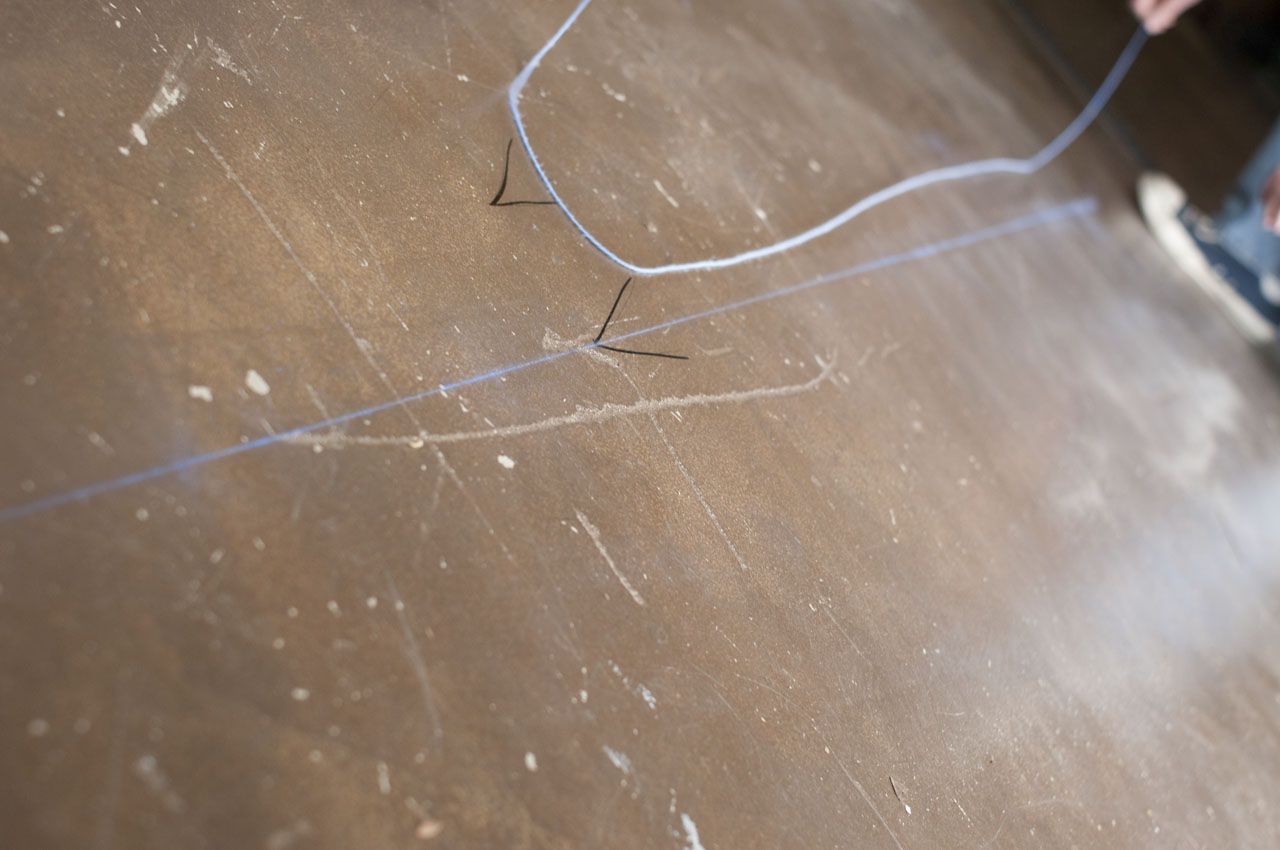
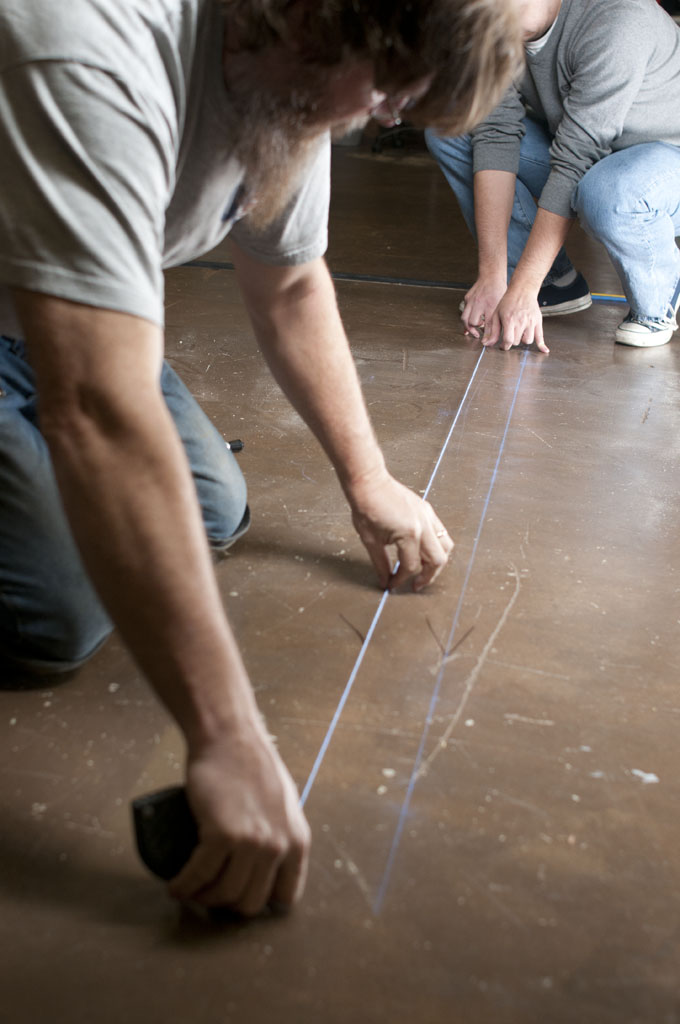
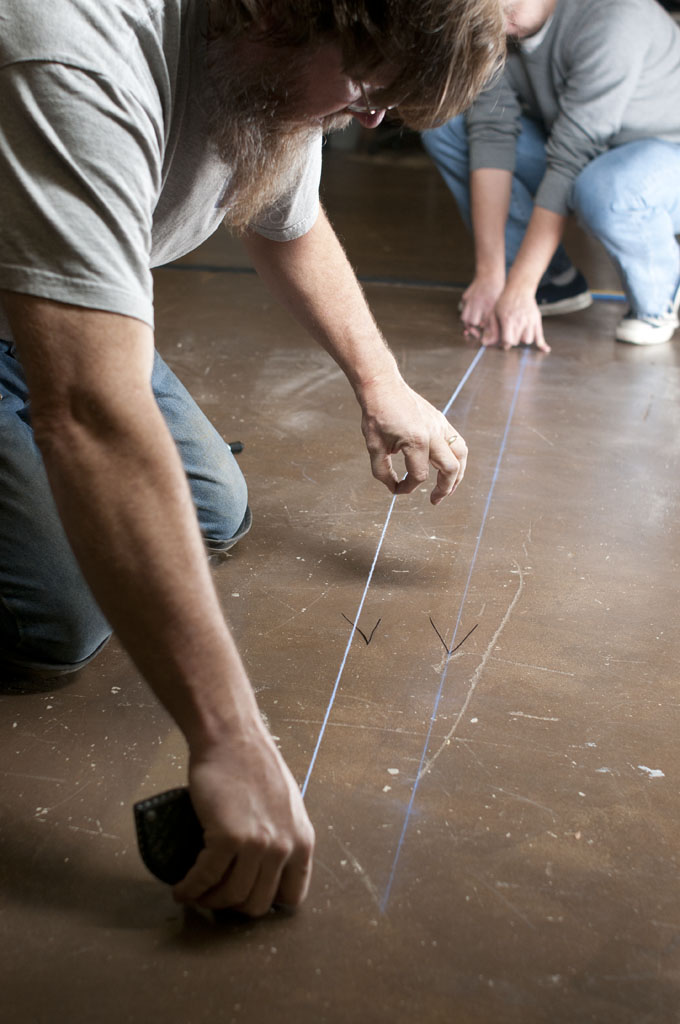
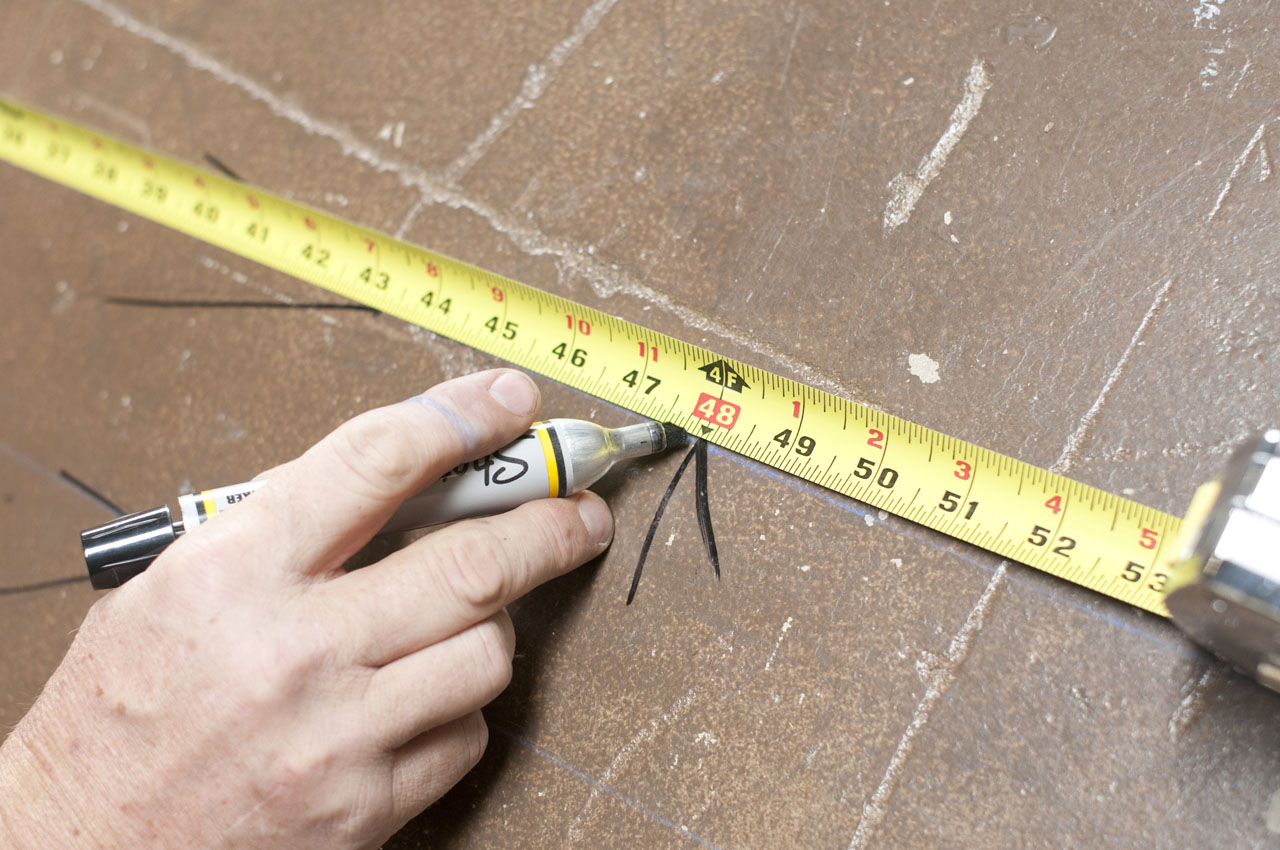
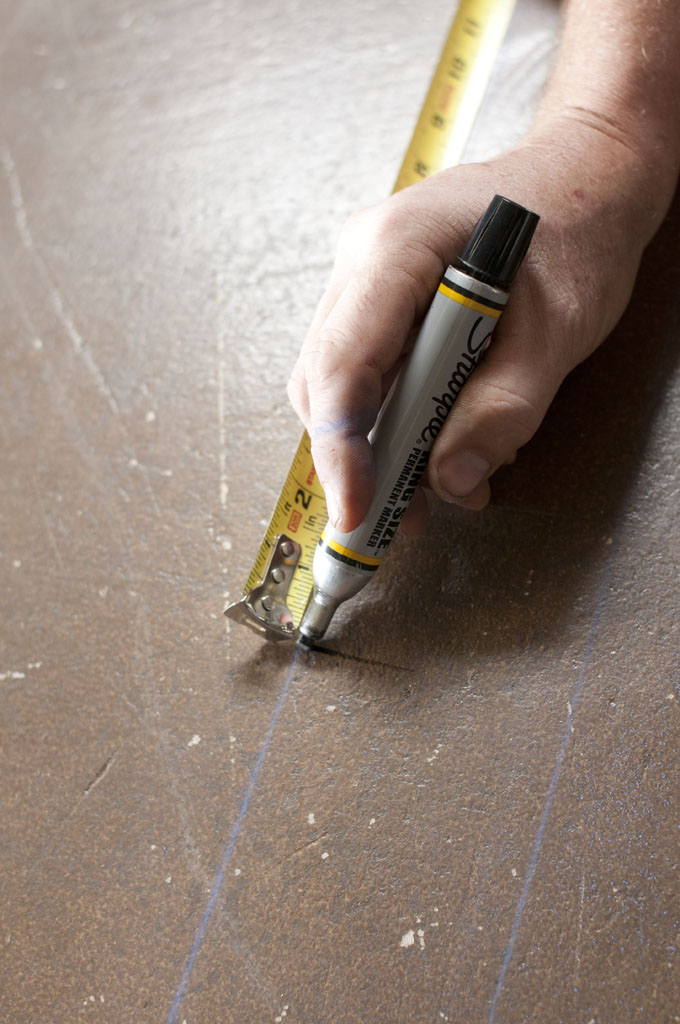
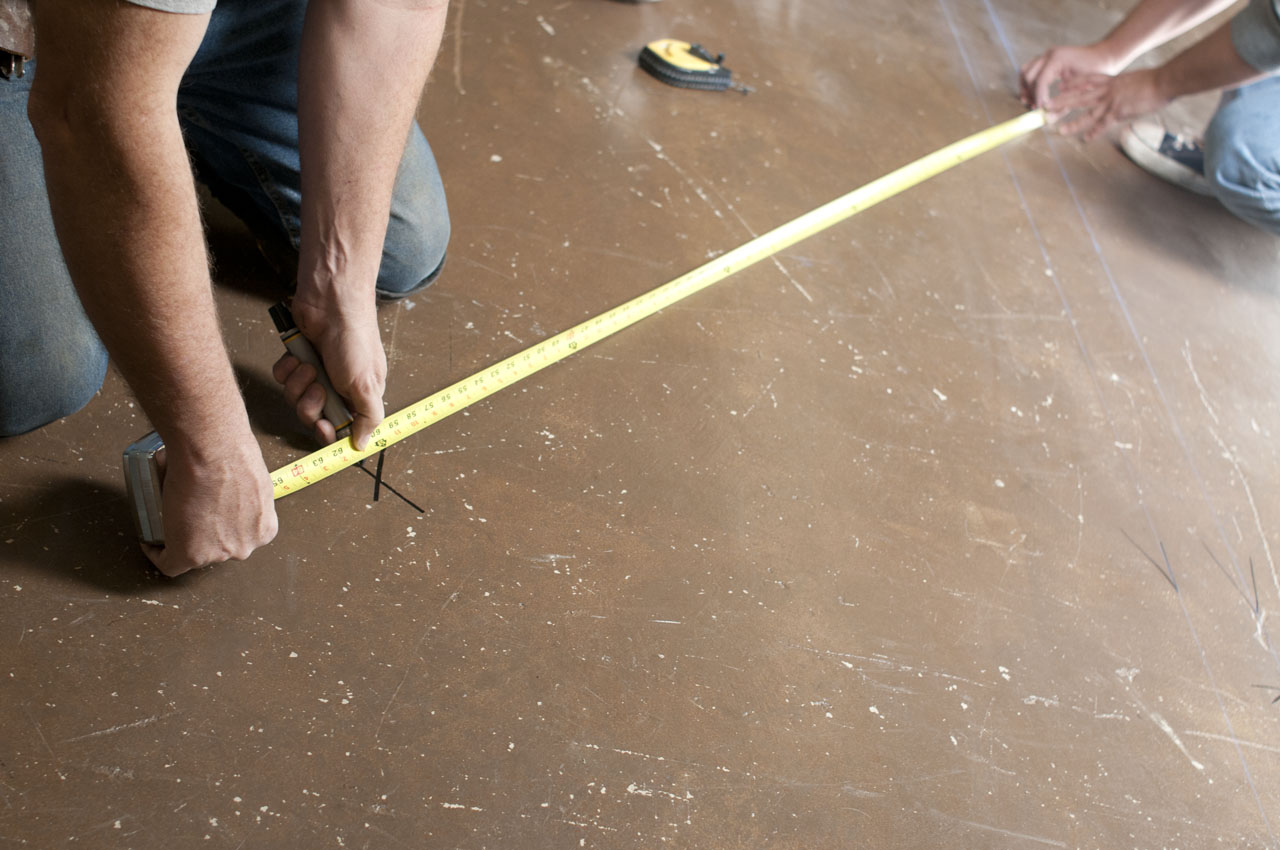
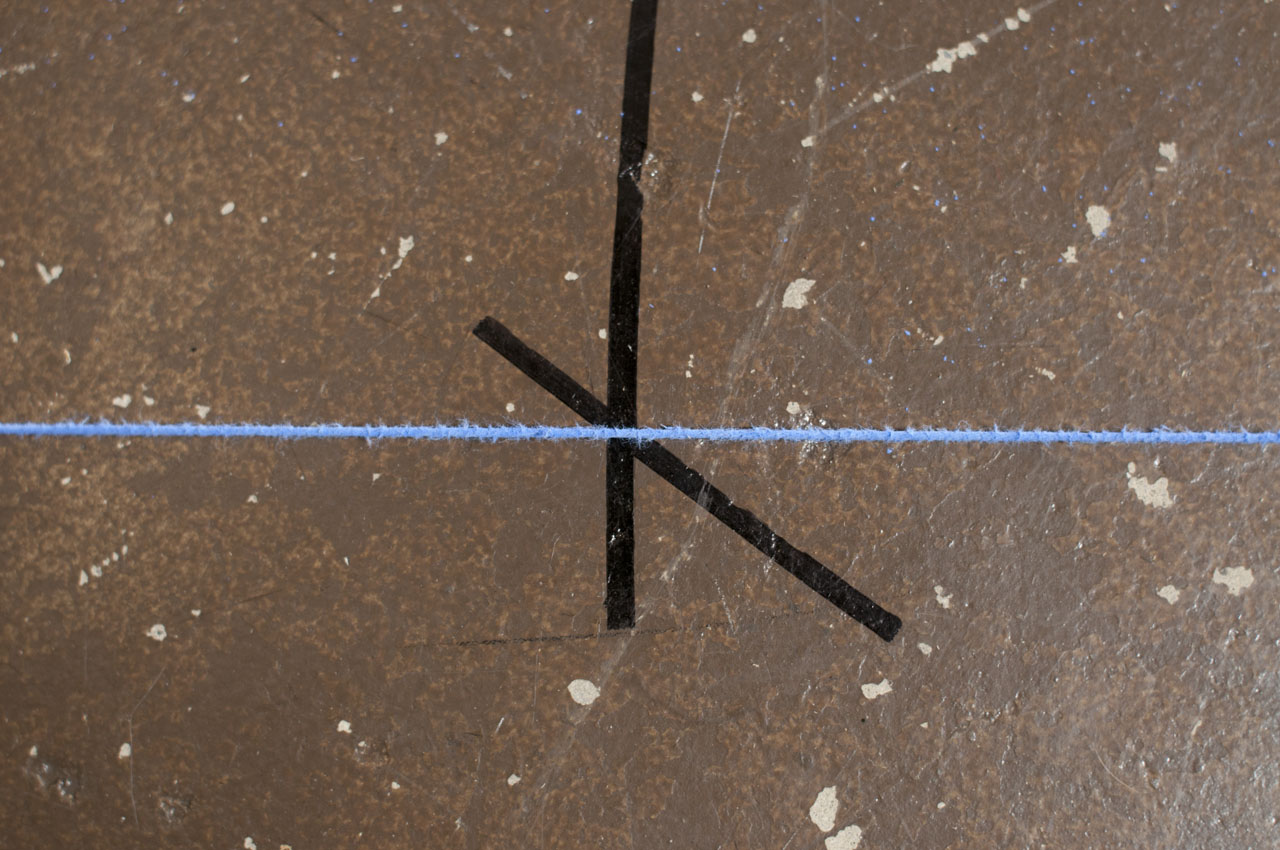
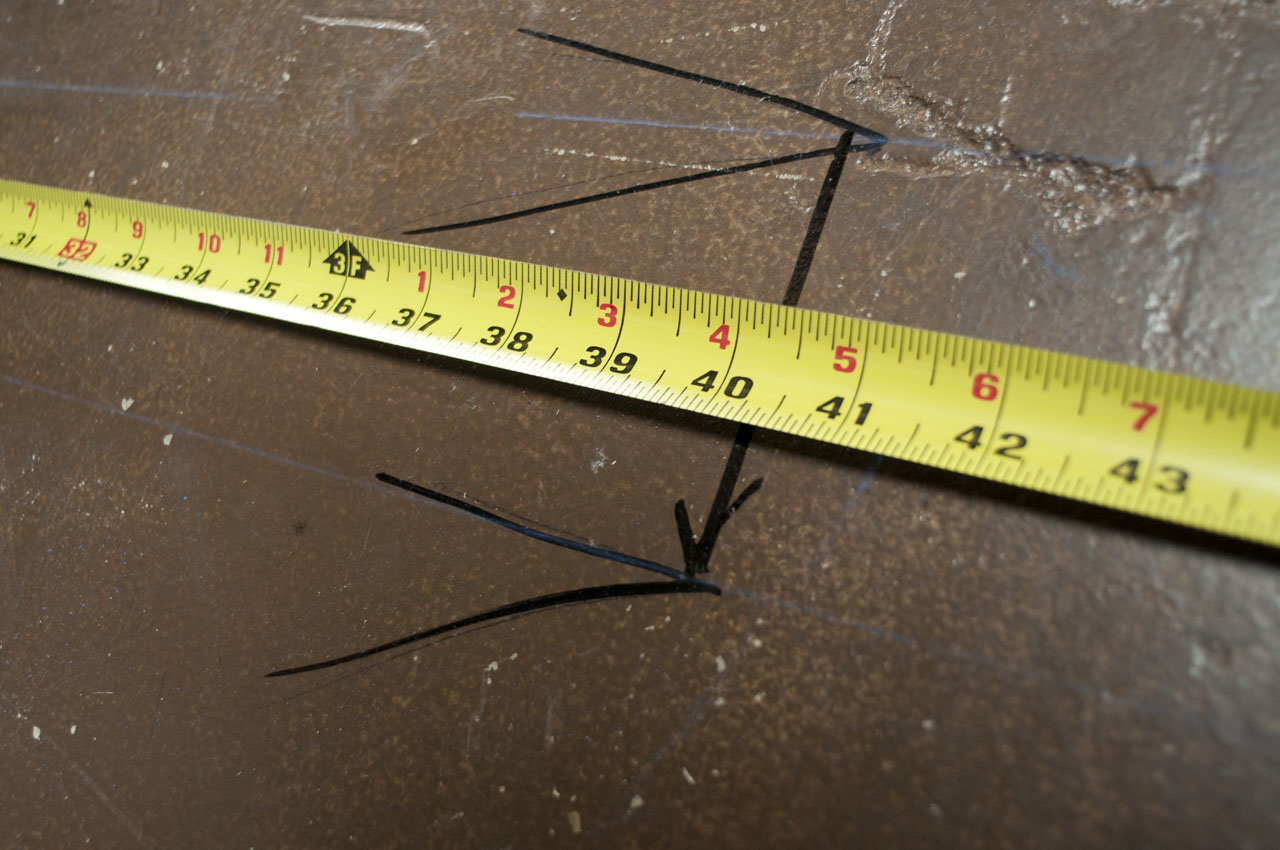
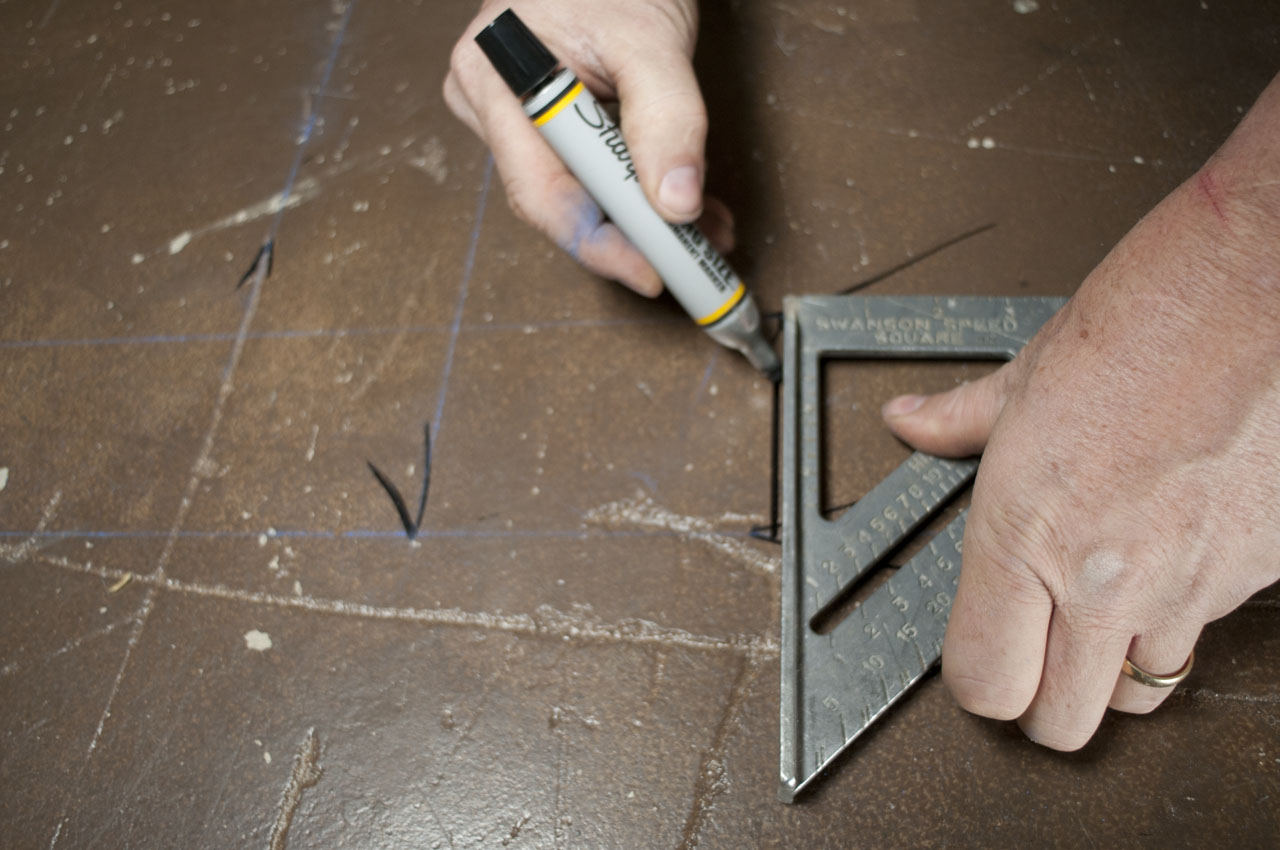
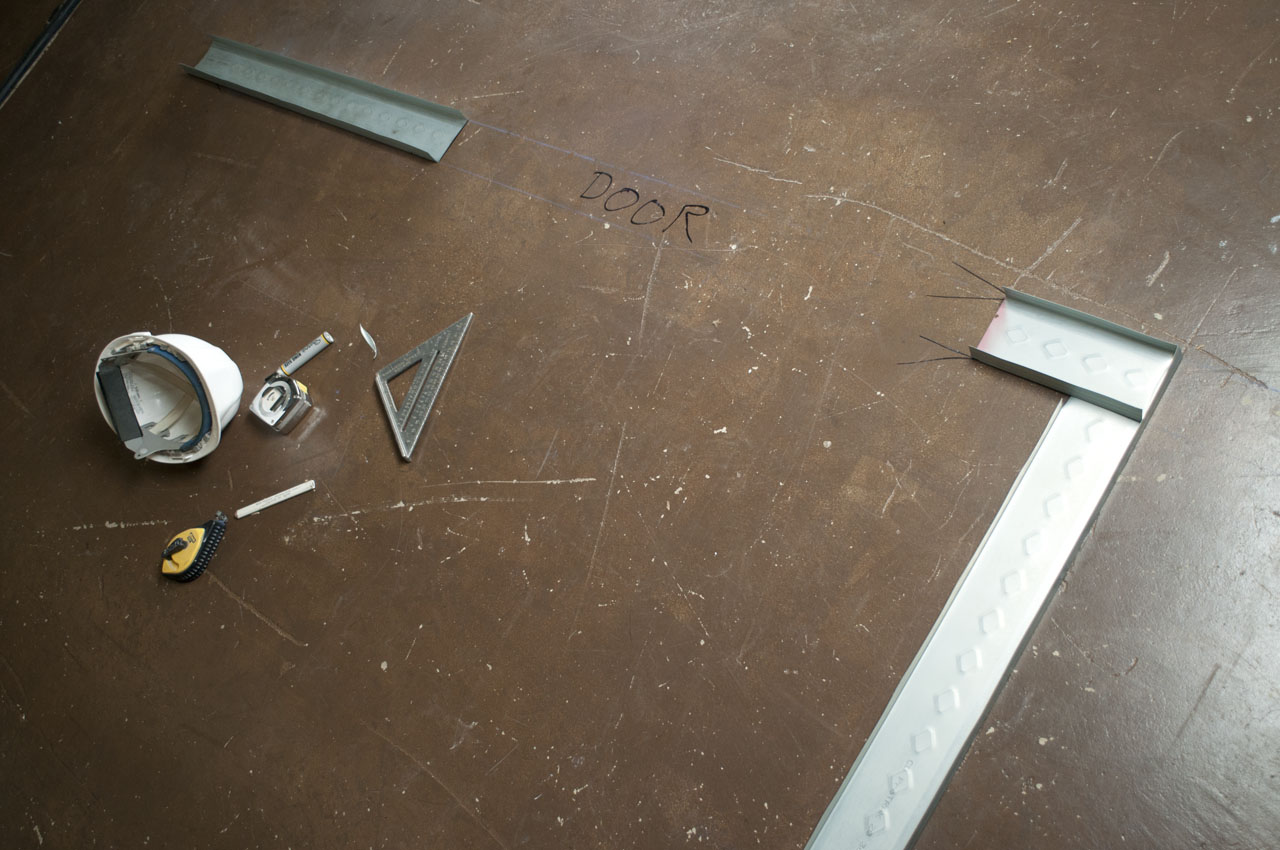
Ask your general superintendent if any problem areas exist. By this point in the project he should know. Most are willing to admit it and it is much easier and better to correct discrepancies now rather than wait until they show up in the carpet or the cabinetry. Intelligent framing can cover a multitude of sins, and this starts with layout. Unroll your prints and try to orient the drawing to the actual building layout. This helps to avoid "North/South, East/West" confusion. I like to use a rolling mini-scaffold as a table. Carry your framing square, extra chalk, and 50' and 100' tape measures on your mini-scaffold. You can use them to hold down your drawings if it�s windy. Look for the two longest outside walls from which dimensions are pulled that are 90 degrees to each other. The longer the wall, the less likely it is out of square. These will be your reference lines. Check them for square. If you don�t have a convenient set of walls to use for reference, create your own lines. Find the center of each end of your project, chalk a center line, then chalk a 90 degree line off that. Use the largest 3:4:5 multiple you can. (A right triangle where the sides are in the ratio of 3:4:5 will give you a 90 degree angle every time.) Start with a line, mark the point you want to square, and make a second mark 4' down the line. Measure off your first mark approximately square to your line, sweeping a small arc at 3' with your pencil. Place your tape on the 4' mark and measure back 5' toward your arc. Sweep an arc at this measurement. The point where the two arcs intersect is square to your original mark. Any multiple of 3:4:5 (such as 6:8:10, 12:16:20, 30:40:50, etc.) will produce the same results. Use the largest multiple that is practical. Take care to "nail" the intersection point when striking the line.


Working your way across the floor plan, add up the architect�s dimensions. General Conditions should tell you if the dimensions are rough or finish. If they don�t, then look at openings and room sizes on the print. If they are even numbers, then likely the print was drawn with finish dimensions. Be careful with your math. Bad addition consistently causes problems. Now measure the overall dimensions of the job. These should match the prints. If they don�t, look for the � sign. This will give you latitude in making wall location and room size decisions. If the discrepancies are large, bring the Job Super in on it. He can pass the problem up the chain of command to get a decision. Next, it would not hurt to find out from which direction the plumbers and electricians pulled. It is easier for you to move your walls than for the plumber to move his pipes. This is the choice most Supers make, so save yourself time and money by clarifying these potential conflicts. Move a chalk line, not a wall.


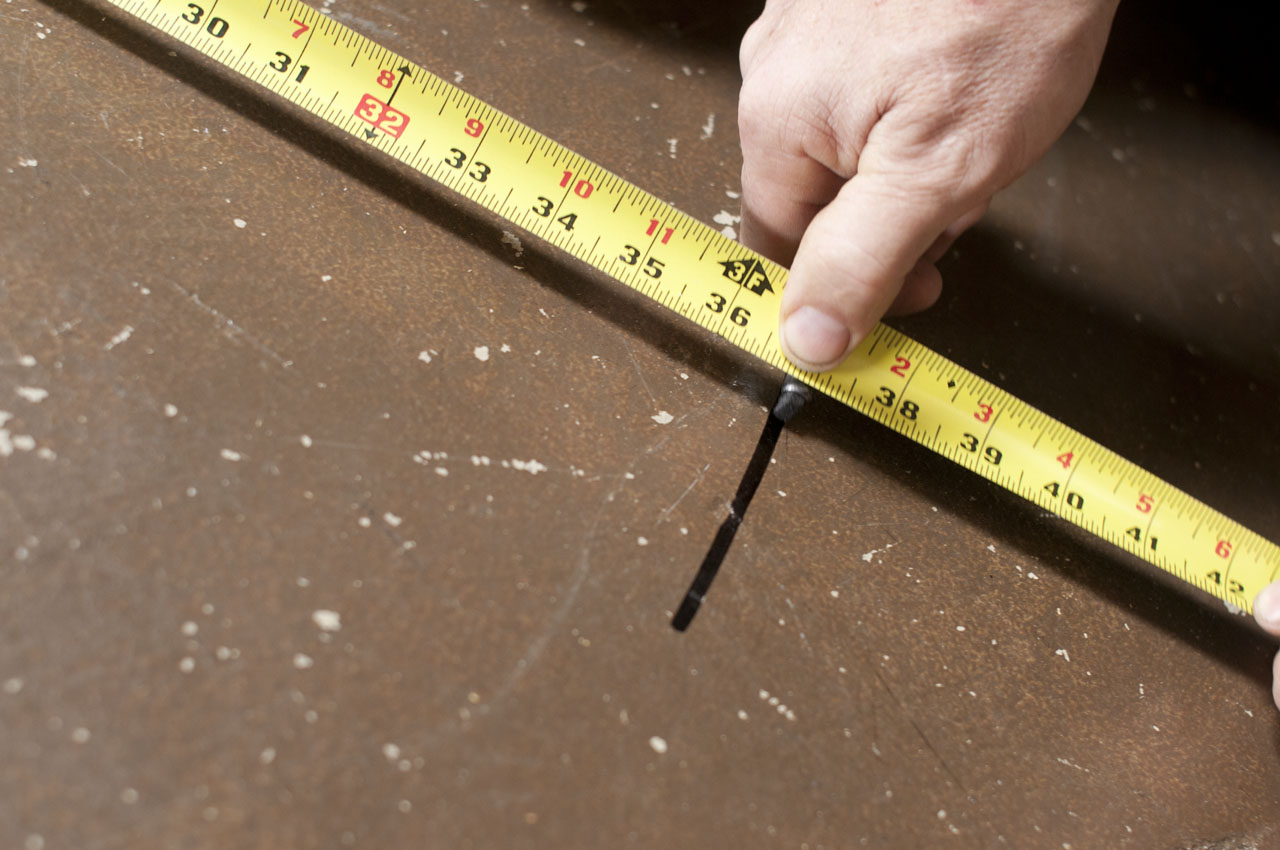
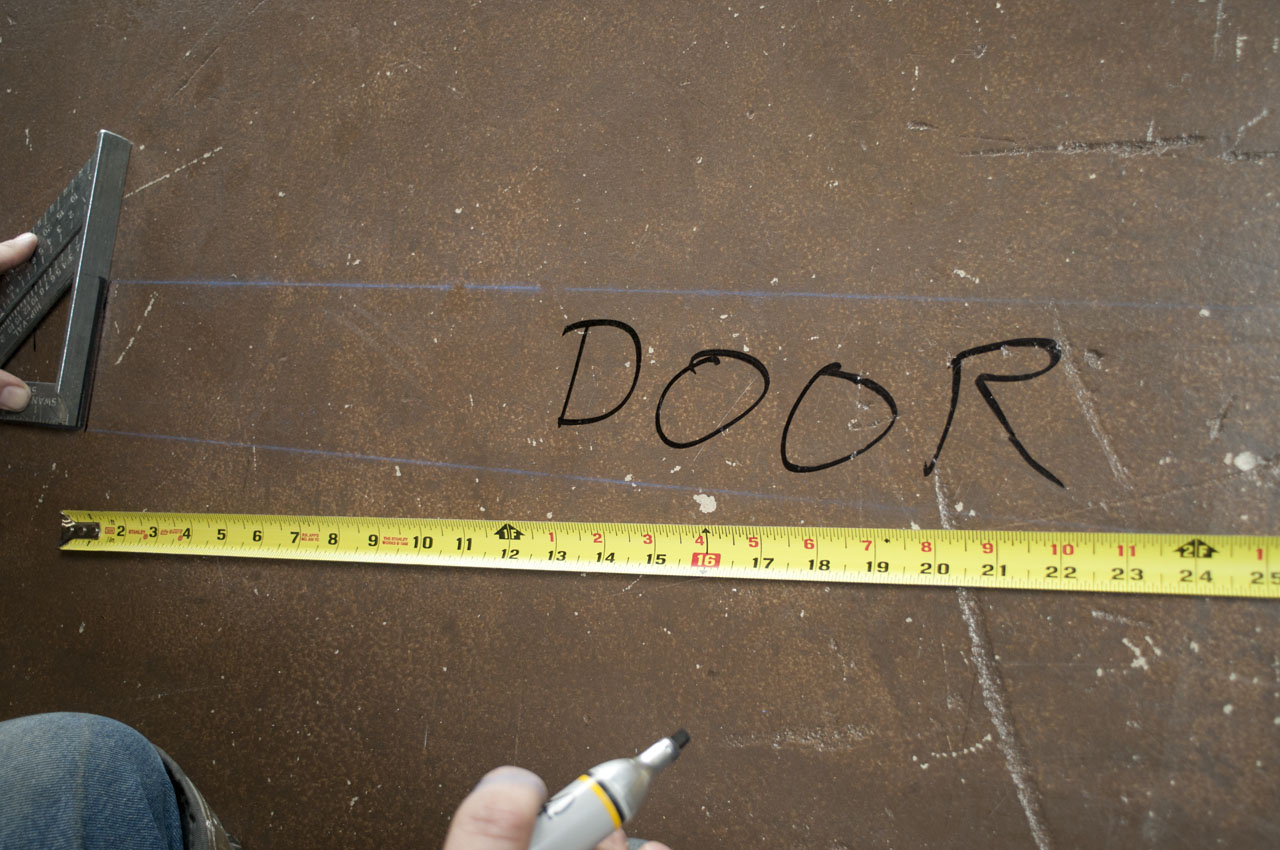
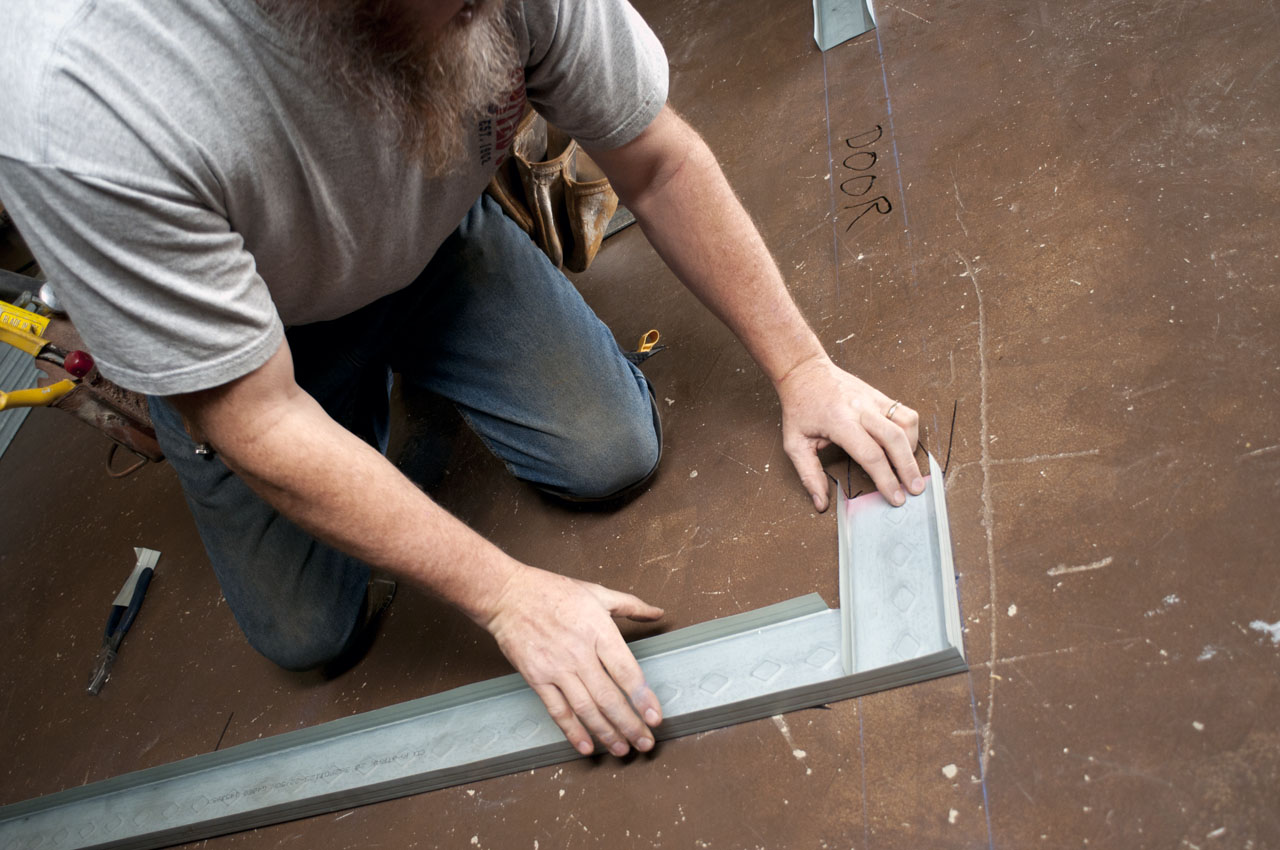
Once you�re satisfied with your starting points, begin your layout. Always keep a good fine sweep broom with you, sweeping each wall location before chalking to avoid debris affecting your lines. Be on the same page with your helper if you have one; miscommunication is an even more prevalent problem than bad math. Always, always reduce your variables. (I say this throughout the framing process.) Whether you use the end of your tape as "zero" or cut an inch, be consistent. If your chalk line misses your layout marks by 1/4�, sweep the line up and strike again. Mistakes in layout carry all the way through the process and then grow, through what I call "job creep." Start perfect � you won�t get better. Don�t assume someone farther down the line will correct things. More likely, they will add their mistakes to yours and those mistakes will accumulate into sloppy, unacceptable work. Often, when chalking long walls, a third person will jump in and hold down the middle of the line with his finger, snapping each half. I discourage this because no matter how tight you pull your line (and it needs to be tight) unevenness in the floor often skews straightness. Pinning it down in the middle does not allow the line to self-correct when lifted before the snap. Just pull the line high and straight up, snap, and then have your helper do the same on the other end. Avoid lifting the line at an angle: that is the surest way to get a "double" line because the string will bounce on contact with the floor. I have found that marking and striking both sides of each wall is the best way to avoid "shoot-down" mistakes. If there is danger losing your lines, spray them with clear lacquer. I spray them lightly at the "crow�s feet" and will rechalk when shooting down track as necessary. How far you place door openings from inside corners is often spelled out on the prints; if not, try to leave your finisher enough room to get at least a 4� knife between the door frame and the adjacent wall. How wide you make door openings depends on the type of frame being used and how the door clips are attached. The rule of thumb for welded jambs is 2-1/8� X 2 plus the door width. So a 3�-0� door with welded jamb would require a 3�-4-1/4� opening. After-drywall knockdown frames typically need 1� past each side of the door, so a 3�-0� door with knockdown frame would require a 3�-2� opening.
Contractor to Contractor: The Five Questions That Really Matter for Interior Contractors

What makes for success as an interior contractor and what are the basics of staying in business? An experienced contractor takes a look at some of the misconceptions that plague the industry and brings the focus back to fundamentals that can help you understand the full value of your skill set. Read More...
Track
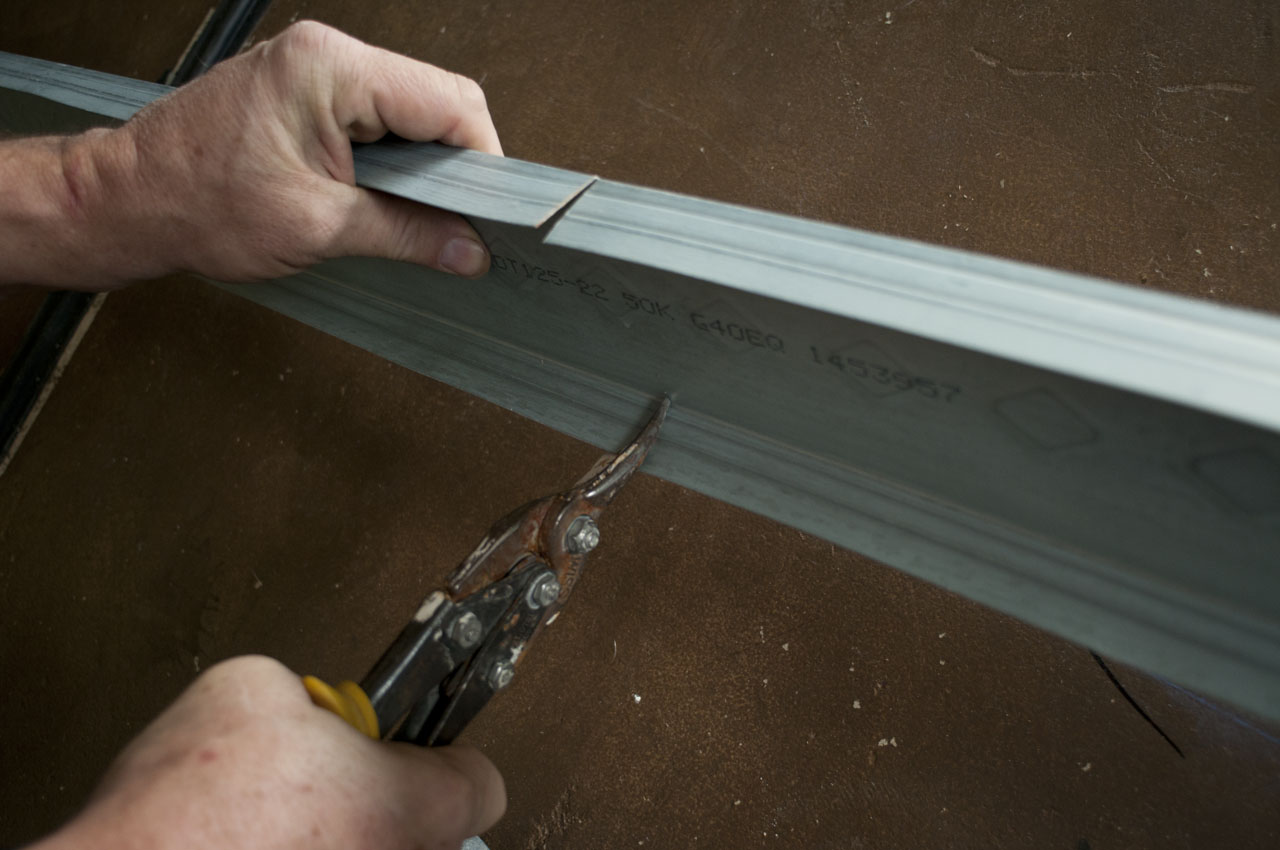
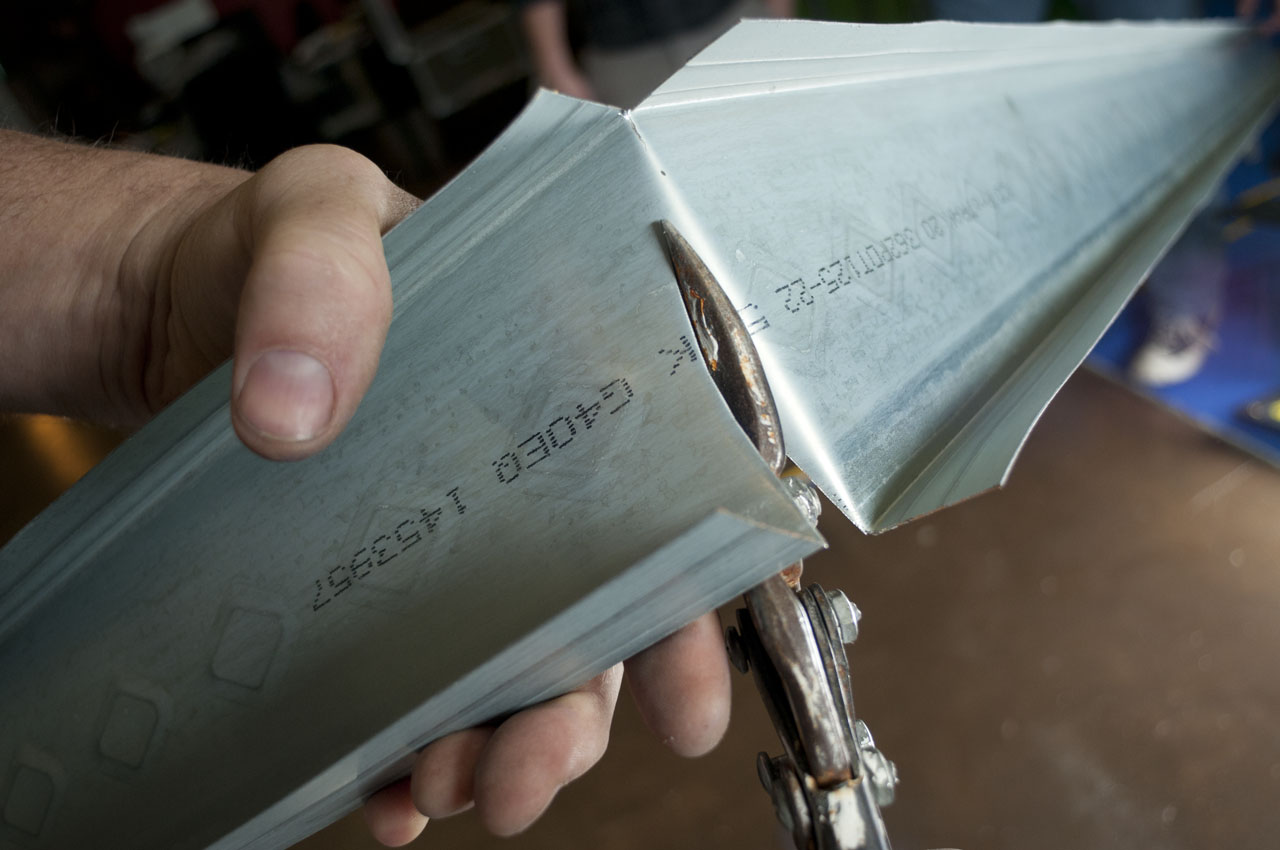
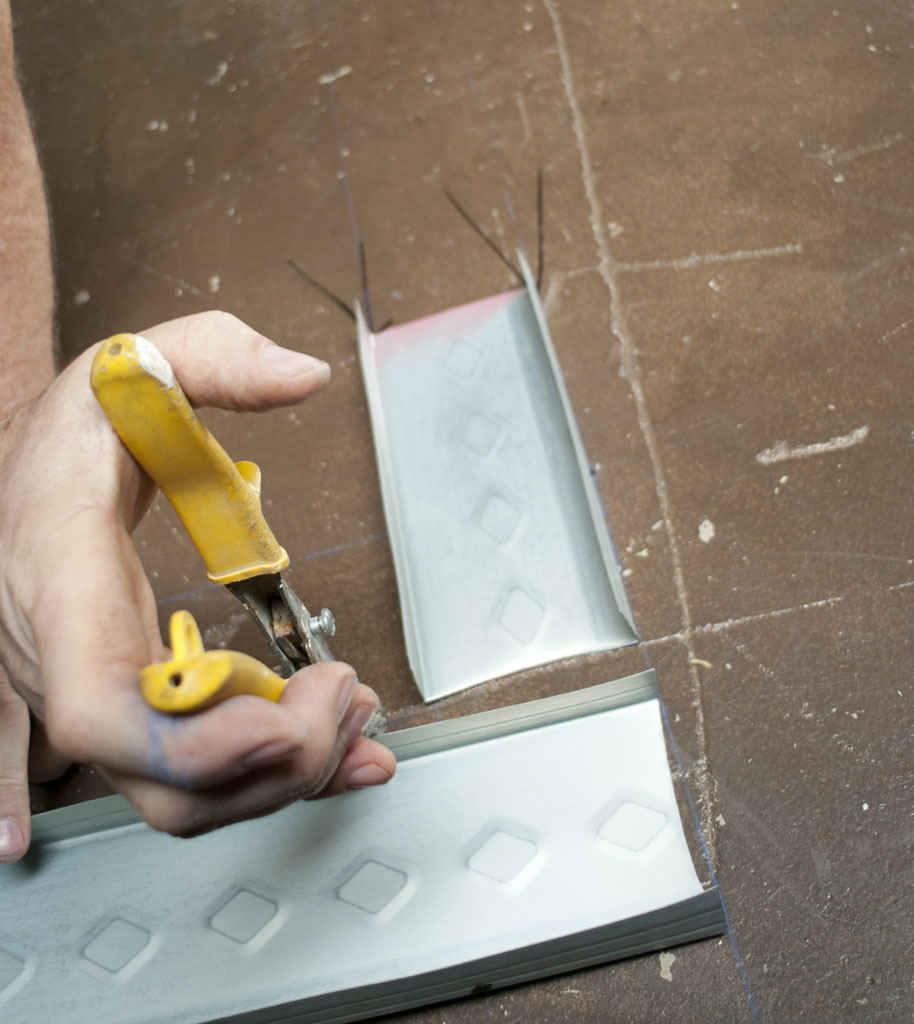
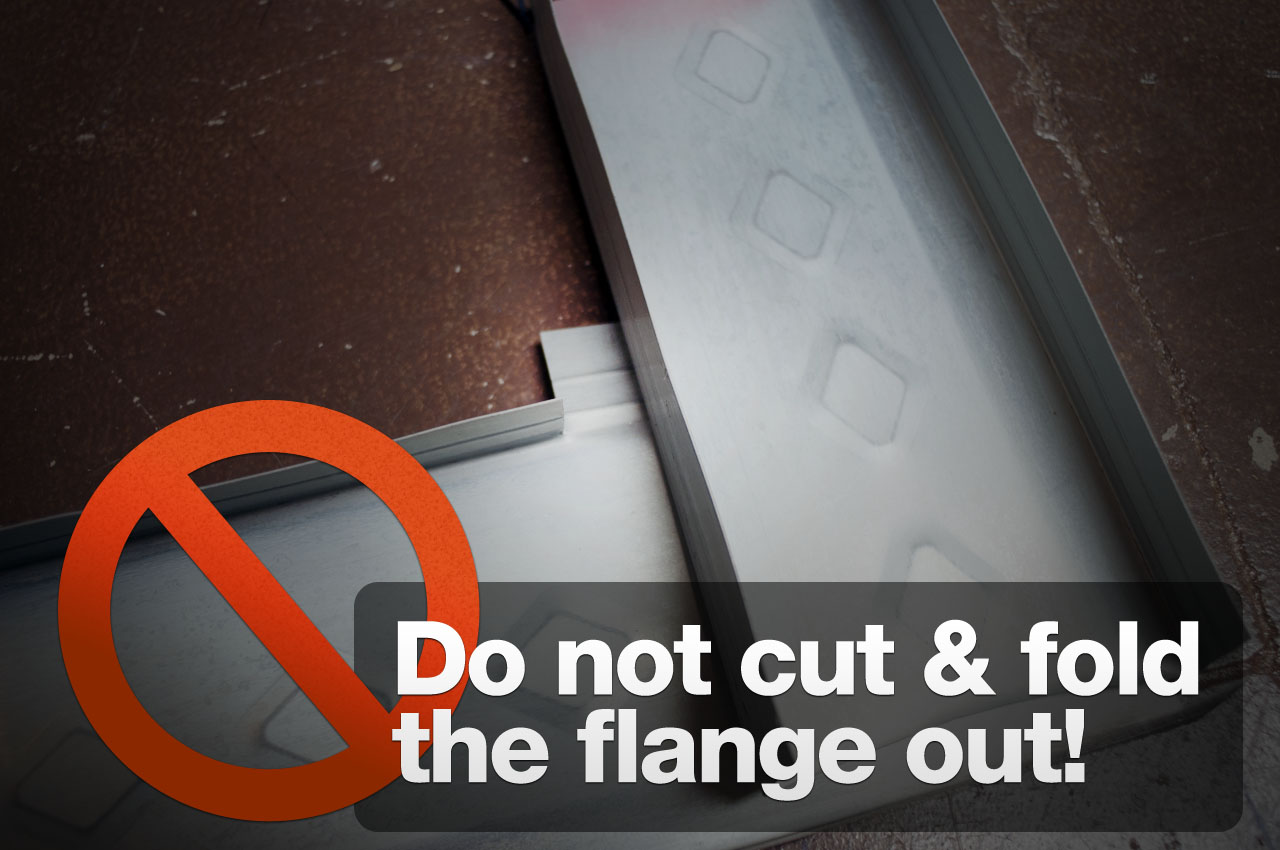
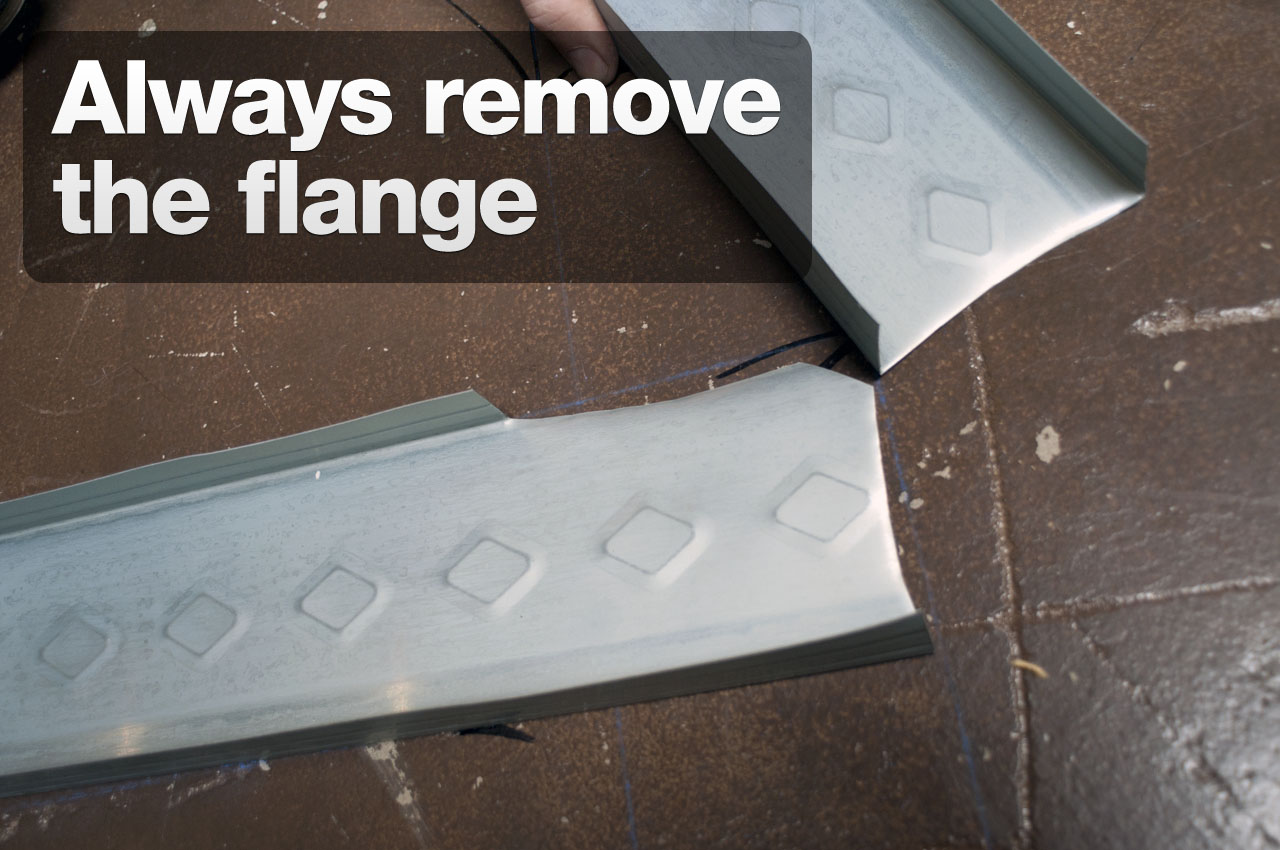
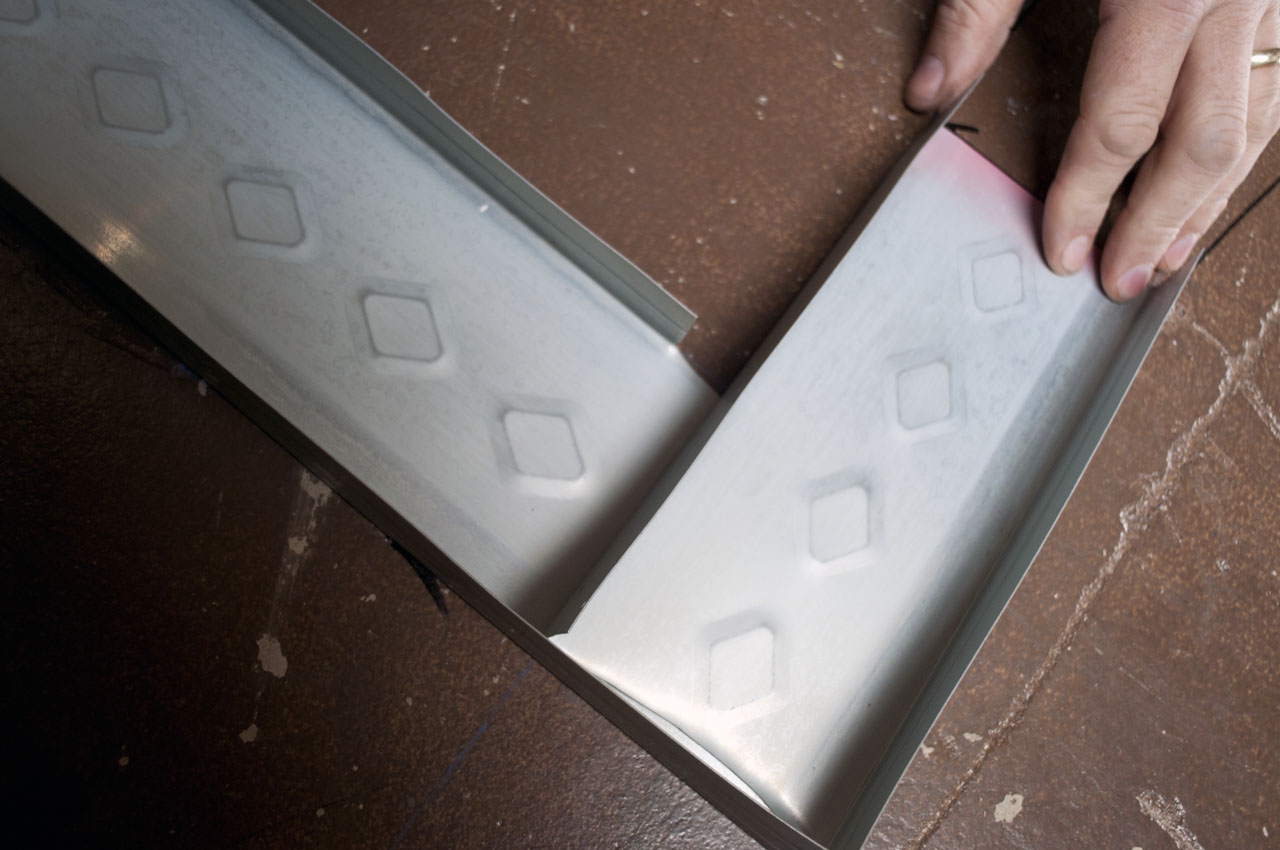
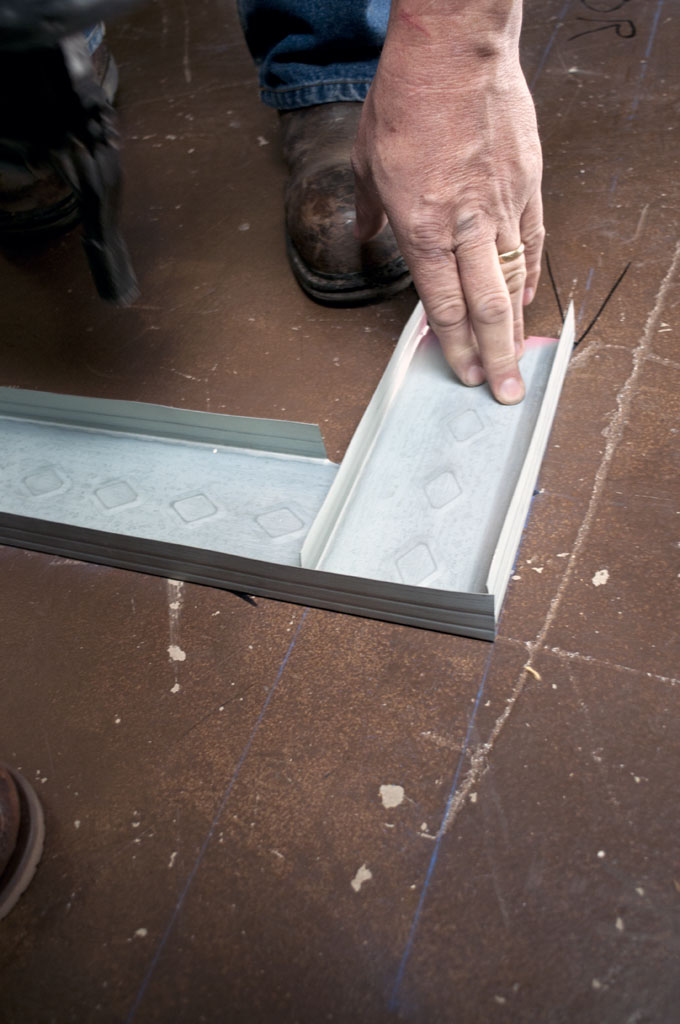
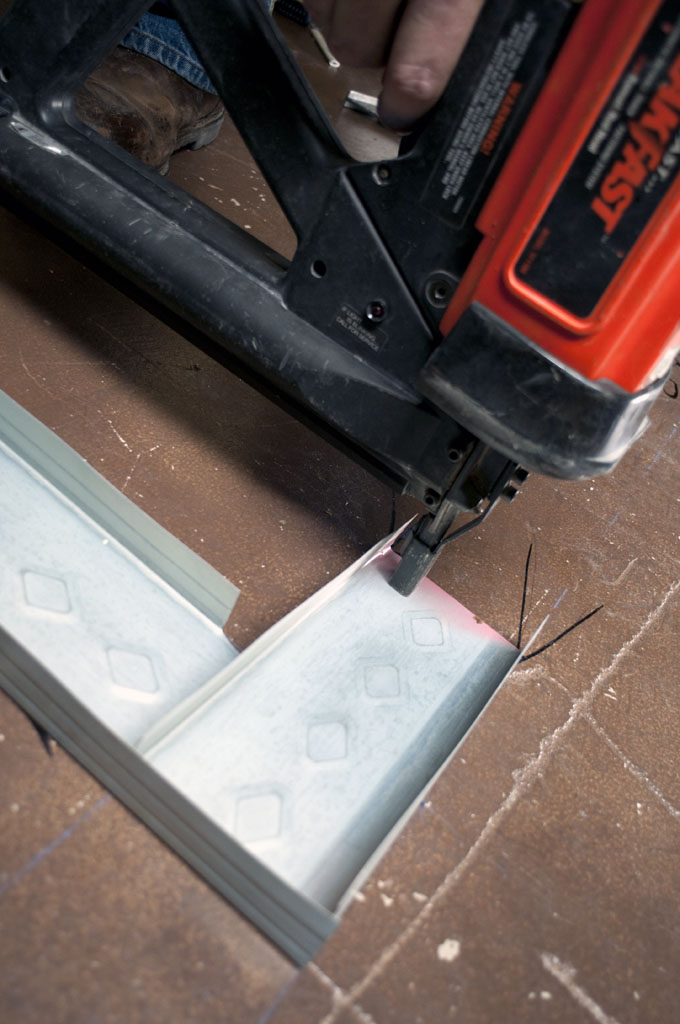
After the layout is complete, start thinking about which walls need to be hung first. Of course, exterior walls, corridor walls, and full height walls need to be built before the rest of the partitions, but try to think like a drywall hanger and provide a smooth "path" of studs for them to hang. I tend to hang drywall from left to right, so I lap my corners counterclockwise around a room. This is the natural progression for a right-handed hanger. For 3-5/8� walls, cut 4-1/4� to 4-3/8� off one end of the inside flange of the track that will receive the floater or slap stud. (Do not cut and fold the flange out! This will stick out past the drywall and cause unnecessary grief for the flooring guy.) Lay the end of the other piece of track on top of this piece so the outside flanges touch. You should have a gap on the inside wide enough for drywall to slide into without binding, but not so wide that the floating stud falls out. Prioritize what you shoot down by this rule of thumb: corners first, then wall ends, then door edges, then track ends, then everything else. For corners, line up both pieces of track on their marks and put firm pressure on the corner, taking care to not move the track, then shoot it down. I generally shoot my first pin about 2� off center in case it blows out. If it does, lift the track, brush out any debris, reset the track, and try again 2� away. One pin should hold both pieces down. Go to the other end of your track, shoot it down, and then fasten the rest of it. Some track will have a crown in it, so you might have to apply side pressure with your foot to align it to the chalk line. Some prints prescribe what fasteners you use and their spacing. As a general rule, 16� on center zigzagging as you go is enough for powder or gas loads. Small pieces of track can be hard to shoot down and keep aligned, so avoid using them near corners or doors unless you have to.


A word about cutting studs and track
You can cut 20 and 25 gauge drywall metal easily with snips. Some people like to snip the flanges, score the web with a utility knife, and "wing" the track back and forth until it separates. This gives you a nice straight edge but is time-consuming. My preferred method is to cut both flanges, bend the web, then cut a slightly arcing "smiley face" from point to point. This is efficient, but it can produce a good deal of hand fatigue on a job with a lot of cutting. On larger jobs, if you use a chop saw, understand the dangers of burning the galvanizing off the metal. Have adequate ventilation. The concentrated vapors can and will kill you. Also, use every precaution when operating a chop saw: have guards in place, secure the stock, wear eye protection, and stand out of the way of the blade rotation.


Confidence comes with competence. Practice will make you better. Don�t be shy about checking your work as you go. If things get out of square, backtrack and find the problem. Good layout and shoot down make the job. Crisp, straight lines are a great calling card! Good luck!
Detail Gallery of the Track Layout Process:


Related Content:

Contractor to Contractor: Installing Welded Hollow Metal Door Frames
In this installment of Rob Thimmes� series on framing walls with light gauge metal studs, he reviews the basics of hollow metal door frame installation.
During your framing process, the question of when you should set welded hollow metal door frames must be addressed. Many contractors prefer to install door frames before the walls are built. This facilitates the ease of fastening the �feet� down to the floor. After the frames are fastened down, braces are required to keep wind or inadvertent contact from toppling the freestanding frames. Read More...

Contractor to Contractor: Framing Out Openings
Contractor to Contractor: Follow professional interior contractor Robert Thimmes as he demonstrates how to frame-out openings. This third installment in a series of articles, Framing Walls With Light Gauge Metal Studs, visits the common practices for the framing of window and door openings. Read More...

Contractor to Contractor: Standing Up and Bracing Off Walls
Contractor to Contractor: Follow professional Interior Contractor Robert Thimmes as he demonstrates how to stand up and brace off walls. This second in a series of articles, Framing Walls With Light Gauge Metal Studs, starts with your walls located, lines chalked and bottom track already shot down (for details on this process, see Metal Stud Track Layout and Shoot-Down). Read More...

Light Gauge Metal Stud Framing
Planning and Best Practices
The light gauge metal stud framing phase of a project significantly impacts several other trades. It is no secret that good planning and practices will achieve higher production rates and a level of quality that meets the project's specifications. Planning and layout should be the responsibility of the project foreman; however, everyone should be involved with preparing the work flow. While actual layout is underway, other production items should also be thought through. Read More...


Robert Thimmes
Rob Thimmes, 30 year veteran of the interior trades and 15 year owner of Homefront Construction Company, still wears his tools most days. As owner/operator of a small business, he has worn all the hats: estimator, accountant, truck driver, warehouse man, project manager, superintendent, foreman, journeyman, and laborer. When he's not on the job he enjoys writing, blacksmithing, church, his family and 'solving all the world's problems'.