Iíll admit that setting aside a day to make holiday gifts by hand sounds abundantly more appealing to me than standing in the eternal checkout lines. More importantly, few things mean more to me than receiving a gift from someone I love that was made thoughtfully by hand.
Handmade gifts are special, regardless of how simple or extravagant they may be. What better way to show everyone you love how special they are than by making them something unique and creative this holiday season!
Each of these quick do-it-yourself projects is not only inexpensive and a cinch to make but is made from recycled materials with simple tools!
ONE Wine Cork Coasters

Tools & Materials
(to create a set of 4)
-
Hot glue gun
-
32 wine corks

These coasters are perfect for the wine lovers in your life and take just a few minutes to make!
Step 1 Using your hot glue gun, begin by tacking your corks together into sets of two. Try to select corks that are roughly the same size. (You can trim them with a utility knife if necessary.)


Step 2 Once your glue has dried, use your pairs to create an alternating pattern and begin assembling each of your coasters, gluing as you go. Each coaster will consist of four sets of two.
Tip Be sure to use thin, lean lines of glue to avoid any drips running down the sides of your coasters!
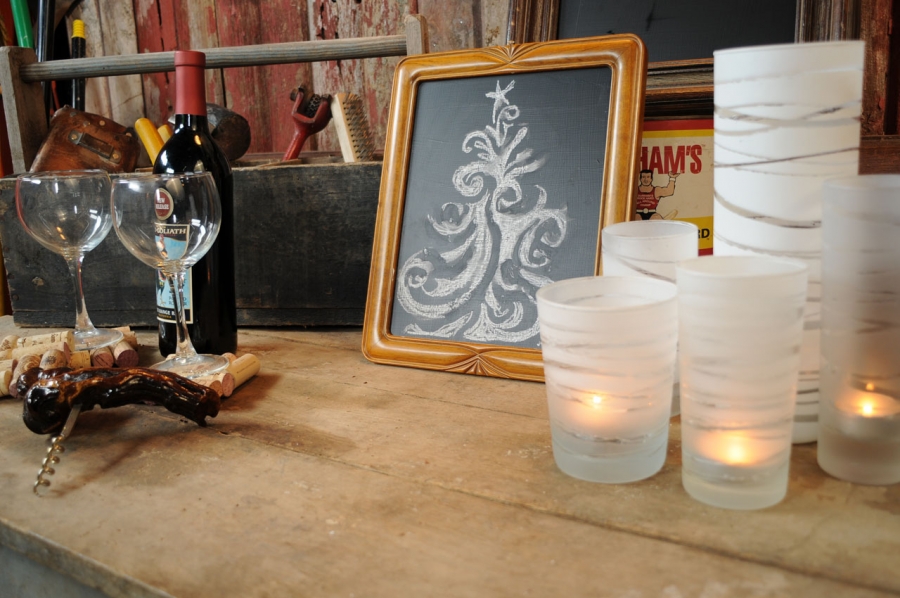
TWO Framed Chalkboards


Tools & Materials
-
Old picture frames
-
Spray primer
-
Chalkboard paint
-
Paintbrush
-
Chalk
Create a beautiful chalkboard simply by painting the glass in frames that you may already have lying around the house. Be sure to include a few pieces of chalk when youíre wrapping up this sweet gift!
Step 1 Disassemble your picture frame and backing to retrieve the glass. Clean the glass thoroughly.
Step 2 Apply a thin, even coat of spray primer to one side of the glass and allow it to dry completely.

Step 3 Apply two coats of chalkboard paint to your glass. To create a perfectly smooth surface, apply your first coat in one direction and allow the paint to dry completely before applying your second coat.


Paint on your second coat, running in the opposite direction of your first brushstroke. Chalkboard paint tends to be very thick, so donít worry if it appears to be going on unevenly Ė once it dries it will smooth out.


Step 4 Place your glass in your frame and reassemble the backing.
Tip Be sure to read the instructions on your paint before using these chalkboards Ė mine required 36 hours of drying time before I could apply chalk!
THREE Modern Frosted Candle Votives

Tools & Materials
-
Rubber bands
-
Window frosting spray paint
-
Tea lights
-
3Ė7 Clear glasses or vases

This beautiful luminary is the easiest DIY project in the world and a complete showstopper! Check your local thrift shop for clear glasses and vases of varying heights and sizes to create interesting arrangements of these modern frosted candle votives.
Step 1 Wash and dry your glassware.
Step 2 Wrap rubber bands of varying thicknesses around your glass at different levels to create irregular organic patterns.


Step 3 Spray a thin, even coat of window frosting on your glasses. Insert a piece of rolled up newspaper into the opening of your glasses to help you paint consistently all the way around. You may want to add another fine coat of window frosting to each glass to increase the contrast and make it pop.

Step 4 Allow the paint to dry completely before removing your rubber bands. Drop in a tea light and arrange these votives in a cluster for the full effect!
Tip: Putting a little bit of water in the bottom of your glasses will allow you to easily remove any melted wax from the bottom of your votive.

With a trip to your local hardware store and thrift shop, you can create these super quick and easy holiday gifts for your friends and family, even on a shoestring budget!
Happy Festivus!