How to Install a Dry-Laid Paver Patio
-
font size
decrease font size
 increase font size
Tired of eating at the picnic table on the lawn but not interested in maintaining a wood deck? Look to make a lasting impression in your backyard by installing a paver patio. Paver patios are aesthetically pleasing and are relatively low-maintenance. If you hire a contractor, you can expect to pay $15�$20 a square foot, depending on where you live and what type of paver you have selected. If you are able to set aside some time and are willing to perform the work on your own, you could save 40%�60% by doing it yourself. Let's get started!
�
Paver Patio Design
Necessary Tools

- Sod cutter
- Square shovel
- Plate compactor
- Tamper
- Tined level rake
- 2 x 4's for screeding sand
- Measuring tape
- Saw or splitter
- Rubber mallet
- Level
- Broom
- Gloves
- Eye protection
Necessary Materials
- Wooden stakes
- String
- Geotextile fabric
- Gravel
- Setting bed and joint sand
- Pavers
- Edging
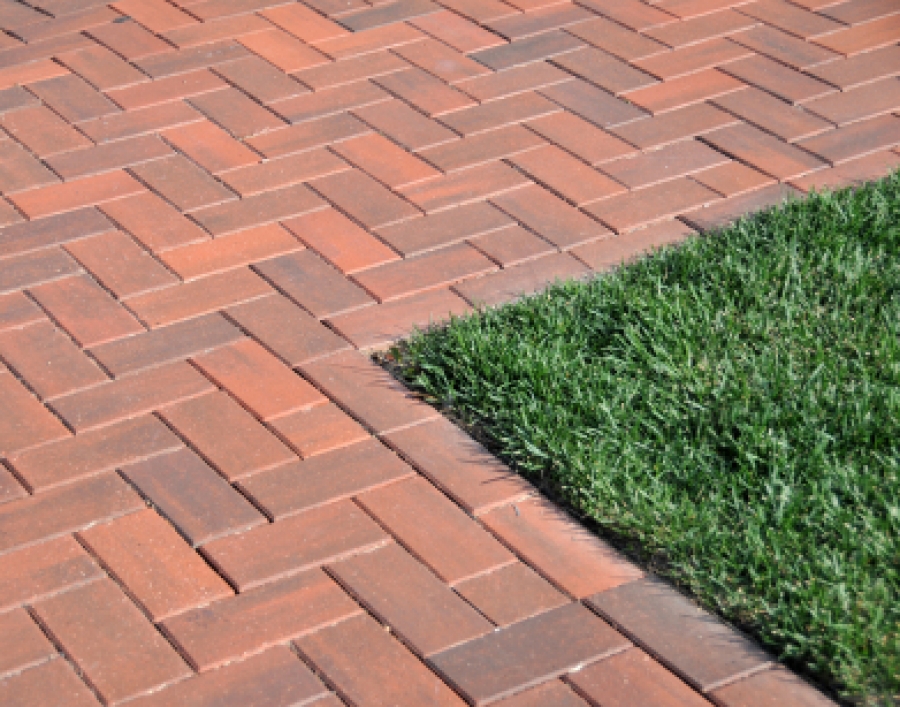
Pavers are available in a wide range of sizes, colors, and shapes. They are typically installed on level ground, within a defined area that is constrained by an edge treatment. The outer edge of a paver patio can be defined by concrete, stone, wood, plastic, or metal materials that are suitable to use as an edge treatment. Pavers are placed inside the edge treatment in a bond pattern. Some of the more popular types of bond patterns include running bond, herringbone, stock bond, and basket weave.
-
Prior to purchasing materials, measure and sketch out on paper the area where you'd like to install a paver patio.
-
Determine the size and desired shape of the patio, taking into consideration what the patio will be used for and the size of your outdoor furniture, grill, etc.
-
Select a paver, an edge treatment, and a bond pattern.
-
Call your local utility company to schedule a time for them to check and mark buried wire, cables, and pipes.
-
Once you have designed the patio and selected the materials, ensure that you have or have access to the tools necessary to complete the job. Using your the measurements and sketch, estimate the amount of material that you need. Be sure to purchase extra pavers to accommodate any wasted material.
Paver Patio Excavation and Layout
After securing the necessary tools and purchasing the materials, it is time to excavate. Quick Tip: It is important that a patio slopes away from the home. A minimum slope of a 1/4" per foot will direct rainwater away from your home's foundation and onto the lawn.
-
Using a measuring tape, mark the location of the outside edge of the patio's edge treatment with wooden stakes.
-
Wrap string tautly around the wooden stakes to define the outer edge of the patio.
-
Step back and look at the defined shape of the patio. Ensure that it suitably relates to your home and any surrounding landscaping. Make any necessary adjustments.
-
Using a sod cutter (if necessary) and a square shovel, excavate 8" for the depth of the patio. An 8" depth allows for 4" of gravel, 1-1/2" sand, and a 2-1/4" thick paver. Depth may vary depending on the thickness of the pavers.
Paver Patio Base
 Now it is time to prepare the base of the patio. A dry-laid paver patio is a flexible system of materials that move in unison with one another. It is vital that the base of the patio be properly prepared. Depending on the type of edging you have selected, edging should be installed either after excavation, after compacting the gravel, or after the pavers have been placed.
-
Fill any voids in the bottom layer of soil and uniformly tamp the soil to a depth of 8".
-
Place a geotextile fabric over the top of the compacted soil.
-
Place and rake gravel to a depth of 4" on top of the geotextile fabric. Fill any voids in the top layer of gravel. Use a plate compactor to compact the gravel base.
-
Place and rake sand to a depth of 1-1/2" on top of the compacted gravel. Fill any voids in the top layer of sand. Using a 2 x 4, screed the sand level.
Paver Installation
With your base in place, you can begin seating the pavers. You will want to define a starting point based on the bond pattern you have chosen. If necessary, use string and stakes to create a level guideline that is elevated over your work surface.
-
Start from the house, outer edge, or a point in the middle that will allow for the most efficient use of material and provide the most aesthetically pleasing pattern.
-
Place pavers a minimum of 1/16" to a maximum of 3/16" apart.
-
Cut pavers as needed with a diamond bladed masonry dry saw, wet saw, or splitter.
-
Use a plate compactor to bring the top of the pavers to an even level and proper surface height.
-
Spread sand over the top of the pavers and brush sand into the joints with a broom.
-
Repeat compacting and filling joints with sand until they have been filled and the pavers are tightly secured.


After you have placed and compacted the pavers and filled the joints with sand, you have completed your dry-laid paver patio. You can choose to seal the pavers with a masonry sealer so they are more resistant to weather and staining. However, you should be aware that you will need to repeat this every couple of years. Over time, wind and rain will wash sand from the joints � be prepared to refill these areas from time to time. At this point, the outside edges of the patio can be reseated and/or landscaped. Sweep the patio regularly and keep it free of debris. Place your outdoor furniture and grill in their new locations and get the party started!


Jeff Calcamuggio
Jeff is an Editor-at-Large for Buildipedia.com who writes and edits Featured At Home and Knowledgebase content. Prior to joining Buildipedia, Jeff's work experience included carpentry, construction documentation, specification writing, construction administration, project management, and real estate property inspection. Jeff is a member of the Construction Specifications Institute (CSI) and an educator at Columbus State Community College and enjoys challenging DIY home improvement projects.
�