Installing Welded Hollow Metal Door Frames
Wed, Mar 14, 2012Reviewing the basics of hollow metal doorframe installation.

Rob Thimmes, 30 year veteran of the interior trades and 15 year owner of Homefront Construction Company, still wears his tools most days. As owner/operator of a small business, he has worn all the hats: estimator, accountant, truck driver, warehouse man, project manager, superintendent, foreman, journeyman, and laborer. When he's not on the job he enjoys writing, blacksmithing, church, his family and 'solving all the world's problems'.
Reviewing the basics of hollow metal doorframe installation.
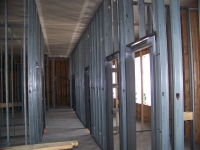
Contractor to Contractor: Follow professional interior contractor Robert Thimmes as he demonstrates how to frame-out openings. This third installment in a series of articles,�Framing Walls With Light Gauge Metal Studs, visits the common practices for the framing of window and door openings.
When plumbing your openings and transferring your layout to the top track, turn your stud 90 degrees and attach your level high on the stud flange. Align the bottom edge of your stud with the edge of your opening, get the bubble "dead-on" and mark the top. Attaching your level to the flange rather than the webbing gives you a straighter surface that is less prone to bow, thus reducing variables and improving quality. Since one side of your opening has been plumbed, now just measure over the actual width of the opening and mark to establish the top of the other side.
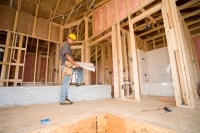
Contractor to Contractor: Follow professional Interior Contractor Robert Thimmes as he demonstrates how to stand up and brace off walls. This second in a series of articles, Framing Walls With Light Gauge Metal Studs, starts with your walls located, lines chalked and bottom track already shot down (for details on this process, see Metal Stud Track Layout and Shoot-Down).
In the previous installment of �Contractor to Contractor,� we reviewed the details of how to perform the track layout and shoot-down for metal stud walls. Now we move on to the second part of our discussion: standing up and bracing.

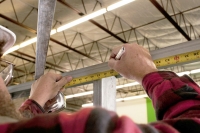
Contractor to Contractor: Follow professional Interior Contractor Robert Thimmes as he produces a layout and final shoot-down of a metal stud track system.
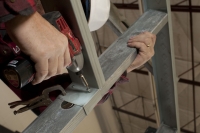
Plumb, level, square, and straight: all carpentry is the same, right? Well, no. Basic building principles apply, but how you build with metal studs differs greatly from building with wood. The following discussion offers a systematic explanation of installing metal studs, with various best practices for each step.
What makes for success as an interior contractor and what are the basics of staying in business? An experienced contractor takes a look at some of the misconceptions that plague the industry and brings the focus back to fundamentals that can help you understand the full value of your skill set.
Being in business in this economy means understanding the fundamentals of our industry and where it's going. As a small business owner I've seen my fair share of ups and downs. Usually most of the misunderstandings and problems can be solved by a little inquiry and a lot of listening.