How to Install Kitchen Base Cabinets
-
font size
decrease font size
 increase font size
Video
Cabinets are a fundamental part of any kitchen. Kitchen cabinets not only provide storage, but they define spatial organization and workflow for one of the most used spaces in a home. As such, cabinets are a focal point of every kitchen, and proper installation is essential to both aesthetic and functional qualities. The cabinets need to be square, level, and secure so doors and drawers operate properly and provide stable support for the countertops and fixtures. With the right tools and a little patience, installing kitchen cabinets is a project any do-it-yourselfer can handle. Join our host, Jeff Wilson, as he installs new base cabinets for a small kitchen.
The first step in any successful kitchen project is to determine a layout. Kitchen cabinets are available in a wide variety of sizes, functions, and styles, and they can be designed and arranged to fit kitchens of any size and shape. Prefabricated modular cabinets are the most common, available in lengths based on 3” increments, with 24” the standard depth of base cabinets and 12” the standard depth of wall cabinets. With design and layout easily manipulated on a computer, kitchen retailers and designers can provide expert assistance and produce 3D renderings of several kitchen layouts and even show what they would look like with various types of cabinets.
For our project, the kitchenette contains only base cabinets, including a 12” deep base cabinet on the short wall, and a standard base, a sink base, and an end panel to cover the side of the undercounter refrigerator on the long wall.
Check the Layout
Necessary Tools
- Pencil
- Tape measure
- Power drill
- Hole saw bit (various sizes)
- Level
- String line
- Wood shims
- Hammer
- Jigsaw
- Screwdrivers
- Wood screws
- Finish nails
- Nail set
The key to successfully installing kitchen base cabinets is maintaining a square and level assembly. Most kitchens will have variations in the dimensions and squareness of the space, so it is important to understand your specific space and how it will affect the installation of the cabinets.
Arrange the cabinets in their approximate locations, using layout drawings to verify that all cabinets are accounted for. Visually inspect the cabinets for any defects and check for proper operation of doors, drawers, and other built-in accessories: once the cabinets are installed, it can be prohibitively difficult to remove them if a defect is discovered.
Checking the layout also helps to identify locations where fillers, or spacers, will be needed. Fillers are strips of wood that match the face of the cabinets and are used to fill in or extend spaces between standard-sized cabinets. They also are useful for extending the cabinet faces in corners when the cabinet doors are a full-face style. Full-face style doors cover most of the cabinet frame and won’t open properly if set too close to a perpendicular corner cabinet. At a minimum, a 1-1/2” filler strip should be added to each cabinet face that meets in a corner when the cabinets have full-face style doors.
Typically, the best place to start installing kitchen cabinets is in a corner. A square and level corner provides a base point for keeping things straight as you move down each wall. It is also easier to install any necessary fillers with the first few cabinets than to fit a small strip between the corner cabinets after everything else is set in place.
Install Spacers or Filler Strips
For our project, we are using full 3” wide spacers to extend the face of both cabinets that form the corner. This will ensure that we have plenty of room to fully open the cabinet doors and drawers.
-
Begin by removing any doors or drawers so that you have open access to the inside edges of the cabinet face frames.
-
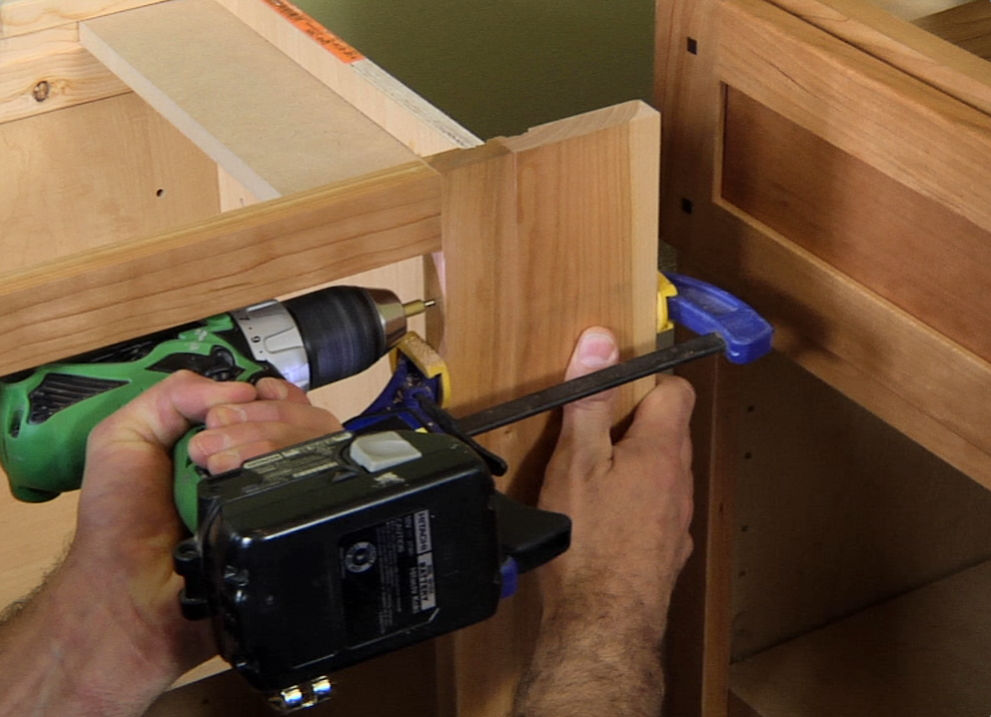
Use adjustable clamps to hold the spacer tight to the edge of the cabinet, so that both faces, the top, and the bottom are flush. Quick Tip: Use shims or small wood blocks to distribute the pressure produced by the clamps. This will minimize the chance of making an imprint in the finished wood of the cabinet face.
-
Drill three or four level pilot holes through the side edge of the cabinet face and into the side of the spacer strip. The pilot holes make it easier to install the connecting wood screws and to minimize the chance of splitting the face of the wood. Be sure to use a drill bit smaller than the diameter of the wood screws so that the screws still have wood to grab onto as they are installed.
-
Install wood screws in the pilot holes. Use screws long enough to penetrate through the cabinet frame and at least 1" into the spacer strip. Tighten screws completely. Quick Tip: Rubbing wood screws in beeswax helps them to turn smoother when installing.
Install the Corner Cabinets First
With the spacers attached, connect the two cabinets that will form the corner.
-
Butt the spacers perpendicular and use a framing square to align the cabinets so that they form a 90° angle.
-
Check for level and a consistent reveal down the face of the spacer and clamp the spacers together at the top and the bottom.
-
Drill pilot holes.
-
Install the wood screws.
Now that these two cabinets form the corner they can be attached to the wall. Typically, base cabinets only need to be attached to the wall to secure them in position. The weight of the cabinets all connected together and at the wall, in addition to the countertop, will act to keep the cabinet assembly in place.
When connecting the cabinets to the wall, it is important to secure them to the framing or the screws will just pull through the drywall. If blocking was added during the rough construction or remodeling, the cabinets can be attached anywhere along the back rail. If there is no blocking, connections must be made at the studs. Use a stud finder to identify the stud locations and mark them appropriately. If you do not have a stud finder, a nail can be used to punch a series of test holes until solid framing is found. (It is best to do this in a location that will be covered by the cabinet or countertop.) Once a stud is located, measure in 16” segments to check the locations of other studs, as studs are commonly laid out at 16” from center to center.
-
Position the cabinets in the corner and check for level. Use shims behind the top back rail and under the bottom front of the cabinet to level the cabinets horizontally and vertically.
-
Install wood screws through the top back rail into the studs in the wall.
Install the Remaining Base Cabinets
With the corner cabinets secured in place, the remaining cabinets can be attached in the same manner.
-
Connect the faces together first, using the clamps to hold the cabinet faces flush. Use a straightedge or taut string line to keep the front of the cabinets aligned.
-
Drill pilot holes.
-
Install wood screws to connect the faces together.
-
Check for level and shim at the floor and back wall as necessary.
-
Attach the subsequent cabinets to the wall at the framing through the top back rail.
A few cabinets, like a sink base, may require access holes to allow for rough plumbing, electrical outlets, or mechanical ducts. Align the cabinet in the approximate position and mark the locations to cut the access holes. Use a jig saw for rectilinear openings and a hole saw for circular openings. Verify that the hole is properly positioned and large enough, and install the cabinet in the same manner as the others.
Install the End Panel
A common component of many kitchen cabinet assemblies are end panels. An end panel is a finished panel that matches the cabinet sides and is used to support the end of a countertop and cover the side of an undercounter fixture, such as a dishwasher or, in our case, an undercounter refrigerator.
-
Mark the location of the end panel on the back wall based on the dimensions of the countertop, layout, or the specific fixture.
-
Attach a wood cleat, such as 2 x 2, to the wall framing.
-
Align the face of the end panel with the faces of the other cabinets and use finish nails to attach it to the cleat.
-
Level the front of the panel and mark a location for an L-bracket on the inside of the panel that will hold the front bottom of the panel to the floor.
-
Drill pilot holes in the floor.
-
Install the L-bracket to the floor and inside of the end panel with appropriate screws.
Depending on when the countertop will be set, it may be helpful to install a temporary brace at the top front of the end panel to keep it from being knocked out of place.
The Finishing Touches
With the cabinets set in place, the doors and drawers can be reattached. Cabinet door hinges are typically adjustable, so tighten them enough to check that the door heights match and adjust them before tightening them completely.
Most cabinet systems will provide standard lengths of toe kick trim to cover the space where the cabinet base sets back at the floor. Measure and cut the toe kick trim to length and use finish nails and a hammer or a pneumatic nail gun to attach the toe kick against the rough face of the cabinet bases.
It may also be necessary to add other trim pieces or moldings to cover gaps or imperfections. A common location to check is at the end panels and exposed cabinet sides. If the cabinet does not fit tightly against the wall, use a small piece of trim that matches the cabinet finish to cover the gap.


Ryan Carpico
Ryan is a Registered Architect who earned a Bachelor of Architecture from the University of Kentucky in 1998. His experience in a broad spectrum of architectural projects includes design and project management in multi-family residential, general commercial, and institutional projects. This architectural experience is balanced with a background in general contracting of residential and light commercial construction projects. Ryan’s knowledge and ability as both architect and builder enable him to address both the technical and practical sides of the comprehensive body of construction knowledge.
Website: carpicodesign.com/