How To Install Door Casing
-
font size
decrease font size
 increase font size
Video
Now that you’ve installed a new energy-efficient front door, your home radiates curb appeal. Inside, though, we have one more project to complete the new look – door casing. With the right tools and a little know-how, installing door casing is a job any DIYer can accomplish. Join the At Home channel’s host, Jeff Wilson, for a quick lesson on how to install simple casement trim around a new front door.
Necessary Tools and Materials
- Wood trim
- Tape measure
- Pencil
- Hand miter saw – compound miter saw
- Safety glasses (for use around miter saw and/or nail gun)
- Finish nails – 4d, 6d, 8d,
- Hammer (or pneumatic finish nail gun)
- Nail set
- Paintable caulking
- Paint
- Paint brush
How to Install Door Casing
First you need to select the desired trim. We’re using a 3 1/4” colonial-style primed wood, but you may want to choose a different profile, narrower trim, or a prefinished or stainable version. Composite and vinyl trim are also available.
Make sure you get enough trim. For the typical front door, you will need three pieces of trim – two pieces a little longer than 7’ and a shorter piece for the head that will be a little less than 4'. Keep in mind when you buy the trim that you not only need enough total linear footage, but you need to make sure you can get all the cuts you need without having to splice.
1. Safety check. Use safety glasses and gloves for demolition work. Use safety glasses and ear protection around power tools. Always read the manufacturer’s directions before using power tools.
2. Prepare the work area.
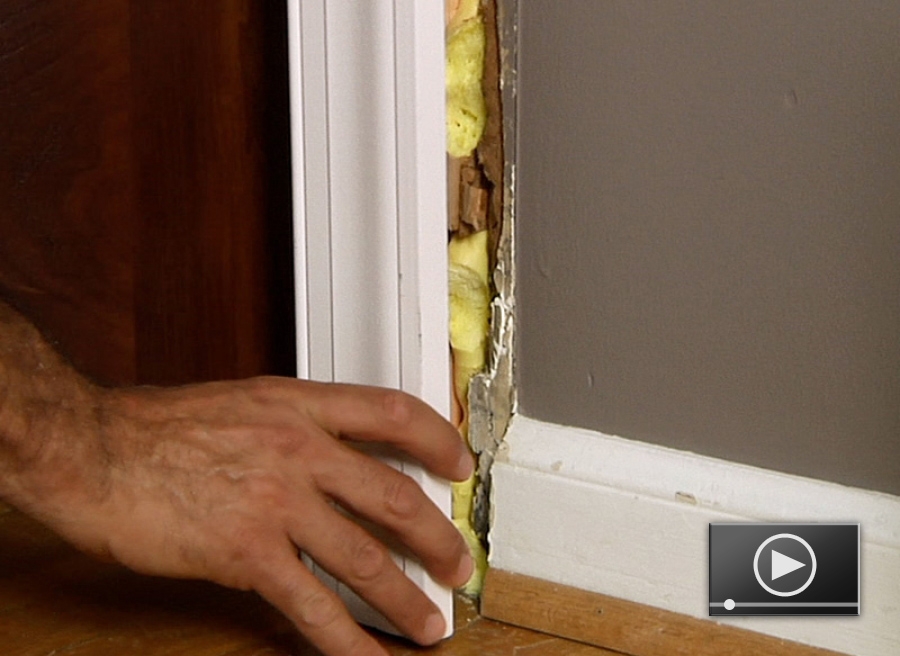
- If you are replacing door casing, use a pry bar and block of wood to carefully pry the existing casing from the wall and door jamb.
- You may also need to remove a portion of the baseboard if the new door casing is a different-sized profile. Be sure to save the baseboard for reattachment after installing the new door casing and adjusting the baseboard length.
- Use a utility knife to score any paint or caulk lines to prevent damage to the paint or wall surface.
3. Mark the desired reveal (typically 3/16” - 1/4”) from the inside edge on the jamb face. This is important because it will tell you just how long each piece will need to be.
4. Measure up from the bottom on one side to the bottom edge of the top jamb and add as necessary for the reveal along the head jamb 1/4". It’s always a good idea to check both sides to make sure they’re the same.
5. Cut the side pieces using the power miter saw.
- A hand miter saw and box could also be used.
- Cut the trim on the saw table with the fat side – the outside edge – against the fence.
- For the left-side casing, set the angle to 45 degrees left, mark the measurement to the short side, and lay it on the table so that the piece to keep is on the left. Cut slightly long and trim to get the best cut.
- For the right-side casing, reverse the angle to 45 degrees right, mark the measurement to the short side, and lay it on the table so that the piece to keep is on the right.
6. Install the left piece, and nail it into place with finish nails.
- Remember that there is a gap between the door jamb and the rough opening studs, so you’ll want some of your nails to go into the jamb edge and some to go into the rough door frame studs.
- 2” finish nails work best for anchoring to the rough door frame studs.
- Smaller finish nails (1 1/4”) work well for nailing into the door jamb edge.
7. Install the right piece the same as the left, maintaining the desired reveal on the jamb face.
8. Measure and cut the top piece. You will be cutting on 45 degrees on either end, making a V. Make your first cut on either side, then measure the length, and make your second cut in the other direction. It is better to err on the long side and test-fit the piece. If it’s too long, shave off a tiny bit at a time until it fits perfectly. It may take a few tries, but getting the right fit will be worth it.
9. Install the head piece the same as the side pieces.
10. Set, or recess, the nails with a nail set.
11. Fill the nail holes, corner joints, and any gaps between the trim and the wall with painter's caulk.
12. Once you’ve set all of the nails and caulked the holes and joints, it is time for a coat of paint.
13. If you’re using prestained or manufacturer-finished wood trim, you can fill the nail holes with color coordinated wax sticks available at most hardware and DIY centers.

Ryan Carpico
Ryan is a Registered Architect who earned a Bachelor of Architecture from the University of Kentucky in 1998. His experience in a broad spectrum of architectural projects includes design and project management in multi-family residential, general commercial, and institutional projects. This architectural experience is balanced with a background in general contracting of residential and light commercial construction projects. Ryan’s knowledge and ability as both architect and builder enable him to address both the technical and practical sides of the comprehensive body of construction knowledge.
Website: carpicodesign.com/