Exterior Painting: Tips for a Lasting Finish
-
font size
decrease font size
 increase font size
Previously in our series on painting, we looked at set-up and interior painting tips, as well as exterior paint failure due to moisture. Although most homeowners will want to leave exterior painting to the professionals, we will discuss exterior painting work that DIYers can perform. At the least, gaining an understanding of exterior painting will benefit homeowners when they're making decisions about home maintenance and improvement.
Many of our past tips translate from interior to exterior. However, we will deal now with environmental elements, so protection becomes our main concern. The finished look of a job is important but that the paint protects is the priority. To achieve this goal, the painter needs a basic knowledge of how the elements work against paint finishes and surfaces and, most especially, what rain will do and how and where it travels. Moisture is the largest cause of paint failure, as we've discussed, and, once a breach has occurred, moisture and sunlight combine to damage the exposed substrate.
Rain Damage to Exterior Wood
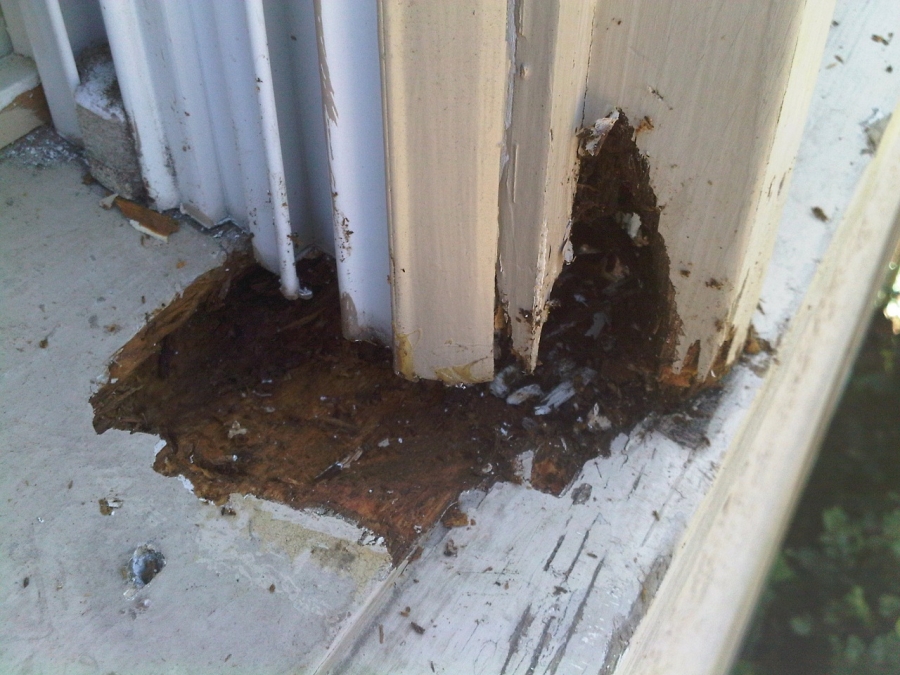
When rain breaches a painted surface, even in the smallest way, the wood becomes wet. Moisture doesn't escape the same way it enters. The sun vaporizes the moisture, which produces blisters, and pulls it out, taking the paint with it. In the photos shown here, the extent of damage was not apparent prior to prep. In fact, although the paint looked good, it peeled right off. I discovered this through sounding (tapping with my finger). The rain was entering through the meeting of the window track and sill, a flawed design and contractor failure. All the sills exposed to rainfall suffered damage because of these failures.
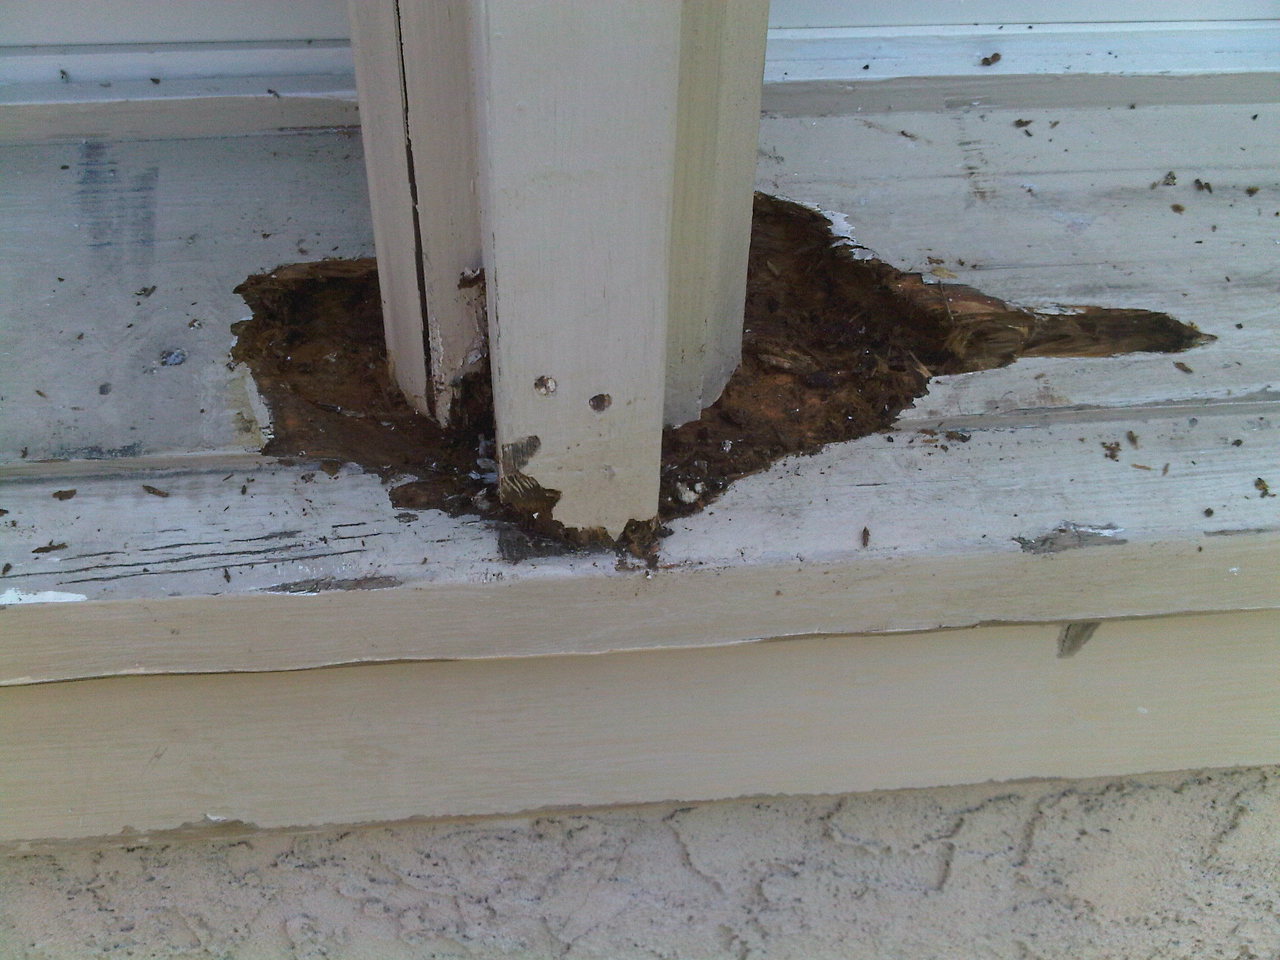
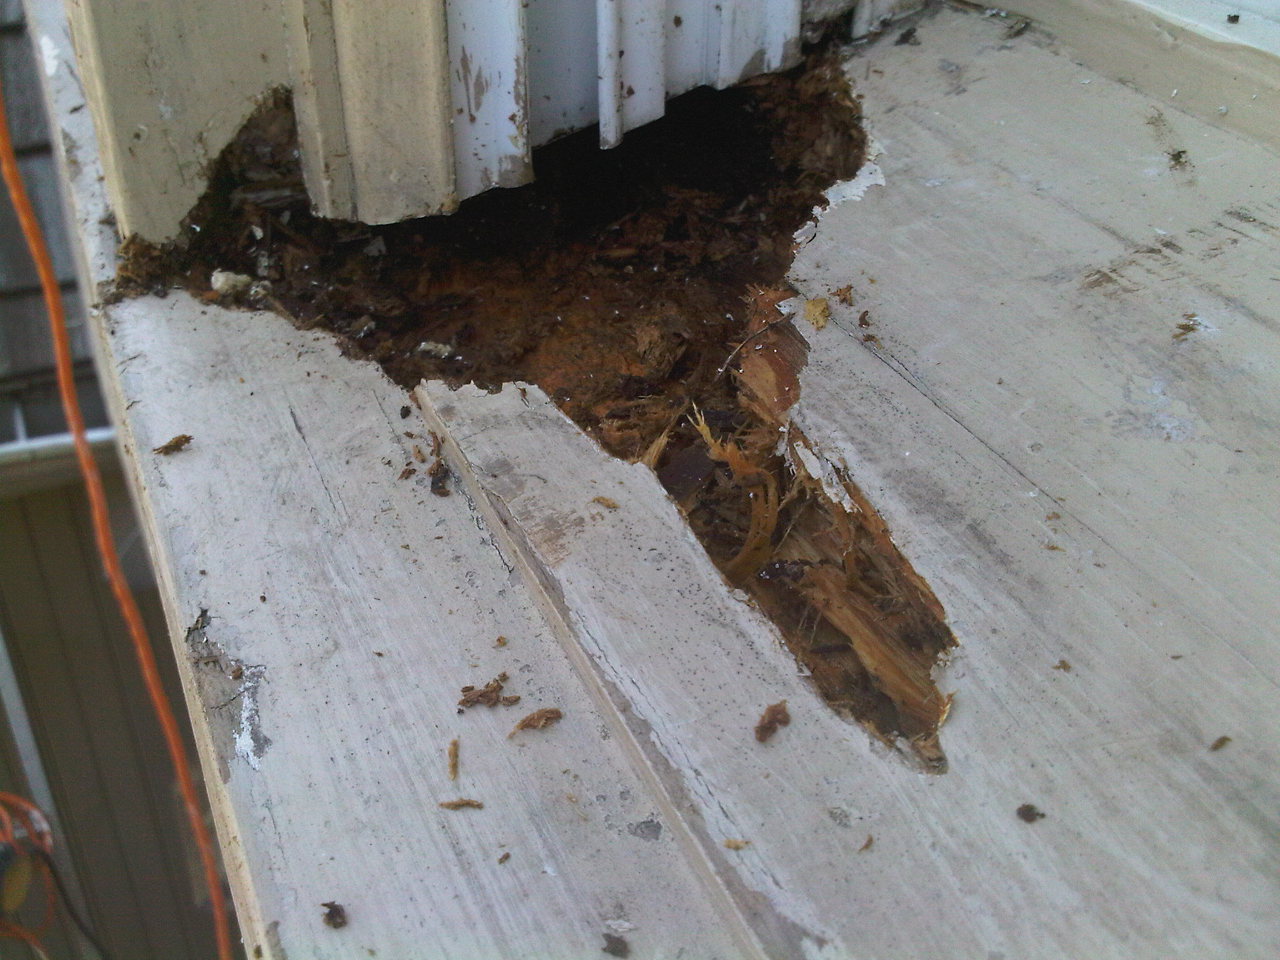
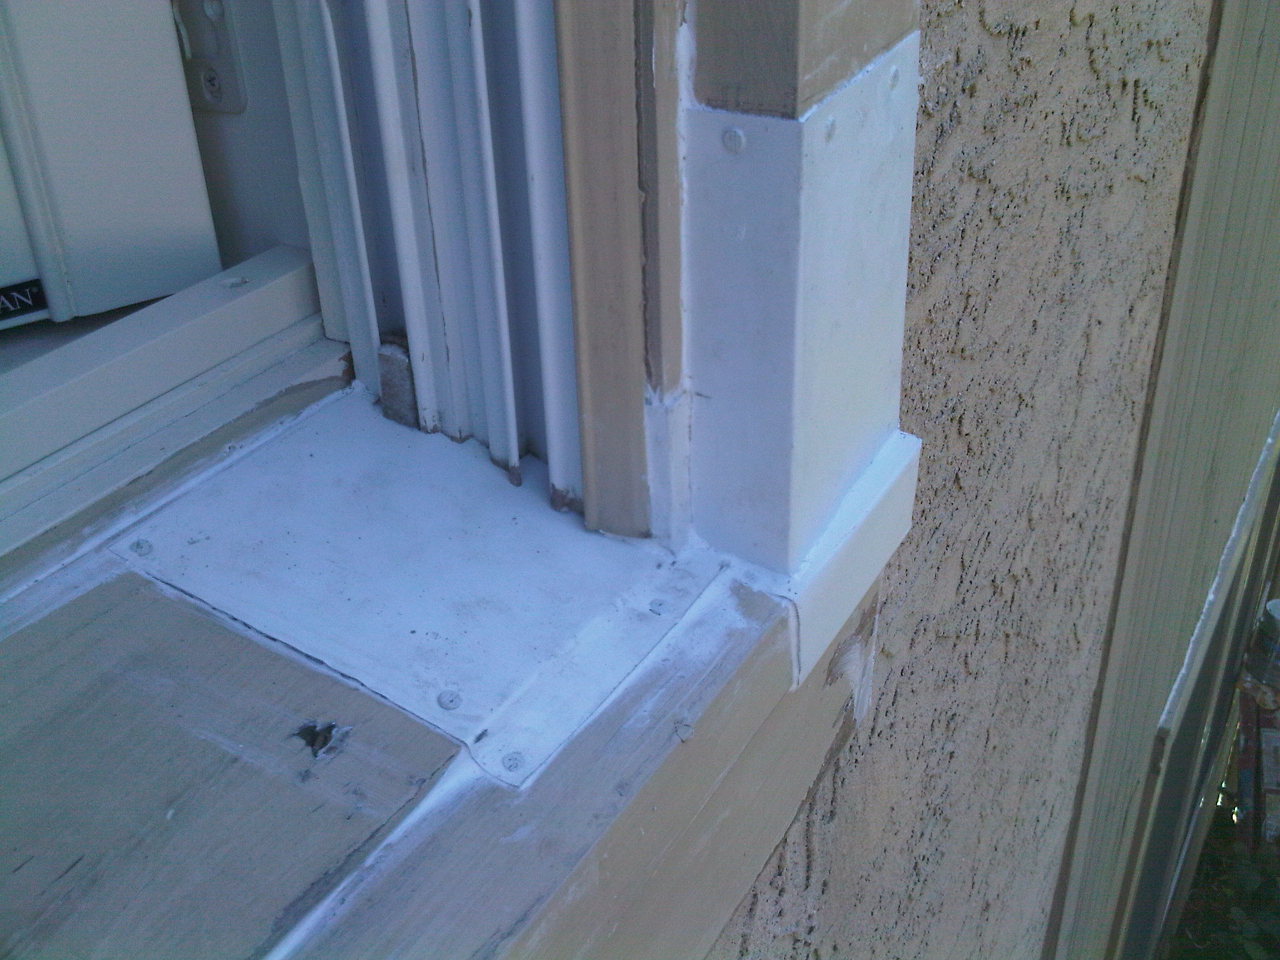
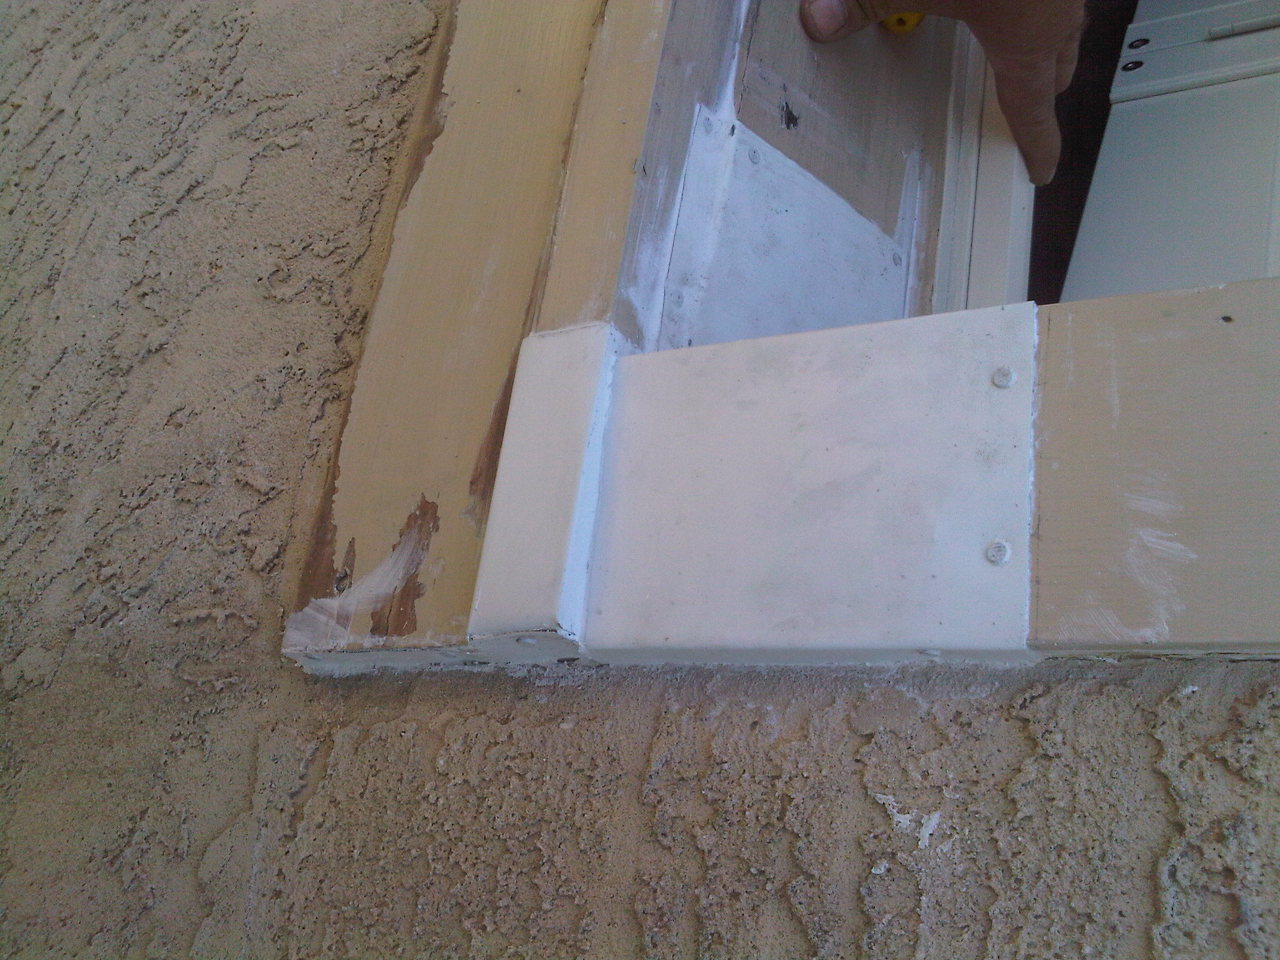
Due to cost restraints and the amount of damaged sills, fabricating aluminum patches was more economical than filling the damaged areas with compound or replacing them. After patching the damage, the side frame window tracks were caulked back to front and inside the tracks.
UV Damage to Exposed Wood Substrates
To understand how the sun's UV rays damage wood, we must understand its makeup. Wood contains a compound called lignin, which, in a very basic sense, is akin to the mortar of a brick wall. UV rays damage lignin, which weakens the bond of the wood fibers. This breakdown begins with as little as one week of sun exposure, according to the U.S. Forest Products Laboratory. The UV exposure not only damages the wood, but also decreases the ability of coatings to adhere to the surface. Consequently, since a paint coating can only be as sound as the substrate to which it is applied, the painter must remove these loose fibers for maximum adhesion.
Exterior Painting Tips
Painting Series
Painting Basics
Interior Painting: Tips and Techniques
Exterior Painting: Moisture as a Cause of Paint Failure
We've discussed two of the bigger impediments to long-term paint protection. The key to preventing these problems lies largely in preparation, time spent, and use of the proper materials.
- Acceptable Moisture Content. Acceptable moisture content is between 15% and 18%, depending on the product, and can be determined by using a moisture meter. Wood exceeding those levels needs time to dry. A pressure-washed deck requires 2-3 good drying days before treatment. If wood is drying out and rain is due, wrap it in plastic until the rain passes.
- Surface Preparation. To remove dirt and mold or algae, it is good practice to clean surfaces first, whether by hand or pressure washer, with a formula of bleach and trisodium phosphate. A pressure washer will remove a lot of old scaling paint. Alternatively, use a pull scraper to remove the loose paint, and use both hands when scraping. Also, use the scraper and a knife to remove old caulk. Next, sand the whole surface with a minimum of 80-grit sandpaper, paying special care to exposed wood. For a better-looking finish, you can feather the old paint edges or spackle them after priming. It is good policy to sand all exterior wood, new or old, before priming. Some "new" wood may only be new to you and could have some UV damage. The last step before priming is to dust the surface and vacuum the sills (especially on older homes). Likewise, before staining decks, vacuum the surface to pull the dirt out of the fastener holes.
- Priming Bare Wood. All exposed exterior wood needs a coat of primer. The primer coat provides the primary bond to the substrate for all subsequent coats. I try to avoid multipurpose primers on exterior work, preferring to use wood and metal primers, which are designed for specific substrates. The key to applying a successful primer coat is ensuring that it is absorbed by the wood. I like using long, penetrating oils, especially on older, harder wood trim. The more time the primer has to penetrate the wood the better. Latex primers, which are faster to dry, work nicely on softer woods like pine. Don't prime in the sun with latex. Penetration is a function of the drying process, which the sun will hasten, and this will retard adhesion. Primer must also be brushed into the surface, not layed on like finish, and any primer that is rolled or sprayed requires back-brushing to "massage" it into the grain. Some final thoughts on primers follow:
- Sometimes a full prime coat is good if the previous finish is especially old.
- Always follow the manufacturer's specified top-coating times, in general but especially with primers.
- Primer and two finish coats constitutes a "paint system." It is wise to use products from the same manufacturer for your entire paint system, because manufacturers design products to complement each other.
- Caulking and Puttying. After our surface is primed (never before), we want to caulk any openings and putty any holes. We don't want to allow moisture access through openings in the trim or depressions where it can puddle. On new work, I generally caulk anywhere two pieces are joined. What might look tight now might not after settlement and contraction. On all work, I always reinforce corners where verticals meet horizontals. These corners are critical. While latex paint is elastic, it only handles surface tension, and caulking provides the necessary elasticity for joints and splits. Always use a high-quality caulk and observe paint ready times.
- Applying Exterior Paint. Brush technique is basically the same for interior and exterior paint jobs. Avoid painting in direct sunlight. All final qualities of a finish, from color to sheen to adhesion and more, are a function of drying times. Anything that hastens drying will effect the paint's qualities. Drag marks will also mar the finish. Let the sun chase you around the house. Whether using oil or latex, always purchase the best quality you can afford and follow the manufacturer's specifications.
- Beyond the Paint Job. A wise springtime chore is to inspect the exterior paint for any failures that may have occurred. As rust is a cancer to metal, so is rot to wood; once established, rot is difficult to eradicate and it becomes a constant management issue. A paint job should last about 5-8 years, depending on the environment. Regular inspections and routine maintenance will prevent major failures (like those shown in the photos), keep full repainting costs down, and keep your home looking better between jobs.

Joe Sheridan
Joe Sheridan has been actively involved in the painting business, a generational trade in his family, for most of his adult life. He has worked most facets of the business, and currently runs a small paint contracting business, J.A. Sheridan Painting, in the Cape May, NJ/South Jersey area. He is now using his experience to benefit homeowners in their projects, and in their dealings with painting contractors.
Website: www.diypaintingguide.org/