How to Replace a Broken Windowpane
Depending on the age of your home, you may have single-pane windows or double-pane insulated windows. Replacing a broken single-pane window can be easily accomplished by a homeowner with the right tools, materials, and a little time, over the period of a week or so. However, if a double-pane insulated window breaks, you will need to replace it. You should contact the manufacturer of the window and replace the affected wooden glazed sash or vinyl window glass pack. If you cannot locate the manufacturer, you should hire a local glazier to replace the broken glass with a custom-fit sash or glass pack.

The following steps will help you to replace a broken single-pane window.
-
If possible, remove the window sash and set it on a flat work surface. Cover the broken pane with a towel or rag and strike the broken glass with a hammer to break it up. Remove all loose glass shards and any pieces embedded in the existing putty. Clean up and dispose of all broken glass. Quick Tip: If you are working with the window sash in place, apply tape to both sides of the broken glass in the shape of an "X" from corner to corner. Gently strike the glass with a hammer to cause it to crack and lift the glass out of place.
-
Using a heat gun, apply heat to the existing putty around the broken window pane to soften it. It is important to be cautious because overheating the glass may cause it to crack further. You also want to avoid softening the adjacent putty.
-
Using a putty knife or a 5-in-1 painter's tool, break the putty loose and remove it. Ensure that the wood is completely clean and free of the putty.
-
Using needle-nose pliers, remove the glazier's points.
-
Sand the bare wood with sandpaper and then apply a coat of exterior primer and paint. Allow paint to dry as indicated by the paint manufacturer.
-
Measure the height and width of the opening. If measuring from muntin to sash, subtract an 1/8" from your height and width measurements. You can cut the glass yourself or visit a local home improvement store or glazier to have a piece cut for you.
-
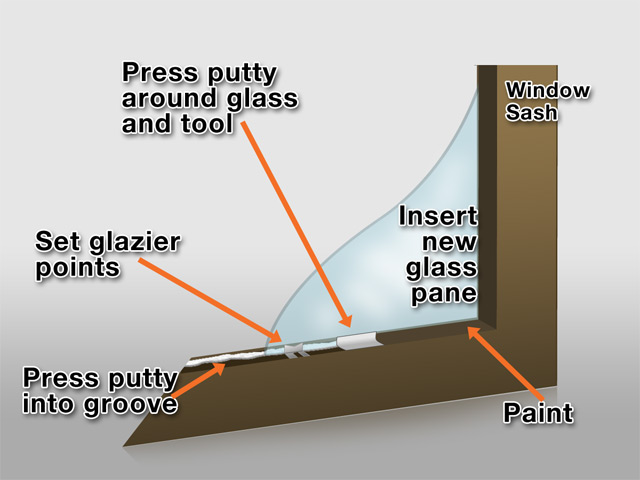
Work putty in your hands to warm it, making it pliable, and roll it into a long snakelike shape. Press the putty into the groove where the new glass pane will fit.
-
Center the new glass pane in its place. Ensure that putty has filled all the gaps between the wood and glass.
-
Set glazier's points with a putty knife. Glazier's points should be placed at the center of all four sides of a glass pane for smaller panes, or spaced every 4" for larger panes. Direct the pointed end toward the wood muntin or sash and apply gentle downward pressure to press the glazier's point into the wood.
-
Remove any excess putty that was squeezed out from the opposing side of the window.
-
Once again, work putty in your hands into a long snakelike shape. Place the putty around all of the the edges of the glass, adjacent to the muntin or sash. Press the putty firmly into place.
-
Using a putty knife on an angle similar to the interior muntin profile, tool the putty, so it becomes flat and smooth. Remove any excess and ensure that the putty line is not noticeable from the interior side of the window.

After a week or so the putty will harden, at which point you can clean the residue off the glass with a dry cloth. You will want to apply an exterior primer to the putty and surrounding muntin and sash. Allow the primer to dry as described by the paint manufacturer and then paint the window sash. After the final coat of paint is dry, scrape any excess paint from the glass and clean the glass panes thoroughly.

Jeff Calcamuggio
Jeff is an Editor-at-Large for Buildipedia.com who writes and edits Featured At Home and Knowledgebase content. Prior to joining Buildipedia, Jeff's work experience included carpentry, construction documentation, specification writing, construction administration, project management, and real estate property inspection. Jeff is a member of the Construction Specifications Institute (CSI) and an educator at Columbus State Community College and enjoys challenging DIY home improvement projects.
†

