How to Repair Drywall
-
font size
decrease font size
 increase font size
Video
Finding a big hole in your drywall isn’t much fun, but fixing it isn’t a big problem. Whether you have a hole to fix or you are just prepping to paint, a few supplies and tools are all you need for the job. Join our host, Jeff Wilson, for a demonstration of how to repair a variety of different size holes and divots in drywall.
Minor Drywall Repair
Necessary Tools and Materials
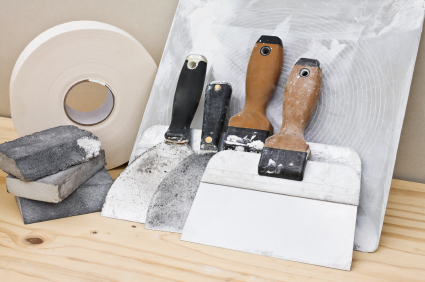
- 4" drywall knife for minor repairs
- 6" drywall knife for moderate repairs
- 10" drywall knife for major repairs
- Mud pan
- Keyhole saw
- Utility knife
- Drywall or gypsum board (if applicable)
- Joint compound or spackling
- Drywall joint tap or mesh
- Fine-grit (150-220) sandpaper
- Tack cloth or damp sponge
- Touch-up painting supplies
Fixing small divots and nail holes represents the most common type of drywall repair. Prior to repainting is often the best time to examine the wall surface for this type of damage. Tip: Use a small piece of painters tape to indicate all of the spots that need repaired.
- Use a drywall knife to remove any loose debris that might get into the joint compound. If you’re repairing a crack, run a drywall knife down the middle of the crack to slightly enlarge it prior to filling with joint compound.
- Next, scoop some joint compound onto the drywall knife and smear it into the crack or hole that is being repaired. Work the joint compound back and forth to ensure the damaged area is completely filled. Tip: The repaired area does not need to be perfectly smooth after applying joint compound, but it is recommended to remove as much of the excess joint compound as possible. This will save on sanding time after the joint compound is dry.
- Once the joint compound is completely dry, use a fine-grit sand paper or sanding block to even out any high spots. Typically one good coat will repair small divots and holes. If not, repeat steps 2 and 3 as necessary until you achieve the quality of repair you desire.
- Wipe down the area with a tack cloth or lightly damp sponge to remove any excess sanding dust and apply touch-up paint as necessary.
Moderate Drywall Repair
In some cases, drywall repair is necessary due to the relocation of electrical, plumbing, or other utility services in the wall. These types of patches are too small to require a new piece of drywall, but too large to coat with joint compound without some type of reinforcing.
- Use a drywall knife, utility knife, or sandpaper to clean the edges of the hole to minimize jagged edges and loose debris.
- Install a self-adhering mesh screen over hole to be patched. The mesh acts as reinforcing and holds the joint compound in-place.
- Scoop some drywall joint compound into a mud pan. Mud pans are not only a good place to hold joint compound as you work, but also provide an edge to scrape clean the drywall knife.
- Use a 10” drywall knife and apply the joint compound over the mesh patch. Be sure to work the joint compound into the mesh reinforcing. Larger drywall knifes provide a nice wide and consistent coat over the repair area. It’s also useful for feathering-out the joint compound.
- Clean the excess joint compound from the drywall knife and remove any excess joint compound from repair area. Work in an area two to three times larger than the hole. This allows you the ability to feather-out the edges of the repair area and minimizes the chance of having a high spot.
- Once the joint compound is completely dry, use a fine-grit sand paper or sanding block to even out any high spots. Tip: For most moderate repairs, it is recommended to apply a second, thinner coat of joint compound for a high-quality and well-blended patch. Repeat steps 2 through 6 as necessary until you achieve the quality of repair you desire.
- Wipe down the area with a tack cloth or lightly damp sponge to remove any excess sanding dust and apply touch-up paint as necessary.
Major Drywall Repair
For larger repairs, especially access holes, it is necessary to install a new piece of drywall, preferably of the same thickness of the existing drywall. Wood blocking may also be required.
- Begin by using a keyhole saw or utility knife to prepare the hole to a rectilinear shape. Where possible, trim the existing drywall back to the middle of a structural stud or framing member. This will provide a substrate to properly secure the new piece of drywall. In the case where no existing framing members can be utilized, use a small piece of scrap wood or blocking along the edge. Insert the blocking into the wall cavity against the back face of the existing drywall and secure it with screws.
- Measure the hole and cut a new piece of drywall to fit. Use wood shims as necessary to match the new surface to the existing. If the new drywall is inset just a little from the surface of the wall, that’s okay. It’s much easier to fill the inset area with joint compound, than it is to level out or build up the edges around a patch that is too high.
- Next, apply drywall joint tape or fiber mesh reinforcing tape around the edges of the patch. This will help keep cracks from developing later. Fiber mesh tape is typically self-adhering and can be applied directly to the wall over the joint. If you’re using drywall joint tape, apply a little bit of the joint compound over the joint to enable proper adhesion of the tape.
- Scoop some drywall joint compound into a mud pan. Use a 10” drywall knife to apply the joint compound over the joints. For larger patches, it may only be necessary to coat the joint rather than covering the whole patch.
- Clean excess joint compound from the drywall knife and remove any excess joint compound from the repair area.
- Once the joint compound is completely dry, use a fine-grit sand paper or sanding block to even out any high spots. Tip: For most major repairs, it is recommended to apply a second, thinner coat of joint compound for a high-quality and well-blended patch. Repeat steps 4 through 6 as necessary until you achieve the quality of repair you desire.
- Wipe down the area with a tack cloth or lightly damp sponge to remove any excess sanding dust and apply touch-up paint as necessary.


Ryan Carpico
Ryan is a Registered Architect who earned a Bachelor of Architecture from the University of Kentucky in 1998. His experience in a broad spectrum of architectural projects includes design and project management in multi-family residential, general commercial, and institutional projects. This architectural experience is balanced with a background in general contracting of residential and light commercial construction projects. Ryan’s knowledge and ability as both architect and builder enable him to address both the technical and practical sides of the comprehensive body of construction knowledge.
Website: carpicodesign.com/