How to Install a Solid-Surface Kitchen Countertop
-
font size
decrease font size
 increase font size
Video
Installing countertops is easy if you know what problems to avoid: unlevel surfaces, out-of-square walls, unfavorable corner conditions, and built-in equipment.
Countertops not only provide the main work surfaces in a kitchen, but they also offer an opportunity to add a splash of color and materiality to the space. With the nearly limitless design options for countertops, choosing the material and color is often the most difficult part of installing new kitchen countertops. Depending on the type of material, fabricating a kitchen countertop can be a challenge for a do-it-yourselfer, but installing the countertop is a project almost any do-it-yourselfer can handle. Join our host, Jeff Wilson, as he completes the kitchen and offers tips on installing a recycled glass countertop.
Installing kitchen countertops seems like a pretty easy task � set the countertop on top of the base cabinets and secure it in place. However, installing countertops is a seemingly easy job that can quickly turn into a headache for those DIYers unprepared to deal with unlevel surfaces, out-of-square walls, unfavorable corner conditions, and built-in equipment. It is also important to understand the nuances of the various materials available for use as countertops, such as granite, concrete, wood, plastic laminate, and synthetic solid-surface materials.
For this project, we are installing an EnviroGLAS countertop. EnviroGLAS makes solid-surface countertops that use a mix of post-consumer recycled glass chips and resin that is then polished smooth for a product that is similar to terrazzo. Our installation includes two pieces that form the countertop for the kitchenette � a main counter with a kitchen sink and a small wing that also fills in the corner.
Fabricating the Countertop
The first step is to fabricate the countertop. Solid-surface countertops, like the type we are using, typically require specialized tools and materials, making professional fabrication a norm. In our case, EnviroGLAS fabricated the two pieces for our kitchenette at the factory based on dimensions we gave them. They even cut out and polished the sink opening.
Planning the fabrication of the countertop begins with taking measurements and determining where to locate any joints, if necessary. Since kitchens are almost never perfectly square or level, it is important to know where the countertop may need to be a little deeper or a little narrower to fit the walls as precisely as possible. It helps to sketch a diagram of the countertop for use in labeling the measurements and noting any special fabrication issues. When measuring the cabinets, be sure to add in the desired countertop overhang, typically 1" from the face of the cabinet frames and ends.
Add Cleats for Support
With the countertop fabricated and on site, it is time to prep the work area. The countertop sits directly on the base cabinets, so it's a good idea to check that the cabinet tops are level. Use a hand plane, belt sander, or coping saw to trim any cabinet tops that may cause the countertop to teeter.
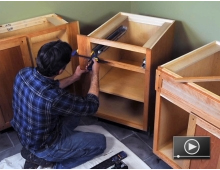
In areas where no cabinet will support the countertop, it may be necessary to install support cleats. Corners are a common location where cleats can be necessary. Spaces for undercounter appliances, like dishwashers or refrigerators, may also need cleats to be attached to the wall to support the countertop. It not usually necessary to add a cleat. However, if the space between the cabinets is less than 30", it doesn't hurt to add a little extra support. Strips of scrap wood, such as the 2 x 2, work well for cleats.
Kitchenette Video Series
How to Install Kitchen Base Cabinets
Additional Kitchen Remodeling Videos
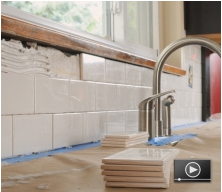
How to Install a Ceramic Tile Backsplash
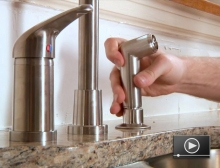
How to Install a Kitchen Faucet
-
Measure and cut the cleat to length.
-
Use a level to extend the line of the cabinet tops. The top of the cleat will sit even with this line.
-
Use a stud finder or test nails to locate the framing members in the wall.
-
Screw the cleat to the studs or framing in the wall.
Installing the Sink in the Countertop
In most cases, the kitchen sink will need to be installed in the countertop. Whether the sink mounts over or under the countertop, installing the sink before installing the countertop often makes for an easier installation. For our project, we are installing an undermounted, single-basin, stainless steel sink.
-
Dry set the sink and mark the locations for the mounting bracket and anchor plugs.
-
Use a 3/8� diameter diamond-tipped hole saw to drill 5/8" deep holes for the anchor plugs. Pour a little water on the surface around the hole to help keep the drill bit cool. Quick Tip: Use tape on the drill bit to mark the depth needed for the anchor holes and to prevent accidentally drilling through the top surface of the countertop.
-
Put a small dab of two-part epoxy in the holes and insert the anchor plugs.
-
Spread a bead of silicone around the perimeter of the sink opening to keep the assembly watertight.
-
Set the sink in place and check for proper alignment.
-
Fasten the mounting brackets with screws at each of the anchors.
-
Check the rim of the sink for a consistent seal. Re-caulk as necessary.
Installing the Faucet in the Countertop
The faucet assembly can also be installed in the countertop before setting the countertop in place. This helps to minimize the work and time spent inside the cabinet and under the countertop. Once the countertop is installed, all that remains is to connect the supply lines.
-
Review the manufacturer�s instructions to determine the number of holes necessary for your specific faucet and mark the location of the faucet holes.
-
Use the appropriately sized diamond hole saw to drill the faucet holes.
-
Spread a bead of silicone sealant around the holes, per the manufacturer's instructions.
-
Insert the faucet assembly and secure it with the mounting nuts. Hand-tighten and check for proper alignment. Then use a wrench to fully tighten the mounting nuts.
Setting the Countertop
Setting and securing the countertop in place is pretty simple. Solid-surface and natural stone countertops are typically fabricated with a thickness of 1-1/2� to 2� and can be installed directly on top of the base cabinets. The mass of the countertop and gravity will keep the countertop in place. The use of silicone sealant on top of the cabinets will create an adhesive bond and minimize any lateral movement in the countertop.
-
Spread a bead of adhesive silicone caulking along the top edges of the cabinets. Quick Tip: Use painter's tape at the top of the cabinet face to prevent the adhesive from adhering to it.
-
With some help, set the countertop assembly onto the cabinet.
-
Check for proper alignment and gently apply downward pressure to create a good seal with the silicone caulking.
Sealing the Joints
Because many countertops are comprised of multiple pieces, one of the last steps is to fill or seal any joints. In applications where a hidden joint or seam is desirable, use one of the many color-matched grouts available. However, to achieve a hidden seam, it may also be necessary to buff the joints to level the countertop and blend in the color-matched grout. As this requires special tools and experience, seaming and buffing the countertop joints is often a job for a professional installer. If the countertops match up well and a hidden joint is not important, as in our project, clear silicone caulking is adequate to seal the joint and prevent any water from penetrating into the cabinets below.
-
Tape along both sides of the joint, leaving just enough room to fill the joint. This will help to minimize the clean up.
-
Fill the joint with a thin bead of silicone caulking.
-
Wipe away any excess caulking with a slightly damp rag.
-
Remove the tape and let the caulking set up for about an hour.
Connecting the Plumbing
-
Begin by connecting the hot and cold water supply lines. Use flexible steel-reinforced supply lines to connect the water shut-off valve to the faucet supply feeders. Be sure to identify the hot and cold sides and make connections to the appropriate feeders on the faucet. After using Teflon tape to seal the fitting, tighten the connections snugly, but don't overtighten or you may damage the fitting.
-
The drain assembly is slightly more complicated, although trap and drain kits are available that minimize the steps for do-it-yourselfers. The trap kit typically includes slip nuts and gaskets that seal the connections but also allow you to disassemble the trap for access. Any other connections in the sanitary drain must be glued together to seal the pipes from leaks and to prevent any sewer gases from escaping.
-
Dry fit the trap and drain assembly to check for proper connections and add or adjust any pieces as necessary.
-
Make any glued connections first, such as a drain extension from the rough plumbing at the wall. Coat the surface to be glued with a PVC primer prior to applying the adhesive. PVC adhesive sets up quickly, so finish installation directly after applying it. Turn the pipe a quarter turn and hold it in place for 20-30 seconds to allow the adhesive to set.
-
Fit the trap kit and the nuts into place and tighten. Again, tighten snugly but do not overtighten.
-
Finally, temporarily remove the aerator in the faucet spout to prevent it from being clogged by any loose debris in the plumbing when you first turn on the water. Turn the water supply valves on and run the water for a couple of minutes. Check for leaks, and retighten connections as necessary.


Ryan Carpico
Ryan is a Registered Architect who earned a Bachelor of Architecture from the University of Kentucky in 1998. His experience in a broad spectrum of architectural projects includes design and project management in multi-family residential, general commercial, and institutional projects. This architectural experience is balanced with a background in general contracting of residential and light commercial construction projects. Ryan�s knowledge and ability as both architect and builder enable him to address both the technical and practical sides of the comprehensive body of construction knowledge.
Website: carpicodesign.com/